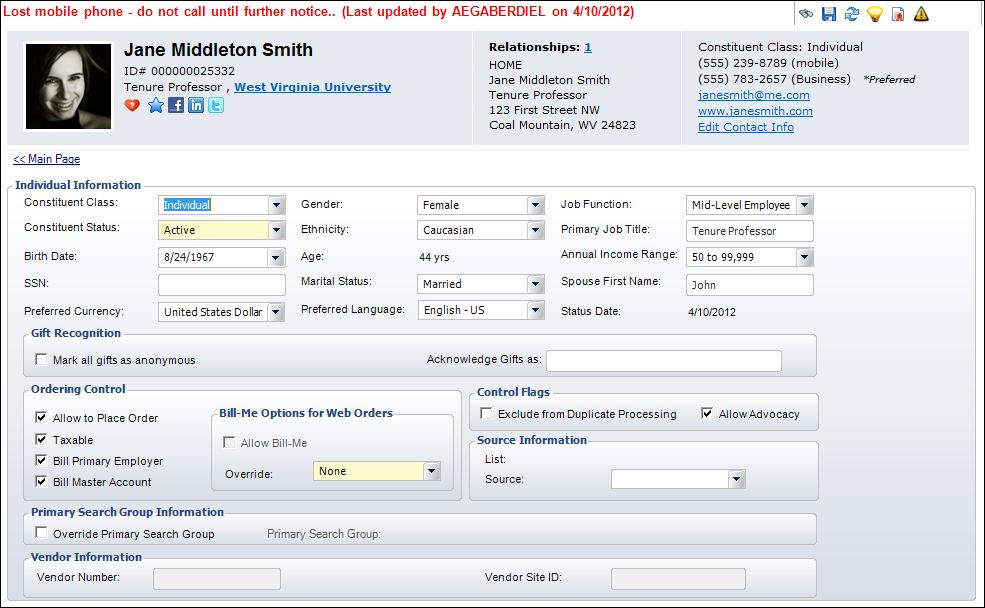
The Individual Information screen displays below the header, as shown below.
To add individual demographic information:
1. From
the Background Information task category in CRM360, click Demographics.
The Individual Information screen displays below the header, as shown below.
2. The constituent's Constituent Class was defined during constituent creation. If necessary, change this.
3. If necessary,
select the constituent's Gender.
Values are populated based on the non-fixed CUS "GENDER"
system type.
4. If
necessary, select the constituent's Job Function from the drop-down.
Values are populated based on the non-fixed CUS "JOB_FUNCTION"
system type.
5. If necessary,
change the Constituent
Status.
Values are populated based on the non-fixed CUS "CUSTOMER_STATUS"
system type.
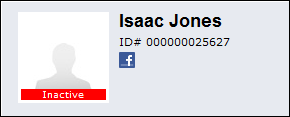
 If
you select a constituent status other than Active, the constituent status
will display in CRM360 header below the constituent image, as shown below.
If
you select a constituent status other than Active, the constituent status
will display in CRM360 header below the constituent image, as shown below.
6. If
necessary, select the constituent's Ethnicity.
Values are populated based on the non-fixed CUS "ETHNICITY"
system type.
7. Enter the constituent's Primary Job Title.
Please note that the system will ask if you want to update the job title
on all addresses. If you change the Job Title on the Additional
Address screen, the system will ask if you want to update the primary
job title of the constituent. Selecting “Yes” will update this field.
8. If
necessary, select the constituent's Birth
Date.
The Age field to the right calculates automatically based on the selected
Birth Date.
9. If
necessary, select the customer's Annual
Income Range.
Values are populated based on the non-fixed CUS "ANNUAL_INCOME_RANGE"
system type.
10. If
necessary, enter the constituent's Social Security Number (SSN).
Based on the SSN_FORMAT
application parameter, you can enter the entire Social Security Number
or just the last four digits.
11. If
necessary, select the constituent's Marital
Status from the drop-down.
Values are populated based on the fixed CUS "CUS_MARITAL_STATUS"
system type.
12. If necessary, enter the constituent's Spouse First Name.
13. By default, the Preferred Currency is set to the organization's base currency. If necessary, change this.
If
an order is created for this constituent, the Preferred Currency defined
here will only be used if a batch
is opened that is setup with this currency and the product added to the
order is not locked in another currency.
14. If
necessary, select the constituent's Default
Language.
Values are populated based on languages defined on the Language Maintenance
(APP004) screen.
15. The Status Date is set to the date in which the constituent was created and cannot be changed.
16. From
the Gift Recognition section, check the Mark all gifts as anonymous
checkbox or uncheck the checkbox and enter the Acknowledge Gifts as
name.
When checked, the constituent's name will not be used on public acknowledgement
lists. The word “Anonymous” displays in the Acknowledge Gifts as field
and in reports instead of the customer name.
17. From the Ordering Control section, select the appropriate checkboxes:
· Allow to Place Order: When checked, the constituent can place an order.
· Taxable: When checked, the constituent will be taxed on product order in which tax has been defined.
· Bill Primary Employer: When checked, the primary employer is added as the bill-to address on all orders for this constituent.
![]() This
checkbox is selected by default, if the application
parameter DEFAULT_BILL_PRIMARY_EMPLOYER is set to “Y”. If this checkbox
is selected and a primary employment relationship does NOT exist for the
constituent, the bill-to address on all orders for this constituent will
default to the constituent's primary address.
This
checkbox is selected by default, if the application
parameter DEFAULT_BILL_PRIMARY_EMPLOYER is set to “Y”. If this checkbox
is selected and a primary employment relationship does NOT exist for the
constituent, the bill-to address on all orders for this constituent will
default to the constituent's primary address.
· Bill Master Account – When checked, if the constituent is a sub-customer (which means their SUB_CUSTOMER_ID is > 0), their master customer will be billed. The master customer for a sub-customer is the customer that has the same MASTER_CUSTOMER_ID as the sub-customer but whose SUB_CUSTOMER_ID = 0.
18. From
the Bill-Me Options for Web Orders section, select the Override
code, if necessary.
Options include Always, Deny, and None. Tab out of the Override field.
If you selected “Always” as the Override code, the Allow Bill-Me
checkbox will automatically be selected.
![]() The
Allow Bill-Me checkbox cannot be edited.
The
Allow Bill-Me checkbox cannot be edited.
19. From
the Control Flags section, if necessary, select the Exclude from Duplicate
Processing checkbox.
When checked, indicates this constituent record will not be included when
duplicates are processed. When unchecked, indicates this constituent record
is included in duplicate processing.
20. By
default, the Allow Advocacy checkbox
is checked. Uncheck this checkbox if the customer does not want to receive
upcoming issues and legislation materials.
This checkbox is related to the CAP100
- CapWiz Integration.
21. From
the Source Information section, select the Source from the drop-down,
if necessary.
This value records the method by which the constituent was added to the
system, such as over the Web or through a marketing list. Values are populated
based on the non-fixed MKT "SOURCE_CODE" system type. This field
will automatically populate with a value of “Web” if the constituent record
was created on the Web. You can define this value to be populated when
a constituent is created on the Web using the Customer application
parameter “WEB_NEW_CUSTOMER_SOURCE_CODE”.
22. By default, if the selected constituent is a member of a chapter, that chapter will be displayed as the Primary Search Group. If necessary, select the Override Primary Search Group checkbox. When checked, the Primary Search Group link is enabled to the right. Search for and select a new Primary Search Group to override the existing.
![]() For
more information on Primary Search Groups, please see Creating
a Primary Search Group Mapping.
For
more information on Primary Search Groups, please see Creating
a Primary Search Group Mapping.
23. As of 7.4.1SP1, the Vendor Number and Vendor Site ID are populated by the FAR803 batch process and cannot be edited.
24. Click
Save.
Click the Main Page link to return
to the overview page.
To add company demographic information:
1. From the
Background Information task category in CRM360,
click Demographics.
The Company Information screen displays, as shown below.
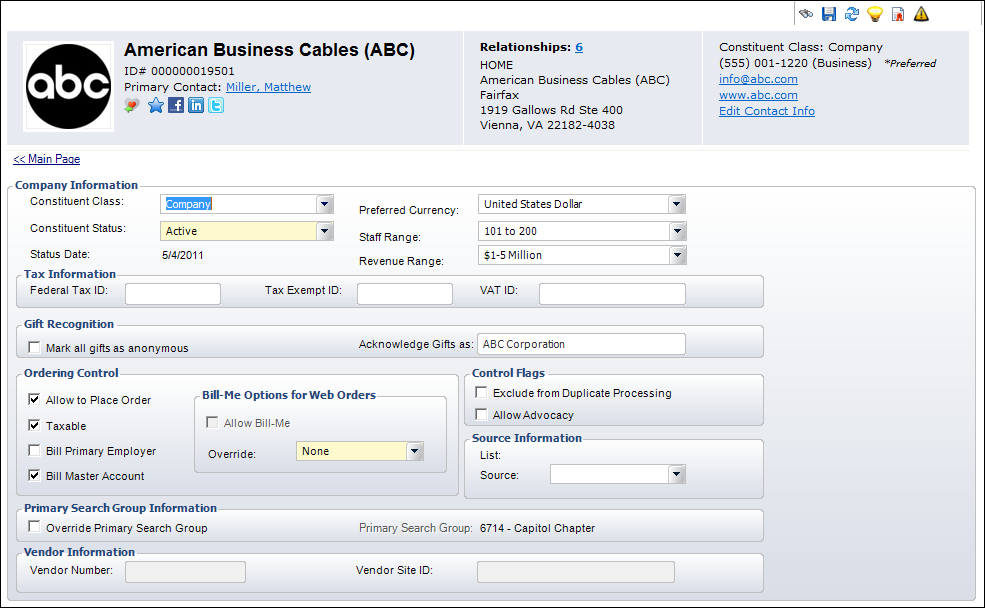
2. The company's Constituent Class was defined during company creation. If necessary, change this.
3. If necessary,
change the Constituent
Status.
Values are populated based on the non-fixed CUS "CUSTOMER_STATUS"
system type.
4. By default, the Preferred Currency code is set to the organization's base currency. If necessary, change this.
5. If
necessary, select the Staff Range from the drop-down.
Values are populated based on the non-fixed CUS "STAFF_RANGE"
system type.
6. If
necessary, select the Revenue Range from the drop-down.
Values are populated based on the non-fixed CUS "REVENUE_RANGE"
system type.
7. In the Tax Information section, enter the applicable IDs:
· Federal Tax ID
· Tax Exempt ID
· VAT ID
8. The Status Date is set to the date in which the constituent was created and cannot be changed.
9. From
the Gift Recognition section, check the Mark all gifts as anonymous
checkbox or uncheck the checkbox and enter the Acknowledge Gifts as
name.
When checked, the company's name will not be used on public acknowledgement
lists. The word “Anonymous” displays in the Acknowledge Gifts as field
and in reports instead of the company name.
10. From the Ordering Control section, select the appropriate checkboxes:
· Allow to Place Order: When checked, the constituent can place an order.
· Taxable: When checked, the constituent will be taxed on product order in which tax has been defined.
· Bill Primary Employer: When checked, the primary employer is added as the bill-to address on all orders for this constituent.
![]() This
checkbox is selected by default, if the application
parameter DEFAULT_BILL_PRIMARY_EMPLOYER is set to “Y”. If this checkbox
is selected and a primary employment relationship does NOT exist for the
constituent, the bill-to address on all orders for this constituent will
default to the constituent's primary address.
This
checkbox is selected by default, if the application
parameter DEFAULT_BILL_PRIMARY_EMPLOYER is set to “Y”. If this checkbox
is selected and a primary employment relationship does NOT exist for the
constituent, the bill-to address on all orders for this constituent will
default to the constituent's primary address.
· Bill Master Account: When checked, if the constituent is a sub-customer (which means their SUB_CUSTOMER_ID is > 0), their master customer will be billed. The master customer for a sub-customer is the customer that has the same MASTER_CUSTOMER_ID as the sub-customer but whose SUB_CUSTOMER_ID = 0.
11. From
the Control Flags section, if necessary, select the Exclude from Duplicate
Processing checkbox.
When checked, indicates this constituent record will not be included when
duplicates are processed. When unchecked, indicates this constituent record
is included in duplicate processing.
12. By
default, the Allow Advocacy checkbox
is unchecked. Check this checkbox if the customer wants to receive upcoming
issues and legislation materials.
This checkbox is related to the CAP100
- CapWiz Integration.
13. From
the Source Information section, select the Source from the drop-down,
if necessary.
This value records the method by which the constituent was added to the
system, such as over the Web or through a marketing list. Values are populated
based on the non-fixed MKT "SOURCE_CODE"
system type. This field will automatically populate with a value of “Web”
if the constituent record was created on the Web. You can define this
value to be populated when a constituent is created on the Web using the
Customer application
parameter “WEB_NEW_CUSTOMER_SOURCE_CODE”.
14. By default, if the selected constituent is a member of a chapter, that chapter will be displayed as the Primary Search Group. If necessary, select the Override Primary Search Group checkbox. When checked, the Primary Search Group link is enabled to the right. Search for and select a new Primary Search Group to override the existing.
![]() For
more information on Primary Search Groups, please see Creating
a Primary Search Group Mapping.
For
more information on Primary Search Groups, please see Creating
a Primary Search Group Mapping.
15. As of 7.4.1SP1, the Vendor Number and Vendor Site ID are populated by the FAR803 batch process and cannot be edited.
16. Click
Save.
Click the Main Page link to return
to the overview page.