The Add Additional Customer Address window displays, as shown below.
The following solicitation preferences are defined at the "Address" communication method level:
· Do Not Include in Label Sales
To add a new address to an individual constituent:
1. From the Background Information task
category in CRM360, click
Contact Information.
Additionally, from the CRM360 header, you can click the Edit
Contact Info link.
The Contact Information screen displays below the header in CRM360.
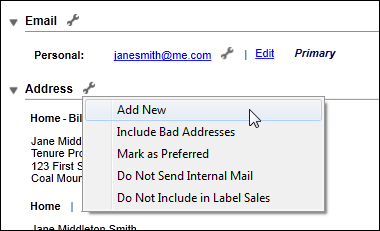
2. From the Address
section, click the wrench icon and select Add
New, as shown below.
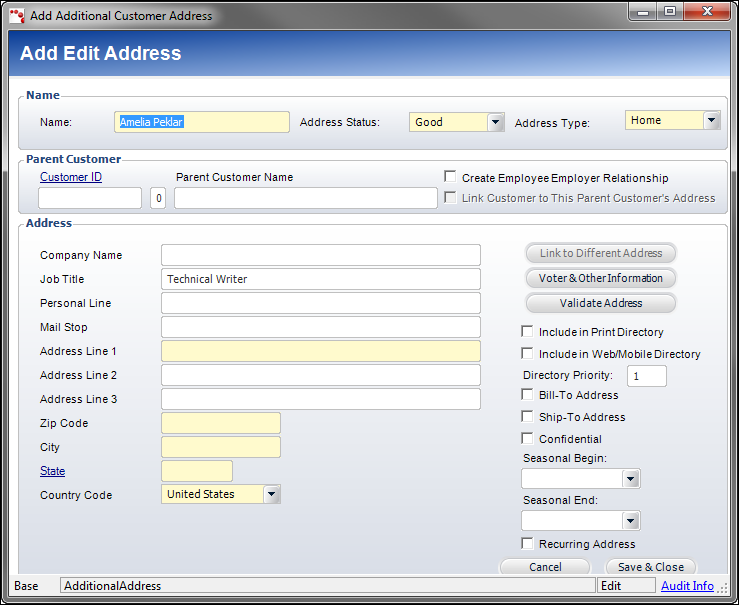
The Add Additional Customer Address window displays, as shown below.
3. If necessary, change the constituent's Name.
 This will only change the constituent's name on this particular address.
4. By
default, the Address Status is
set to "Good". Change this if necessary.
Values are populated based on the non-fixed CUS "ADDRESS_STATUS"
system type.
5. By default, the Address
Type is set to "Home". Change this if necessary.
Values are populated based on the non-fixed CUS "ADDRESS_TYPE"
system type.
6. If
this constituent is an employee, consultant, or owner of a company, you
can link the company address to this constituent. Additionally, individuals
can be linked to committees and/or subgroups. Therefore, if the company/committee/subgroup
moves and the address is updated, all linked constituents will be updated
as well.
To do so, perform the following:
a. Click the Customer ID link.
The Customer Chooser displays for you to search for and select the appropriate
customer. Based on the selected customer, the fields in the Address section
are automatically populated and read-only.
b. Uncheck the Link Customer to This Parent Customer's Address checkbox to enable the fields in the Address section.
c. If you want to create an Employee/Employer relationship between this constituent and the selected parent, check the Create Employee Employer Relationship.
Individuals
can only have one primary employer/employee relationship. As of 7.4.1SP1,
if an existing primary employer/employee relationship
already exists, the system will prompt you to end the previous relationship.
7. From the Address section, enter the name of the constituent's Company Name, if necessary.
8. Enter the constituent's Job Title, if necessary.
If a primary
job title does NOT already exist for the constituent (defined on the Demographics screen),
the system will ask if you want to update the primary job title on the
customer. If you select Yes, the job title entered on this screen
will be added to the Demographics screen. If you select No, the job title
will only be added to this address record.
9. Enter
a Personal Line and/or Mail Stop,
if necessary.
The personal line and mail stop are extra ways identifying the constituent
for mail routing. Depending on the address structure defined by your organization,
these may be used on mailing labels.
10. Enter the constituent's Address Line 1.
11. Enter Address Line 2, Address Line 3, and/or Address Line 4, if necessary.
12. Enter
the constituent's Zip Code.
If more than one city exists for the entered zip code, a pop-up will display
from which you can select the appropriate city.
13. If the system found the zip code entered, the City and State fields will be automatically populated. Otherwise, enter the City and click the State link to search for and select the appropriate state.
14. Enter the County, if necessary.
15. Select the Country from the drop-down menu.
![]() When
an address is created for a customer that owns the address, an entry is
created in the CUS_Address_Details table and the CUS_Address table. When
a linked address is created for a customer, an entry is created in the
CUS_Address_Details table. You cannot link an address for an individual
once an unlinked address is saved because the CUS_Address table will not
be properly updated.
When
an address is created for a customer that owns the address, an entry is
created in the CUS_Address_Details table and the CUS_Address table. When
a linked address is created for a customer, an entry is created in the
CUS_Address_Details table. You cannot link an address for an individual
once an unlinked address is saved because the CUS_Address table will not
be properly updated.
16. If
the new constituent's information should be published in any base directory
reports, whether printed or published on the Web (e.g., XBT1202), select
the Include in Print Directory
and/or Include in Web/Mobile Directory
checkbox.
When unchecked, the e-Business Member Directory web part excludes this
new customer information.
17. Enter the priority in which the address will be listed in the directory in the Directory Priority field.
18. If
this address should be the primary bill-to address on all orders for this
constituent, select the Bill-To Address checkbox.
Please note that at least one, and only one, address can be designated
as the default bill-to address.
19. If
this address should be the primary ship-to address on all orders for this
constituent, select the Ship-To Address checkbox.
Please note that at least one, and only one, address can be designated
as the default ship-to address.
20. If this constituent does NOT want the address to display on base roster reports (e.g., MBR1212PE), select the Confidential checkbox.
![]() In
the back-office, all online roster and directory reports where the last
character in the report name is “E” (for external), respect this “Confidential”
flag for addresses and the “Include in Directory” flag for communication methods.
For example, MBR1200CE and MBR1200PE. MBR1200CE means it is a report that
lists companies first (hence the “C” in MBR1200CE) and then the employees,
and it’s an external report (hence the “E” in MBR1200CE), meaning that
it is intended to be viewed by people outside the organization. MBR1200PE
means it lists individuals (hence the “P” for “professionals” in
MBR1200PE), and it is intended to be viewed by people outside the organization
(hence the “E” for “external” in MBR1200PE). The confidential flag is
ignored on internal reports, which are reports that have an “I” as the
last character in their name (e.g., MBR1200CI and MBR1200PI).
In
the back-office, all online roster and directory reports where the last
character in the report name is “E” (for external), respect this “Confidential”
flag for addresses and the “Include in Directory” flag for communication methods.
For example, MBR1200CE and MBR1200PE. MBR1200CE means it is a report that
lists companies first (hence the “C” in MBR1200CE) and then the employees,
and it’s an external report (hence the “E” in MBR1200CE), meaning that
it is intended to be viewed by people outside the organization. MBR1200PE
means it lists individuals (hence the “P” for “professionals” in
MBR1200PE), and it is intended to be viewed by people outside the organization
(hence the “E” for “external” in MBR1200PE). The confidential flag is
ignored on internal reports, which are reports that have an “I” as the
last character in their name (e.g., MBR1200CI and MBR1200PI).
The “confidential” flag is also respected in the mobile member directory.
21. If
applicable, select the Seasonal Begin and Seasonal End dates.
These dates indicate the valid begin and end dates of a seasonal address.
Typically, seasonal addresses apply when a constituent wants mail sent
to a different address for a specific period of time.
22. If
the seasonal date range is recurring, select the Recurring Address
checkbox.
In this case, Personify automatically updates the range by one year after
the address has expired to renew the next season.
23. If necessary, click Voter & Other Information.
24. Click
Validate Address.
The Address Validation screen displays with the status of the validation.
Click Accept. See Validating
a Customer Address for more information.
25. Click Save & Close.
To add a new address to a company constituent:
1. From
the Background Information task category in CRM360,
click Contact Information.
Additionally, from the CRM360 header, you can click the Edit
Contact Info link.
The Contact Information screen displays below the header in CRM360.
2. From the Address
section, click the wrench icon and select Add
New, as shown below.
The Add Additional Customer Address window displays, as shown below.
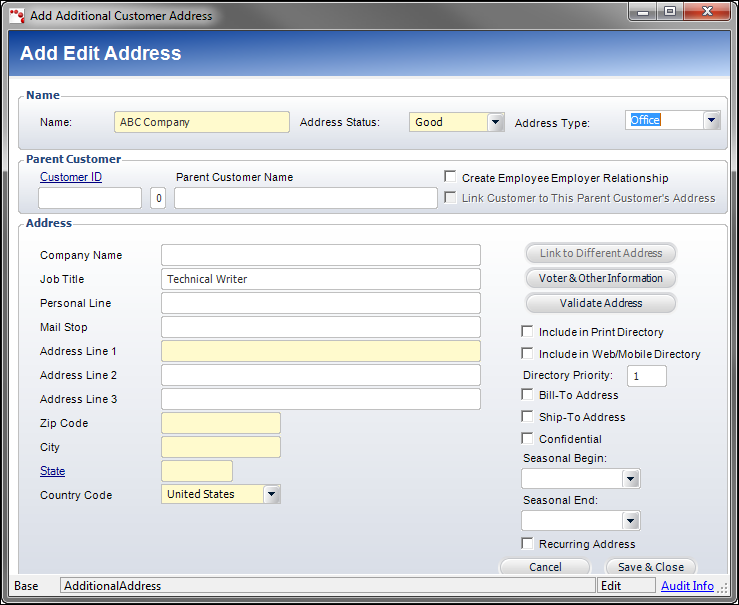
3. If necessary,
change the company's Name.
Note that this will only change the company's name on this particular address.
4. By default, the
Address Status is set to "Good".
Change this if necessary.
Values are populated based on the non-fixed CUS "ADDRESS_STATUS"
system type.
5. By
default, the Address Type is set
to "Home". Change this if necessary.
Values are populated based on the non-fixed CUS "ADDRESS_TYPE"
system type.
6. If this company
is a subsidiary of another company, you can link the company address to
this company. Therefore, if the company moves and the address is updated,
all linked constituents will be updated as well.
To do so, perform the following:
a. Click the Customer ID link.
The Customer Chooser displays for you to search for and select the appropriate
customer. Based on the selected customer, the fields in the Address section
are automatically populated and read-only.
b. Uncheck the Link Customer to This Parent Customer's Address checkbox to enable the fields in the Address section.
c. If you want to create a Corporate/Subsidiary relationship between this company and the selected parent, check the Create Subsidiary Relationship.
Subsidiaries
can only have one corporate parent relationship. As of 7.4.1SP1, if an
existing corporate/subsidiary relationship already exists, the system
will prompt you to end the previous relationship.
7. From the Address
section, click the Attn link to open the Customer Chooser.
From this search, search for and select a customer to be added as the Attention
line on mailing labels.
8. Enter the company’s Job Title, if necessary.
9. Enter a Personal
Line and/or Mail Stop, if necessary.
The personal line and mail stop are extra ways identifying the constituent
for mail routing. Depending on the address structure defined by your organization,
these may be used on mailing labels.
10. Enter the company’s Address Line 1.
11. Enter Address Line 2, Address Line 3, and/or Address Line 4, if necessary.
12. Enter the company’s
Zip Code.
If more than one city exists for the entered zip code, a pop-up will display
from which you can select the appropriate city.
13. If the system found the zip code entered, the City and State fields will be automatically populated. Otherwise, enter the City and click the State link to search for and select the appropriate state.
14. Enter the County, if necessary.
15. Select the Country from the drop-down menu.
![]() When
an address is created for a constituent that owns the address, an entry
is created in the CUS_Address_Details table and the CUS_Address table.
When a linked address is created for a constituent, an entry is created
in the CUS_Address_Details table. You cannot link an address for an individual
once an unlinked address is saved because the CUS_Address table will not
be properly updated.
When
an address is created for a constituent that owns the address, an entry
is created in the CUS_Address_Details table and the CUS_Address table.
When a linked address is created for a constituent, an entry is created
in the CUS_Address_Details table. You cannot link an address for an individual
once an unlinked address is saved because the CUS_Address table will not
be properly updated.
16. If the new company's
information should be published in any base directory reports, whether
printed or published on the Web (e.g., XBT1202), select the Include
in Print Directory and/or Include
in Web/Mobile Directory checkbox.
When unchecked, the e-Business Member Directory web part excludes this
new company information.
17. Enter the priority in which the address will be listed in the directory in the Directory Priority field.
18. If this address
should be the primary bill-to address on all orders for this constituent,
select the Bill-To Address checkbox.
Please note that at least one, and only one, address can be designated
as the default bill-to address.
19. If this address
should be the primary ship-to address on all orders for this constituent,
select the Ship-To Address checkbox.
Please note that at least one, and only one, address can be designated
as the default ship-to address.
20. If this constituent does NOT want the address to display on base roster reports (e.g., MBR1212PE), select the Confidential checkbox.
![]() When
defining contact information for a constituent, phone, email, web/social
media, and fax communication methods can be marked as “Include in Directory”.
Additionally, address communication
methods can be marked as “Confidential”. In the back office, all online
roster and directory reports where the last character in the report name
is “E” (for external), respect the “Confidential” and “Include in Directory”
definition for the listed constituents’ communication methods. For example,
if John Smith has his personal mobile phone number marked as not to be
included in the directory, that number will not be included in the MBR1200PE
report. For example, MBR1200CE and
MBR1200PE. MBR1200CE means it is a report that lists companies first (hence
the “C” in MBR1200CE), then the employees, and finally, it is an external
report (hence the “E” in MBR1200CE). This
means that its intended audience is people outside the organization. MBR1200PE
means it is a report that lists individuals (hence the “P” for “professionals”
in MBR1200PE), and it
is intended to be viewed by people outside the organization (hence the
“E” for “external” in MBR1200PE).
The confidential flag is ignored on internal reports, which are reports
that have an “I” as the last character in their name (e.g., MBR1200CI and
MBR1200PI).
When
defining contact information for a constituent, phone, email, web/social
media, and fax communication methods can be marked as “Include in Directory”.
Additionally, address communication
methods can be marked as “Confidential”. In the back office, all online
roster and directory reports where the last character in the report name
is “E” (for external), respect the “Confidential” and “Include in Directory”
definition for the listed constituents’ communication methods. For example,
if John Smith has his personal mobile phone number marked as not to be
included in the directory, that number will not be included in the MBR1200PE
report. For example, MBR1200CE and
MBR1200PE. MBR1200CE means it is a report that lists companies first (hence
the “C” in MBR1200CE), then the employees, and finally, it is an external
report (hence the “E” in MBR1200CE). This
means that its intended audience is people outside the organization. MBR1200PE
means it is a report that lists individuals (hence the “P” for “professionals”
in MBR1200PE), and it
is intended to be viewed by people outside the organization (hence the
“E” for “external” in MBR1200PE).
The confidential flag is ignored on internal reports, which are reports
that have an “I” as the last character in their name (e.g., MBR1200CI and
MBR1200PI).
The “confidential” flag is also respected in the mobile member directory.
21. If applicable,
select the Seasonal Begin and Seasonal End dates.
These dates indicate the valid begin and end dates of a seasonal address.
Typically, seasonal addresses apply when a constituent wants mail sent
to a different address for a specific period of time.
22. If the seasonal
date range is recurring, select the Recurring Address checkbox.
In this case, Personify automatically updates the range by one year after
the address has expired to renew the next season.
23. If necessary, click Voter & Other Information.
24. Click Validate
Address.
The Address Validation screen displays with the status of the validation.
Click Accept. See Validating
a Customer Address for more information.
25. Click Save & Close.