 If
the CUS subsystem parameter AUTOMATIC_SEARCH_GROUP_ASSIGNMENT is set to
'Y', the Primary Search Group is automatically populated for each customer,
based on the customer's primary address.
Your organization might want an option to filter searches for customers and products based on the Primary Search Group assigned to the user. You can assign users (through Security setup) to a specific Primary Search Group (generally a chapter or region). This gives the ability for the user to search through Personify based on their Primary Search Group.
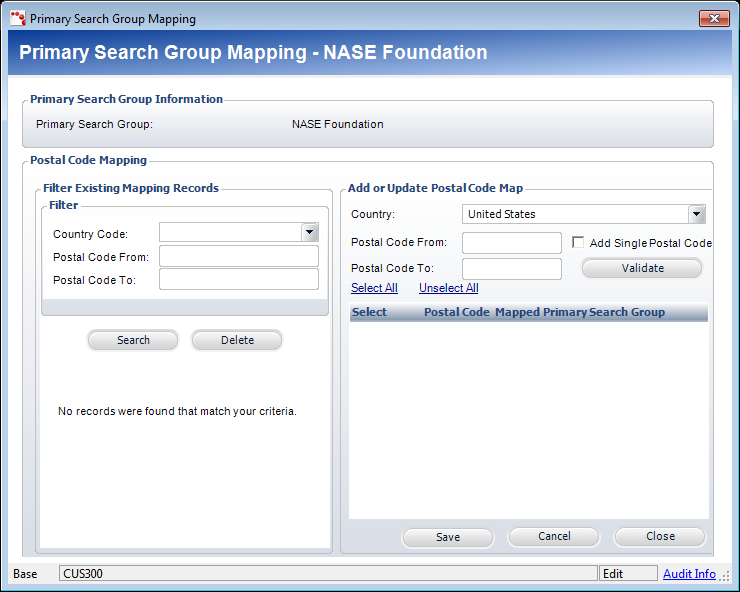
From the Subgroup Central screen, after defining the basic subgroup parameters and setup, you can use Postal Mapping to associate specific zip codes to a Primary Search Group. To access the Primary Search Group Mapping screen, select Maintain Primary Search Group Mapping under the Segmentation task group on the Subgroup Central screen.
 If
the CUS subsystem parameter AUTOMATIC_SEARCH_GROUP_ASSIGNMENT is set to
'Y', the Primary Search Group is automatically populated for each customer,
based on the customer's primary address.
To create a primary search group mapping:
1. From
the Subgroup Central screen, in Segmentation task category, click Maintain Primary Search Group Mapping.
The Primary Search Group Mapping screen displays, as shown below.

2. From the Filter Existing Mapping Records section, select a Country Code from the drop-down menu.
3. Enter in Postal Code From.
4. Enter in Postal Code To.
5. Click
the Search button.
The Postal Codes within the specific range display.
6. From the Add or Update Postal Code Mapping section, select the Country from the drop-down menu.
7. Enter in the Postal Code From.
8. Enter in the Postal Code To.
9. If you are searching for a single Postal Code, check the Add Single Postal Code checkbox.
10. Click
the Validate button.
The Postal Code(s) within the specific range display(s).
11. To map any Postal Codes displayed here to your Primary Search Group, check the corresponding checkboxes.
12. Once
you have selected each Postal Code that you want to map to your Primary
Search Group, click Save.
The selected Postal Codes will update their Primary Search Group to your
selected Primary Search Group.
13. Click Close.