This section explains how to configure the following affiliate management workflows:
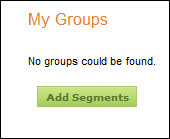
Completing configuration of the Create New Segments workflow displays
and enables the Create Employment Segment and Create Committee segment
buttons. Click Add Segments from the Affiliate Management
Homepage to access these buttons, as shown below.
 If you have enabled users with the ability to create new segments via
the “Allow Creating New Segments” checkbox on the Affiliate Segment List
settings page, as discussed in Configuring
the Affiliate Management - Segment List Web Module, and a user has
been assigned the right to create new segments via the Organization Segmentation
(ORG002) screen in the back office, then you MUST create and configure
additional pages to complete the workflow.
If you have enabled users with the ability to create new segments via
the “Allow Creating New Segments” checkbox on the Affiliate Segment List
settings page, as discussed in Configuring
the Affiliate Management - Segment List Web Module, and a user has
been assigned the right to create new segments via the Organization Segmentation
(ORG002) screen in the back office, then you MUST create and configure
additional pages to complete the workflow.
To configure the Create New Segments workflow:
1. Create a new page entitled “Create New Employment Segment”.
You can name this page anything you desire. For the purposes of this section,
the page is entitled, "Create New Employment Segment".
2. Install the Customer Registration module to this page.
3. Select
Edit Customer Registration Settings. .
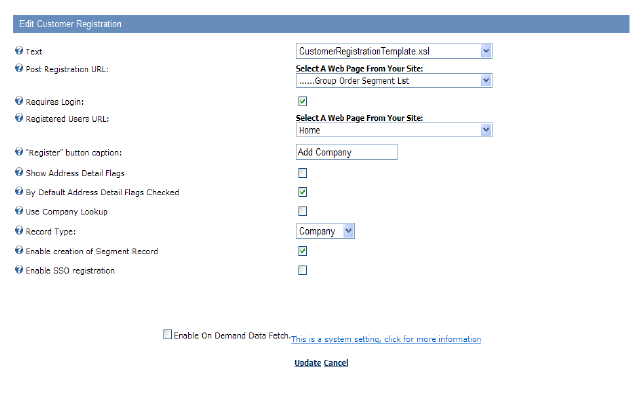
The edit settings page displays, as shown below.
4. Configure the following settings:
· Text: select “CustomerRegistrationTemplate.xsl” from the drop-down menu.
If
your association created its own version of this template, make sure to
select your customized template instead.
· Post Registration URL: select the desired page you want to direct users to after they complete the registration. It should also have the Affiliate Management Segment Listing module installed on it. For example, the Affiliate Management Homepage as discussed in Affiliate Management - Segment List Web Module.
· Requires Login:check the checkbox to enable.
· “Register” button caption: enter the text you want to appear on the button at the bottom of the Create New Employment Segment page. For example, “Add Company” (since this registration page is for creating new employment segments).
· Record Type: select “Company” from the drop-down menu.
· Enable Creation of Segment Record:
check the checkbox, as displayed below.
Refer to Configuring the Customer
Registration Web Module for additional configuration settings.
5. Click Update.
6. Create another page entitled “Create New Committee Segment”.
You
can name this page anything you desire. For the purposes of this section,
the page is entitled, "Create New Committee Segment".
7. Install the Customer Registration module.
8. Select
Edit Customer Registration Settings.
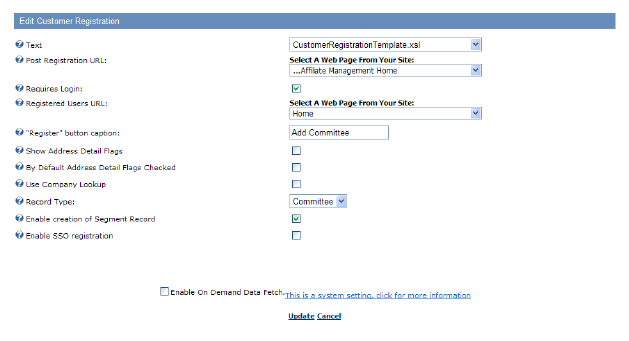
The edit settings page displays.
9. Configure the following settings, as shown below:
· Text: select “CustomerRegistrationTemplate.xsl” from the drop-down menu.
If your association created its own version of this template, make sure
to select your customized template instead.
· Post Registration URL: select the desired page you want to direct users to after they complete the registration that also has the Affiliate Management Segment Listing module installed on it. For example, the Affiliate Management Homepage as discussed in Affiliate Management - Segment List Web Module.
· Requires Login: check the checkbox to enable.
· “Register” button caption: enter the text you want to appear on the button at the bottom of the Create New Employment Segment page. For example, “Add Committee” (since this registration page is for creating new committee segments).
· Record Type: select “Committee” from the drop-down menu.
· Enable Creation of Segment Record:
check the checkbox to enable.
Refer
to Configuring
the Customer Registration Web Module for additional configuration
settings.
10. Click Update.
11. Navigate to your Affiliate Management Homepage and selectEdit Affiliate Segment List Settings.
12. From
the Create New Employment Segment drop-down menu, select the first
page you created for this workflow.
For example, Create New Employment Segment.
13. From
the Create New Committee Segment drop-down menu, select the second
page you created for this workflow. .
For example, Create New Committee Segment.
14. Click Update.
If a user is assigned the right to add a committee member to a committee segment, then you need to create and configure additional pages to complete the New Committee Member workflow.
To configure the New Committee Member workflow:
1. Create a new page entitled “Create New Committee Member”.
You
can name this page anything you desire. For the purposes of this section,
the page is entitled, “Create New Committee Member”.
2. Install the Customer Registration module to this page.
3. Select
Edit Customer Registration Settings.
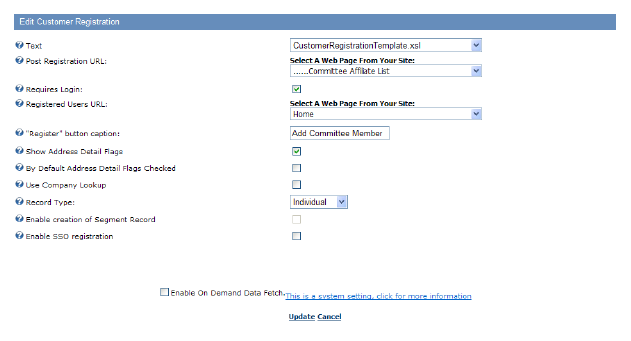
The edit settings page displays.
4. Configure the following settings, as shown below:
· Text: select “CustomerRegistrationTemplate.xsl” from the drop-down menu.
If your association created its own version of this template, make sure
to select your customized template instead.
· Post Registration URL: select the desired page you want to direct users to after they complete the registration that also has the Affiliate Management Segment Listing module installed on it. For example, the Affiliate Management Homepage as discussed in Affiliate Management - Segment List Web Module.
· Requires Login: check the checkbox to enable.
· “Register” button caption: enter the text you want to appear on the button at the bottom of the Create New Employment Segment page. For example, “Add Committee Member” (since this registration page is for creating new employment segments).
· Record Type: select “Individual” from the drop-down menu.
· Enable Creation of Segment Record:
uncheck the checkbox to disable.
Refer
to Configuring
the Customer Registration Web Module for additional configuration
settings.
5. Click Update.
6. Create another page entitled “Committee Member Search.”
You
can name this page anything you desire. For the purposes of this section,
the page is entitled, “Committee Member Management" to avoid confusion.
7. Install the Dynamic Search module.
8. Select
Edit Dynamic Search.
The edit settings page displays.
9. Check the Redirect to dynamic search detail via link checkbox.
10. Configure any other settings you desire.
11. Click Update.
12. Create a third page entitled "Committee Member Management".
You
can name this page anything you desire. For the purposes of this section,
the page is entitled, “Committee Member Management" to avoid confusion.
13. Install Personify – Committee Member module.
14. Select
Edit Committee Member Settings.
The edit settings page displays, as shown below.
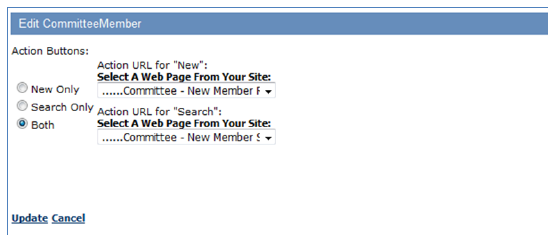
15. Select the desired radio button from the following options:
· New Only: Users only have the ability to add a committee member to the segment that is entirely new to the system.
· Search Only: Users only have the ability to add a committee member to the segment that is already entered in the system.
· Both: Users have the ability to add a committee member to the segment by adding a new customer to the system or searching for an existing one.
16. From
the Action URL for “New” drop-down menu, select the first
page you created in this workflow.
For example, Create New Committee Member.
17. From
the Action URL for “Search” drop-down menu, select the second
page you created in this workflow.
For example, Committee Member Search.
18. Click Update.
19. Navigate
back to the second page you created in this workflow.
For example, Committee Member Search.
20. Open the Dynamic Search module for editing.
21. From
the Dynamic Search drop-down menu, select the third page you created
in this workflow.
For example, Committee Member Management.
22. Make sure you include the following search parameters, as highlighted below:
· Table
Name: SubCustomerId
Query String ParameterName: Scid
Include as Out Query String Parameter: True
· Table
Name: MasterCustomerID
Query String ParameterName: Mcid
Include as Out Query String Parameter: True
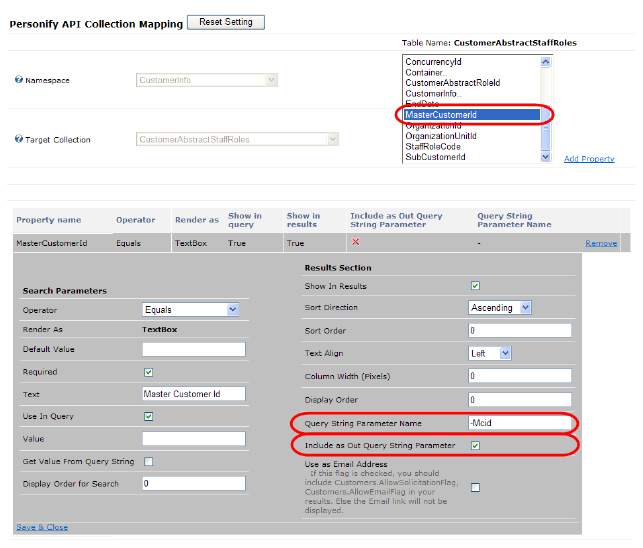
23. Click Update.
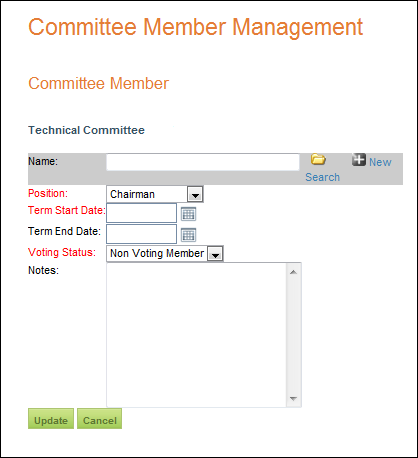
After setting up the New Committee member workflow, when a user selects
"Add Member", he/she is directed to the Committee Member Management
page, as shown below. This page gives the Affiliate Manager the option
of searching for an existing customer or adding a new customer.
In order to give users access to renew product for a particular segment (i.e., inventoried products or memberships), you need to do the following:
· Create an additional page,
· Configure the new page,
· Configure the Affiliate Segment List Homepage.
To configure the Renewable Products workflow:
1. Create a page entitled “Pay Renewables”.
You
can name this page anything you desire. For the purposes of this section,
the page is entitled, “Pay Renewables”.
2. Install the PayOrders module.
3. Select
Edit PayOrders.
The edit settings page displays.
4. Configure the following settings, as shown below:
· PayOrders Mode: Pay Renewals,
· PayOrders Template: PayRenewals.xsl,
· Credit Card Template: CreditCardwithoutCVV2.xsl,
· Electronic Check Template: ECheck.xsl,
· Enable Electronic Check: False,
· Action URL: select the page with the
OrderSummary module installed on it.
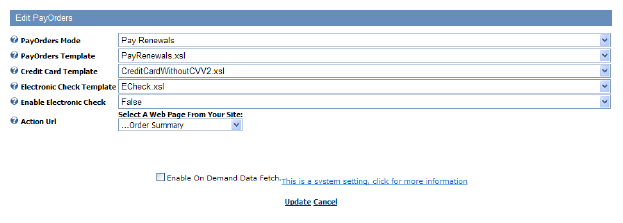
5. Click Update.
6. Create another page entitled “Renewable Products”.
You
can name this page anything you desire. For the purposes of this section,
the page is entitled, “Renewable Products”.
7. Install the Personify – Renewable Products module to this page.
8. Select
the option to Edit Personify – Renewable Products Settings on this page.
The edit settings page displays.
9. Configure the following settings:
· Order Method Code: enter RETAIN
· Number of Orders to Process: enter the number of renewal orders that you want users to be able to create for the entire group.
Creating
renewal is a performance intensive process. TMA Resources recommends you
refrain from allowing users to create more than 20 orders at a time.
· Interval in Months: enter the number of months in the future you want the system to search for products that can be renewed. The system will only allow users to renew products that will expire at some point within the amount of months you specified.
· Action URL for Browse: elect the page which has products and the Personify – Affiliate List module installed on it.
· Pay Renew Action URL: select the page
which has the Pay Orders module installed on it and is associated with
Renewable Products.
For example, Pay Renewals, as shown below.
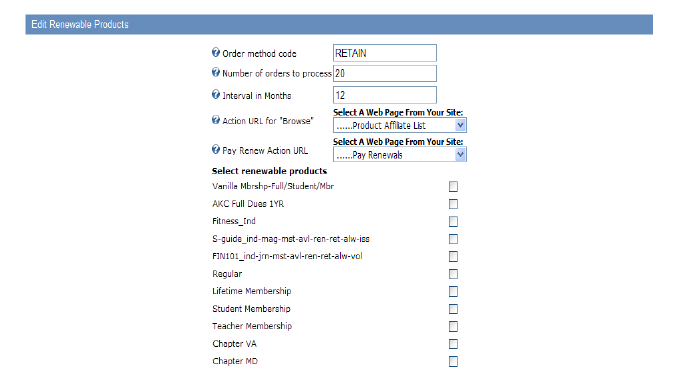
10. Click Update.
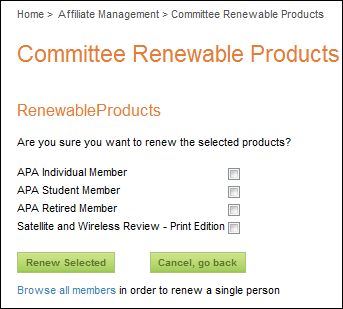
After setting up the Renewable Products workflow, when a user selects
"Renew All", he/she is directed to the Committee Renewable Products
page, as shown below. This page gives the Affiliate Manager the option
of renewing selected products for his/her whole group or selected members.
Offered in the Personify 7.2.1 package and above, to set up the Buy Product Workflow for Affiliate Management, you must have installed all of the following modules:
· Personify – Affiliate Segment List
· Personify – Affiliate List
· Personify – Product Listing
· Personify – Product Detail
· Personify – Shopping Cart
You use these modules to create pages that guide users through the workflow necessary to buy products for affiliate groups. The steps described below detail the specific settings necessary to create this workflow.
The configuration of this workflow involves the creation of six pages
that include the modules listed above. Below is a list the pages you will
create (the page names are only examples for the purposes of this section,
you can name them whatever you desire), the required module for each page,
and the order in which you will create them when configuring this workflow.
This list serves as a quick reference to use while configuring the workflow.
1. Affiliate Product Shopping Cart
module: Personify – Shopping Cart
2. Affiliate
Group Purchase Confirmation
module: Personify – Affiliate List
3. Affiliate
Group Purchase Action
module: Personify – Affiliate List
4. Affiliate
List Group Purchase Action
module: Personify – Affiliate List
5. Affiliate
Product Detail
module: Personify – Product Detail
6. Affiliate
Product Listing
module: Personify – Product Listing
For
this workflow, you will also use the Affiliate Management page you created
in Affiliate
Management - Segment List Web Module that includes the Personify –
Affiliate Segment List Module. For the purposes of this section, the page
is entitled, “Affiliate Management Home”.
This
section assumes you have worked with Personify Web Modules and created
e-Business webpages with the modules before. For more information on creating
e-Business webpages with modules, please refer to Working
with Pages and Adding
a Personify Web Module to the Webpage.
To configure the Affiliate Management Buy Product workflow:
1. Create a page entitled “Affiliate Product Shopping Cart”.
You
can name this page anything you desire. For the purposes of this section,
the page is entitled, “Affiliate Product Shopping Cart”.
2. Install the Personify – Shopping Cart module to this page.
3. Configure
any settings as you desire.
There are no required settings specific to Affiliate Management.
4. Click Update.
5. Create a second page entitled “Affiliate Group Purchase Confirmation”.
You
can name this page anything you desire, however, for the purposes of this
section, we have named it as such to avoid confusion.
6. Install Personify – Affiliate List.
7. Select
Edit Personify – Affiliate List Setting.
The edit settings page displays.
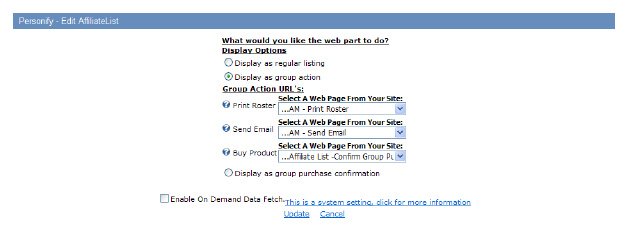
8. Configure the following settings:
· Display as Group Purchase Confirmation: select this radio button.
· Buy
another product for different group: select the page you created in Affiliate
Management - Segment List Web Module that includes the Personify –
Affiliate Segment List Module.
For example, Affiliate Management Home.
· Proceed
to Cart: select the first page you created in this workflow that includes
the Personify – Shopping Cart module.
For example, Affiliate Product Shopping Cart.

Refer
to Configuring
the Customer Registration Web Module for additional configuration
settings.
9. Click Update.
10. Create a third page entitled “Affiliate Group Purchase Action".
You can name this page anything you desire. For the purposes of this section,
the page is entitled, "Affiliate Group Purchase Action”.
11. Install the Personify – Affiliate List module to this page.
12. Select
the option to Edit Personify – Affiliate List Settings on this page.
The edit settings page displays.
13. Configure the following settings:
· Display as Group Action: select this radio button.
· Buy Product URL: select the second
page you created in this workflow.
For example, Affiliate Group Purchase Confirmation.
14. Configure any other settings as you desire.
15. Click Update.
16. Create a fourth page entitled, “Affiliate List Group Purchase Action".
You can name this page anything you desire. For the purposes of this section,
the page is entitled, "Affiliate List Group Purchase Action”.
17. Install the Personify – Affiliate List module to this page.
18. Select
t Edit Personify – Affiliate List Settings.
The edit settings page displays.
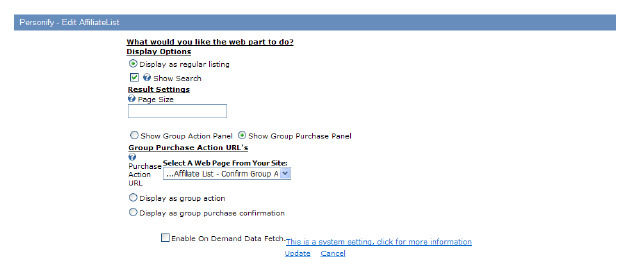
19. Configure the following settings, as shown below:
· Display as Regular Listing: select this radio button.
· Show Search: check/uncheck as desired.
· Show Group Purchase Panel: select this radio button.
· Purchase Action URL: select the third
page you created in this workflow.
For example, Affiliate Group Purchase Action.
20. Configure any other settings as you desire.
21. Click Update.
22. Create a fifth page entitled “Affiliate Product Detail.”
You
can name this page anything you desire. For the purposes of this section,
the page is entitled, “Affiliate Product Detail”.
23. Install Personify – Product Detail module.
24. Select
Edit Personify – Product Detail Settings.
The edit settings page displays.
25. Configure the following settings:
· Add to Cart: FALSE,
· Add to Wish List: FALSE,
· Buy For Group: TRUE,
· Group Purchase Action URL: select the
fourth page you created in this workflow.
For example, Affiliate List Group Purchase Action.
26. Configure any other settings as you desire.
27. Click Update.
28. Create a sixth page entitled, “Affiliate Product Listing.”
You can name this page anything you desire. For the purposes of this section,
the page is entitled, “Affiliate Product Listing”.
29. Install Personify – Product Listing module.
30. Select
Edit Personify – Product Listing Settings.
The edit settings page displays.
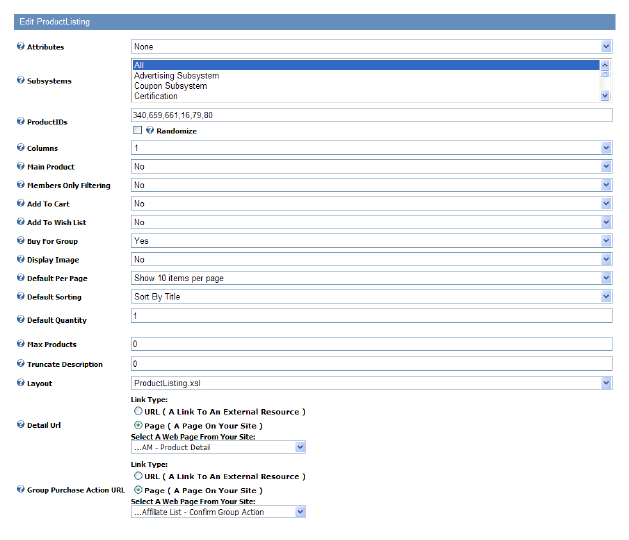
31. Configure the following settings, as shown below:
· Add to Cart: FALSE,
· Add to Wish List: FALSE,
· Buy For Group: TRUE,
· Detail URL: select the fifth page you
created in this workflow.
For example, Affiliate Product Detail.
· Group Purchase Action URL: select the
fourth page you created in this workflow.
For example, Affiliate List Group Purchase Action.
32. Configure any other settings as you desire.
33. Click Update.
34. Navigate
back to the third page you created in this workflow.
For example, Affiliate Group Purchase Confirmation.
35. Open Personify – Affiliate List module for editing.
36. From
the Affiliate List in Group Purchase Confirm Mode drop-down
menu, select the fourth page you created in this workflow.
For example, Affiliate List Group Purchase Action.
37. From
the Buy Another Product for same group drop-down menu,
select the fifth page you created in this workflow and it should include
the Personify – Product Detail module.
For example, Affiliate Product Detail.
38. Click Update.
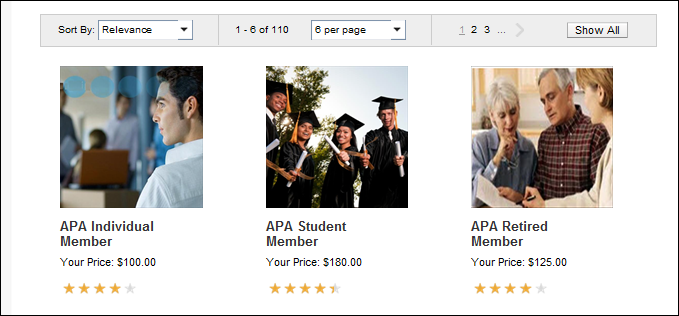
After setting up the Buy Products work flow, when a user selects "Buy
Product", he/she is directed to the Product Listing Page, as shown
below. This page gives the Affiliate Manager the option of buying products
for his/her whole group or selected members.
As
of 7.4.2, Affiliate Management now works with the .NET control for the
new online store (see Configuring
the Affiliate Management .NET Control for more information).