The Persona Maintenance screen displays, as shown below.
You can create a new persona from the Persona Maintenance screen or using the Persona Wizard. Once the persona is set up, it can be assigned to security groups and a menu structure can be created for the persona. See the “Defining Menu Structures” section for more information. If the personas are assigned to a user, they effect the selections in the My Persona drop-down.
To define personas:
1. From the Security Central screen, click Maintain Personas.
2. Click
Create New Persona.
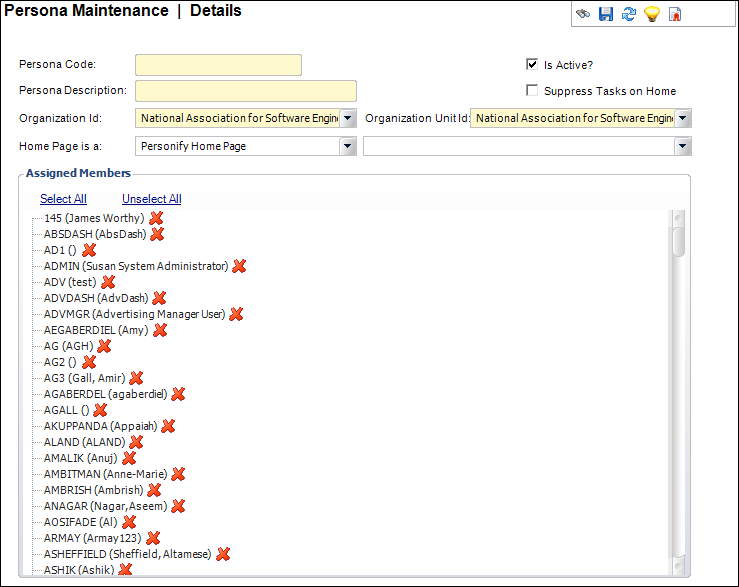
The Persona Maintenance screen displays, as shown below.
 This
is the screen that appears on Personify 7.3.1 and later. If you currently
work on a version earlier than 7.3.1, you may see different fields at
the top of the screen.
This
is the screen that appears on Personify 7.3.1 and later. If you currently
work on a version earlier than 7.3.1, you may see different fields at
the top of the screen.
3. Enter the Persona Code.
4. Enter the Persona Description.
5. Select the Organization ID and Organization Unit ID.
6. If necessary, check the Is Active? checkbox.
7. From the first drop-down next to “Home Page is a:”, select one of the following to determine the screen that displays when a user with this persona as default logs into the application:
a. Personify Home Page
If selected, the second drop-down provides you with a list of quick-start
Personify Home Pages
as set up by your administrator during System Setup.
b. Dashboard
If selected, the second drop-down provides you with a list of available
BusinessObjects
dashboards the persona is associated with.
c. Command or URL
If selected, the second entry field allows you to open the Command Builder
and build a Personify command you want executing upon login OR type in
a URL of a webpage you want opened upon login.
8. Depending
on your selection in the first drop-down, select or enter an entry into
the second drop-down.
Options include a specific Home Page, Dashboard, Personify Command, or
URL.
9. Select whether or not to Suppress Tasks on Home page.
As
of Personify 7.3.1, you can no longer implement the CUSExpress screen
from the Persona Maintenance (PSM004) screen. This functionality must
be set up using the PSMScreenAlias screen as discussed in Assigning
Screen Aliases to a Persona.
10. In
the Assigned Members section, double-click the member you want to add
to the persona.
The red X changes to a green
checkmark.
If
you want to select or deselect all users, click the Select All or Unselect
All links.
11. Click Save.
Screen Element |
Description |
|---|---|
Persona Code |
Text box. The name of the persona. For example, Call Center Manager or System Administrator. |
Persona Description |
Text box. The description of the persona. This description displays at the top-right corner of the Personify screen (or in the My Persona drop-down if you have multiple personas). |
Organization ID |
Drop-down. Identify the organization that owns the persona. |
Organization Unit ID |
Drop-down. Identify the organization unit that owns the persona. |
Home Page is a |
Drop-down. The screen that displays when a user with this persona as default logs into the application. Depending on your selection in the first drop-down, select or enter an entry into the second drop-down. Options include a specific Home Page, Dashboard, Personify Command, or URL. |
Is Active? |
Checkbox. When checked, indicates the persona is active. Only an active persona can be assigned. |
Suppress Tasks on Home |
Checkbox. When checked, the "What do you want to do?" tasks pane will not display on the home page selected from the "Home Page is a" drop-down. |