Adding Prospect Address Information
The Address tab provides detailed address information on the prospect.
To enter address information:
1. From
the toolbar, select Marketing & Communication
> Prospect Edits.
The Prospect Edit search screen displays, as shown below.
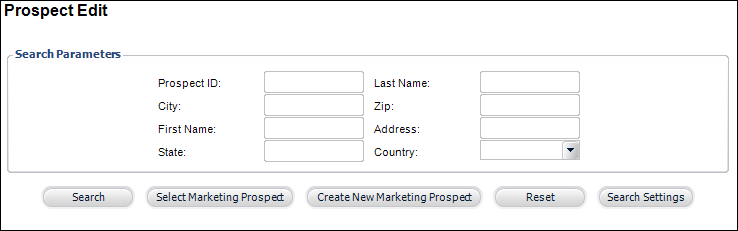
2. Search
for an existing prospect and click Select
Marketing Prospect or create
a new prospect.
The Prospect Edit screen displays, as shown below.
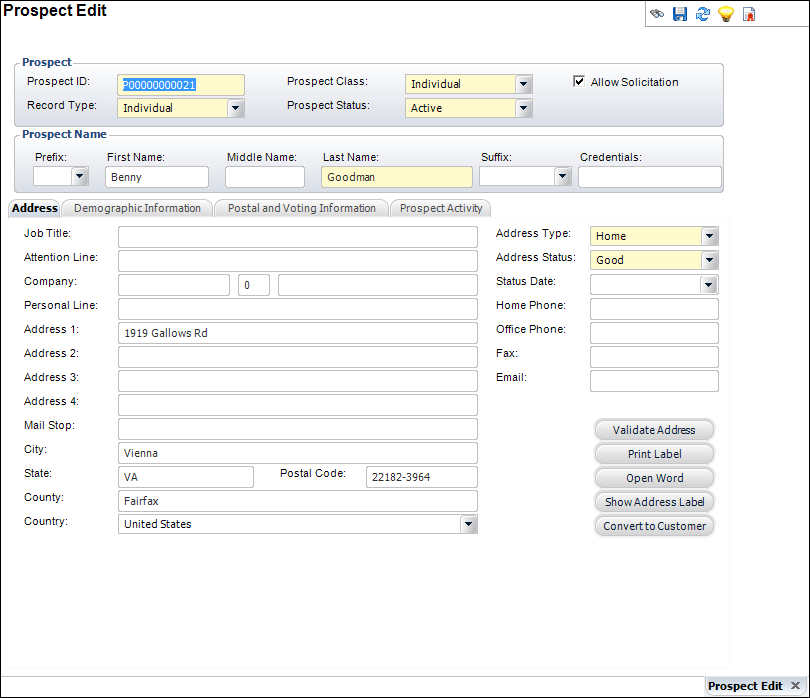
3. On
the Address tab (shown above), enter the Job
Title.
4. Enter
the Attention Line.
5. Enter
the Company name.
6. Enter
the Personal Line.
7. Enter
the address in Address 1, Address 2, Address
3, and Address 4.
8. Enter
the Mail Stop.
9. Enter
the City.
10. Enter
the State.
11. Enter
the Postal Code.
12. Enter
the County.
13. Select
the Country from the drop-down.
14. Select
the Address Type from the
drop-down.
15. Select
the Address Status from the drop-down.
16. Select
the Status Date from the
drop-down.
17. Enter
the Home Phone.
18. Enter
the Office Phone.
19. Enter
the Fax.
20. Enter
the Email.
21. Click
Save.
| Screen Element |
Description |
| Job Title |
Text
box. The job title of the prospect. |
| Attention Line |
Text
box. The name of the contact in case the company records are being
loaded. |
| Company |
Text
box. The name of the company of the prospect. |
| Personal Line |
Text
box. An optional field where you can add a personal note. |
| Address 1 |
Text
box. The number and street name for the address of the prospect. |
| Address 2 |
Text
box. The apartment or suite number of the prospect address. |
| Address 3 |
Text
box. A third address line for the prospect address. |
| Address 4 |
Text
box. A fourth address line for prospect address. |
| Mail Stop |
Text
box. The mail destination. |
| City |
Text
box. The name of the city where the prospect resides. |
| State |
Text
box. The name of the state where the prospect resides. |
| Postal Code |
Text
box. The zip or postal code used by the post office to direct
mail to its proper destination. |
| County |
Text
box. The name of the county in which the prospect resides. |
| Country |
Drop-down.
The name of the country in which the prospect resides. |
| Address Type |
Drop-down.
The type of prospect address. For example, home or business. |
| Address Status |
Drop-down.
The status of the prospect address. |
| Status Date |
Drop-down.
The date when the status was determined or changed. |
| Home Phone |
Text
box. The home phone number of the prospect. |
| Office Phone |
Text
box. The office phone number of the prospect. |
| Fax |
Text
box. The fax number of the prospect so that a prospect can receive
an electronic printout over the phone lines. |
| Email |
Text
box. The email address of the prospect so that a prospect can
receive an electronic mail message. |
| Validate Address |
Button.
When clicked, the Address Validation screen displays, which enables
you to verify and validate the address of the customer. You can
make the address deliverable or override the address entered. |
| Print Label |
Button.
When clicked, the Report Viewer screen displays, where you can
preview the address label for the customer. |
| Open Word |
Button.
When clicked, the Microsoft Word application opens with the address
label for the customer displayed. You can easily print the label
from this interface. |
| Show Address Label |
Button.
When clicked, the Prospect Details screen displays with the name
and address of the customer as it would appear in the label. |
| Convert to Customer |
Button.
When clicked, the system assigns the prospect a customer ID and
converts them to
a customer. |
|