 You
cannot send a pre note and a deduction transaction for the same person
in the same batch.
You
cannot send a pre note and a deduction transaction for the same person
in the same batch.
Electronic Funds Transfer (EFT) is one type of auto-payment that Personify supports. It uses a standard Automated Clearing House (ACH) file. Transactions received by the financial institution during the day are stored and processed later in batch mode. Rather than sending each payment separately, ACH transactions are accumulated and sorted by destination for transmission during a predetermined time period.
The basic process includes the following steps:
1. The association arranges a deal with a bank for EFT and sets up their connection information.
2. When customers request an auto-pay situation through EFT for memberships, fundraising activities, show management, and anything that includes scheduled payments, they will provide the association with their bank’s EFT routing information.
3. Prior to the transfer of funds, the customer’s information must be sent to the bank as a “pre note,” which verifies that everything is in place to make this automatic in the future.
4. After the pre note is recorded, the association periodically sends a “deduction” transaction to the bank. This automatically moves some amount of money from the customer’s account to the association’s account.
You
cannot send a pre note and a deduction transaction for the same person
in the same batch.
5. Run the outgoing EFT680 process. This creates a file with pre-notifications and deductions transactions which will be sent to the bank.
6. Periodically, the association processes a file returned from the bank that lists all errors encountered with the original EFT transmission. This is the EFT681 process.
The EFT Bank Information screen is used to define the bank information of the association to the system. This screen is completed once and does not require updates unless specific data elements change.
To set up the EFT bank information:
1. Select System Admin > Organization Structure > Organization Unit Definition from the toolbar.
2. Search
for an organization unit and double-click it or highlight it and click
Select Org Unit.
The Organizational Unit Maintenance General Parameters screen displays.
3. From
the System Information task category, click EFT
Bank Information.
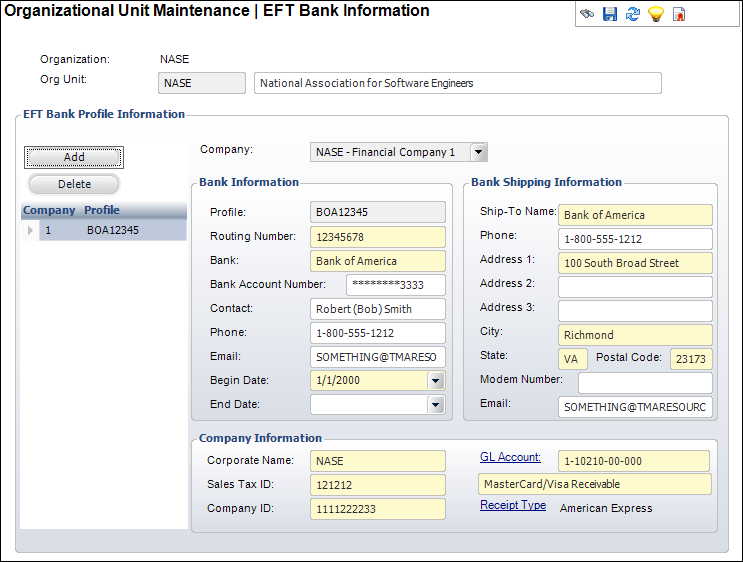
The Organizational Unit Maintenance EFT Bank Information screen displays,
as shown below.
4. Click
Add.
The EFT Bank Profile Information fields are enabled.
5. Select the Company from the drop-down.
6. In the Bank Information section, enter the following bank information:
· Profile code
· Routing Number
· Bank name
· Bank Account Number
· Contact, Phone, and Email
· Begin Date
· End Date
7. In the Bank Shipping Information section, enter the following bank shipping information:
· Ship-To Name
· Phone number
· Address, including City, State, and Postal Code
· Modem Number and Email
8. In the Company Information section, perform the following:
a. Enter the Corporate Name.
b. Enter the Sales Tax ID.
c. Enter the Company ID.
d. Click
the GL Account link to search
for a GL Account associated with the company.
The field below automatically populates with the description of the GL
account.
e. The Receipt Type automatically populates based on the GL Account selected. If necessary, click the Receipt Type link to select a different receipt type.
9. Click Save.
Screen Element |
Description |
|---|---|
Add |
Button. When clicked, a row is added to the table and the corresponding fields are enabled to add EFT bank information. |
Delete |
Button. When clicked, the highlighted row from the table is deleted. |
Company |
Drop-down. The company to which you want to add the EFT bank information. |
Bank Information |
|
Profile |
Text box. A user-defined code for the bank. This is for Personify purposes only and is used to track multiple banks within one company. |
Routing Number |
Text box. The bank’s routing number. This is a nine-digit number that identifies a specific financial institution. |
Bank |
Text box. The bank’s name. |
Bank Account Number |
Text box. The bank’s account number. |
Contact |
Text box. The contact person at the bank. |
Phone |
Text box. The phone number of the contact person at the bank. |
Text box. The email of the contact person at the bank. |
|
Begin Date |
Drop-down. The date of when the member starts the EFT. |
End Date |
Drop-down. The date of when the member stops the EFT. |
Bank Shipping Information |
|
Ship-To Name |
Text box. The name of the bank. |
Phone |
Text box. The phone number of the bank. |
Address 1, 2, 3 |
Text box. The first, second, and third lines of the bank’s address. |
City |
Text box. The city associated with the bank. |
State |
Text box. The state associated with the bank. |
Postal Code |
Text box. The postal code associated with the address provided. |
Modem Number |
Text box. The modem number of the bank. This is needed when sending electronic shipments. |
Text box. The email address to which the EFT file will be sent. |
|
Company Information |
|
Corporate Name |
Text box. The corporate name for the EFT file. |
Sales Tax ID |
Text box. The sales tax ID of the company associated with the bank. |
Company ID |
Text box. The company ID of the company associated with the bank. |
GL Account |
Link. The GL cash account of the company associated with the bank. |
Receipt Type |
Link. Automatically populates based on the default receipt type set with the GL account selected. As of 7.4.2, if necessary, this can be changed. |