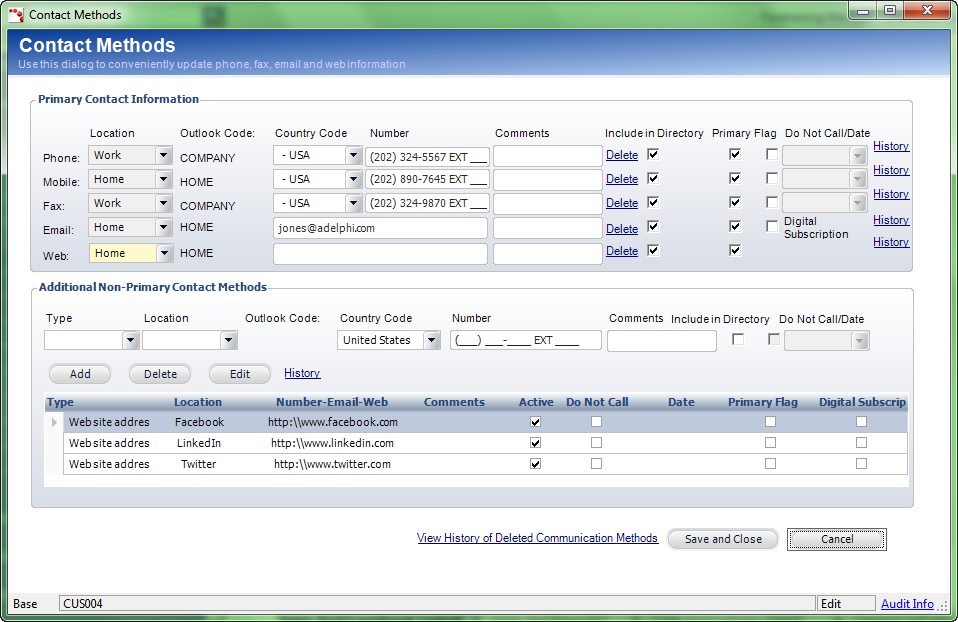
The Contact Methods screen displays, as shown below.
You can change the contact information for the customer, such as phone numbers, email addresses, and web pages. You can also add non-primary contact information and specify whether the added information should be included in the directory.
To change a customer’s contact information:
Access the Contact Methods screen from one of the following ways:
1. On the Customer Central screen, select the Common Tasks task category and click Change Contact Information.
· From the Customer Details tab in Customer Central, click Change Contact Information.
· On the Call Center screen, select the Demographics task category and click Change Contact Information.
· From the Customer Summary tab in Call Center, click Change Contact Information.
· On the Subgroup Central screen, select the Subgroups as Customers task category and click Change Contact Information.
· From
the Subgroup Information tab in Subgroup Central screen, click Update
Contact Information.
The Contact Methods screen displays, as shown below.
2. Change any of the primary contact information:
· Phone – when your area code is less than the maximum numbers allowed, use your mouse to click to the appropriate phone number field. You cannot click Tab to go to the next field.
· Mobile
· Fax
· Email– the email address must contain an @ symbol and a period with at least two characters after the period. The following characters can be added before the @ symbol: ! # $ % & ' * + - / = ? ^ _ ` { | } ~
![]() If
the user’s email address and SSO username are the same in the back-office,
if the user updates their primary email address, their email address and
SSO username will be updated to the new email address. If the user’s email
address and SSO username are NOT the same in the back-office, if the user
updates their primary email address, their email address will be updated
to the new email address, but their username will stay the same and can
be updated manually via the Web Access
Control screen.
If
the user’s email address and SSO username are the same in the back-office,
if the user updates their primary email address, their email address and
SSO username will be updated to the new email address. If the user’s email
address and SSO username are NOT the same in the back-office, if the user
updates their primary email address, their email address will be updated
to the new email address, but their username will stay the same and can
be updated manually via the Web Access
Control screen.
· Web address (URL)
3. If necessary, select the Include in Directory checkbox next to the appropriate contact information to include that information in the company directory.
4. If necessary, select the Primary Flag to designate that contact information as primary.
![]() If
you want to delete a primary contact method, do NOT delete the information
from the text boxes. Click the Delete link next to the appropriate
information to delete the method. This link will be disabled if you do
not have appropriate privileges.
If
you want to delete a primary contact method, do NOT delete the information
from the text boxes. Click the Delete link next to the appropriate
information to delete the method. This link will be disabled if you do
not have appropriate privileges.
5. If
necessary, check the Do
Not Call checkbox next to the appropriate contact method.
Today’s date is automatically selected as the start date in which the contact
method cannot be called. The contact information cannot be called for
purposes of soliciting or promoting a product, service, membership, etc.
This complies with the CAN-SPAM standards.
![]() The
“Do Not Call” fields do not display for the Email and Web contact types
because those types are controlled by the solicitation flags on the Special
Info tab and the Solicitation Preferences task on the Customer Central
screen.
The
“Do Not Call” fields do not display for the Email and Web contact types
because those types are controlled by the solicitation flags on the Special
Info tab and the Solicitation Preferences task on the Customer Central
screen.
6. Select the Digital Subscription link to indicate that the customer's digital subscription will use this email for delivery of the electronic content. Only one email address can be checked.
7. Enter
information in the Additional Non-Primary Contact Methods section and
click Add.
Fields in this section change depending on the Type selected. Once the
contact method is added to the table, you can select whether it is Active,
on the Do Not Call list, or if you entered the non-primary contact method
in error, you can select it here as Primary (available as of the 7.2.1
release).
8. Click Save.
9. Click the History link to view changes of any contact type.
10. Click the View History of Deleted Communication Methods link to display the Communication History screen to list any methods that were deleted when the Delete link was used.