 Rate
Structures can be completed after primary membership products are setup.
Rate
Structures can be completed after primary membership products are setup.
The Rate Structure Maintenance screen lets you enter and maintain rate structures for orders. Rate structures are owned at the organization level and are used to categorize customer’s pricing. Products can be referenced in rate structures across organization units as long as they are within the same organization.
Rate
Structures can be completed after primary membership products are setup.
To set up rate structure defaults:
1. Select
CRM/Orders > Rates, Discounts,
Coupons > Rate Structure and Defaults from the toolbar.
The Rate Structure Maintenance Overview screen displays, as shown below.

2. From the Rate Structure Definition task category, click Rate Structure Definition.
3. Click
Create New Rate Structure.
The Structure Mapping screen displays, as shown below.
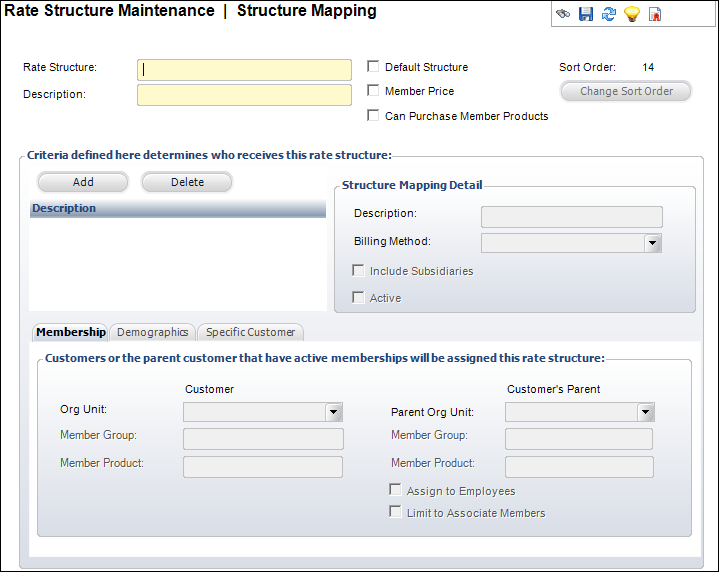
4. Enter a Rate Structure name.
5. Enter a Description.
6. Select the appropriate checkboxes:
a. Default Structure
b. Member Price
c. Can Purchase Member Products
As
of the 7.2.3 release, the Exhibitors and Donors tabs were removed from
this screen because the functionality was not yet implemented. The tabs
will be reinstated when functionality is added.
7. To determine who receives this rate structure, perform the following in the Structure Mapping Detail section:
a. Click Add.
b. Enter a Description.
c. Select the Billing Method from the drop-down.
d. Select
the appropriate checkboxes.
Options are Include Subsidiaries
and Active.
8. From the Membership tab, perform the following:
a. Select the Org Unit of the customer and/or customer’s parent.
b. Click
the Member Group link.
The Membership Group Chooser screen displays.
c. Search for a membership group and double-click it to select it. Select the membership group for the customer and/or customer’s parent.
d. Click
the Member Product Code link.
The Product Chooser screen displays.
e. Search for a membership product and double-click it to select it. Select the product for the customer and/or customer’s parent.
Only
validated membership product will display in the search results.
f. Select the appropriate checkboxes:
· Assign to Employee Members
· Limit to Associate Members
9. From the Demographics tab, perform the following:
a. Select the Customer Class from the drop-downs for the customer and/or customer’s parent.
b. Select the Customer Status from the drop-downs for the customer and/or customer’s parent.
c. Select the Purchasing Group from the drop-downs for the customer and/or customer’s parent.
10. From the Specific Customer tab, perform the following:
a. Click
the Customer link.
The Customer Chooser screen displays.
b. Search for a customer and double-click it to select it.
c. Click
the Customer’s Parent link.
The Customer Chooser screen displays.
d. Search for a customer’s parent and double-click it to select it.
11. Click Save.
12. You can now define rate code defaults.
Screen Element |
Description |
|---|---|
Rate Structure |
Text box. The code or abbreviation of the rate structure. This is a structure that defines a customer. They are defined during the system setup. Certain customers, such as members vs. non-members, receive special rates. The rates for these structures are defined in the Rate Code. |
Description |
Text box. The description of the rate structure. |
Default Structure |
Checkbox. When checked, indicates the rate structure has the default list price structure. |
Member Price |
Checkbox. When checked, indicates the rate structure has the default member price structure. |
Can Purchase Member Products |
Checkbox. When checked, indicates members and non-members (all rate structure defaults) can purchase products that are members-only products. |
Change Sort Order |
Button. When clicked, the Rate Structure Sorts screen displays. Select either the Sort Order Up or Sort Order Down button and save the order. |
Add |
Button. When clicked, a row is added to the table and the corresponding fields are enabled to define a rate structure. |
Delete |
Button. When clicked, the highlighted row from the table is deleted. |
Structure Mapping Detail |
|
Description |
Text box. The description of the rate structure default group, as it pertains to the rate structure. |
Billing Method |
Drop-down. The method in which the rate structure will be billed. For example, Bill To, Ship To, or Both. |
Include Subsidiaries |
Checkbox. When checked, indicates that any customer ID sub-accounts should be included. This is used for trade associations and other organizations where members and their employees are granted member pricing. |
Active |
Checkbox. When checked, indicates the structure mapping detail is active. Only active structures display in the lookup and can be used for product setup or in transactions. |
Membership tab |
|
Org Unit |
Drop-downs. Identifies the organization unit ID of the member product for the customer/customer’s parent company. If an organization unit is selected, this implies that the customer has an active membership. |
Member Group |
Link. Opens the Membership Group Chooser screen. Select the member group for the customer/customer’s parent company. |
Member Product Code |
Link. Opens the Product Chooser screen. Select the member product code of the customer/customer’s parent company. |
Assign to Employee Members |
Checkbox. When checked, indicates only employees of the member company will receive this rate structure. |
Limit to Associate Members |
Checkbox. When checked, indicates the parent record (primary employer’s) membership is considered only if the individual is a registered associate member. This is used for trade associations and other organizations where members and their employees are granted member pricing. |
Demographics tab |
|
Customer Class |
Drop-down. The class of the customer/customer’s parent company. For example, Educator, Prospect, or Individual. |
Customer Status |
Drop-down. The status of the customer/customer’s parent company. For example, Active, Deceased, Duplicate, or Inactive. |
Purchasing Group |
Drop-down. The group code used to organize special pricing for groups. The name of the purchasing group or the company of the user for the customer/customer’s parent company. See “Purchasing Group Definition” for more information. |
Specific Customer tab |
|
Customer |
Link. Opens the Customer Chooser screen. Select the customer ID number of the customer who should be assigned this rate structure. The customer selected here overrides all other rules. |
Customer’s Parent |
Link. Opens the Customer Chooser screen. Select the customer ID number of the customer’s parent company who should be assigned this rate structure. The customer’s parent company selected here overrides all other rules. |