 The
most current version of ISO country codes are available at http://www.iso.org/iso/country_codes/iso_3166_code_lists/country_names_and_code_elements.htm.
The
most current version of ISO country codes are available at http://www.iso.org/iso/country_codes/iso_3166_code_lists/country_names_and_code_elements.htm.
The Country and State Code Maintenance screen allows you to maintain country and state codes. Most of this data is prepopulated during installation, but you can add new data using this screen. You can also modify the name of a country from this screen, should the need arise.
The country codes used in Personify reflect ISO standards. TMA Resources recommends that you follow these standards and use ISO-recommended codes when adding new countries.
The
most current version of ISO country codes are available at http://www.iso.org/iso/country_codes/iso_3166_code_lists/country_names_and_code_elements.htm.
A default country is assigned at the organization level, so it is necessary that the country code exist in the Country Code setup before you try assigning the default country. Countries are also used in the Address Structure setup and in Shipping Charge Definition.
Country codes are maintained in the App_Country table. Country codes are pre-populated in the App_Country table for USA, Canada, and Mexico when Personify is delivered.
State codes are maintained in the App_State table. Before state codes can be created, the country code must first exist in the App_Country table. State codes are pre-populated in the App_State table for USA, Canada, and Mexico when Personify is delivered.
Adding extensive data to the App_Country and App_State tables can cause possible performance overhead. TMA Resources recommends only populating the tables with necessary data.
To set up a country and state code:
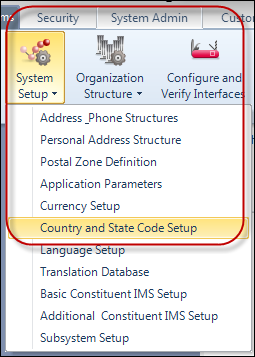
1. Select
System Admin > System Setup >
Country and State Code Setup from the toolbar, as shown below.
The Currency Exchange Rate Maintenance screen displays, as shown below.

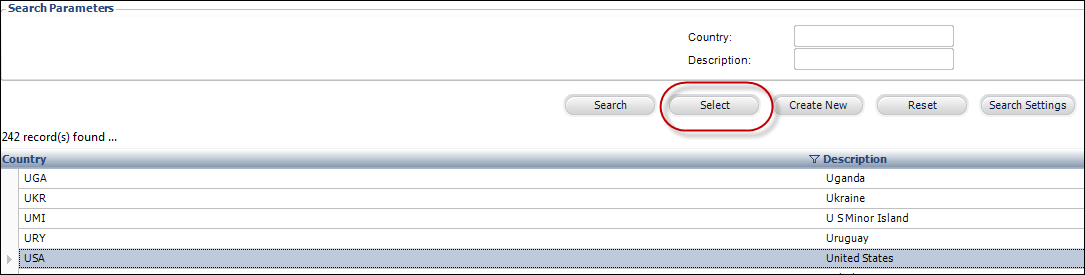
2. To
edit an existing Country code, search for the existing record and click
Select, as shown below.
To create a new Country code, click Create
New, as shown below.

Regardless if you search for an existing Country code or create a new one,
the Country and State Code Maintenance screen displays, as shown below.
.png)
3. Edit
the necessary information in the Header section, as described and shown
below.

· Country: The appropriate country for the record. This field is disabled when you are editing an existing record. Personify uses the three-character international standard code for each country. The default country code is defined for all Personify organization units within an organization at the organization level. The default country code defined at the Personify organization-level is the country code that defaults into all addresses and elsewhere in the application where a country code is used.
· Description: The description or long name of the country.
· ISO2 Country Code: The 2-letter country code as established by the International Organization for Standardization (ISO). Please see http://www.iso.org/iso/country_codes/iso_3166_code_lists/country_names_and_code_elements.htm for more information on the current country codes.
· Audit Continent: This drop-down allows you to select the region or continent that the country is located (i.e., Africa, Central America, North America, etc).
· Active: Indicates whether the country code is active. It is selected by default. Only active countries can be selected for addresses and elsewhere where country codes are validated.
4. Edit
the necessary information in the Phone section, as described and shown
below.
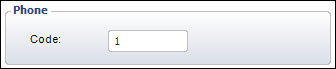
· Code: The phone area code for dialing the country.
5. Edit
the necessary information in the VAT Info section, as described and shown
below.
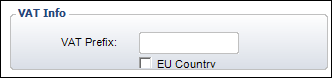
· VAT Prefix: Prefix for the value-added tax. This tax is used in Europe. The prefix for the exempt code must start with the phone number code.
· EU Country: Identifies countries that are members of the European Union. As of 2007, there are 27 member countries.
6. Edit
the necessary information in the Address Validation section, as described
and shown below.
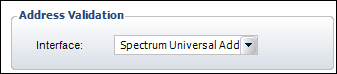
· Interface: The interface with which to perform the validation. For example, Group1 Universal Coder. If you do not want to validate addresses (or if issues occur with Group1), you can select “None” here to turn it off.
7. Edit
the necessary information in the On Screen Validation section, as described
and shown below.
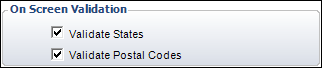
· Validate States: When selected, indicates that validation will be performed when information is entered in a state field. It is deselected by default. This validation is needed for the ZIP100 process to function properly.
State
codes can only be entered for countries where the Validate States checkbox
is checked.
· Validate Postal Codes: When selected, indicates that validation will be performed when information is entered in a zip (postal) code field. This validation is needed for the ZIP100 process to function properly.
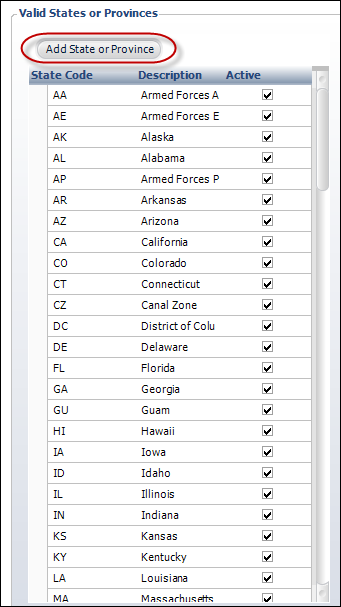
8. To add a new state
or province associated with the country, click Add
State or Province, as shown below.
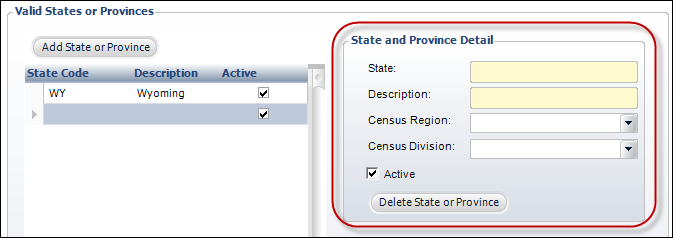
The State and Province Detail fields are enabled, as shown below.
State
codes can only be entered for countries where the Validate States checkbox
is checked.
9. In
the State and Province Detail section, enter the following information,
as shown below.
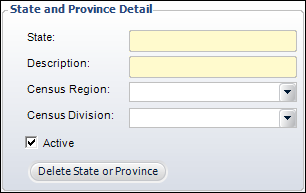
· State: The code of the state or province within the country. For example, “VA” is the state code for Virginia in the United States
· Description: The description or long name of the state or province.
· Census Region: A geographic area consisting of several states defined by the U.S. Department of Commerce, Bureau of the Census. The states are grouped into four regions and nine divisions. The regions include Northeast, Midwest, South, and West. This field relates to the CENSUS_REGION column in the APP_STATE table. Please see http://www.census.gov/geo/www/us_regdiv.pdf for more information on selecting the correct census region.
· Census Division: Drop-down. A geographic area consisting of several states defined by the U.S. Department of Commerce, Bureau of the Census. The states are grouped into four regions and nine divisions. The divisions include New England, Middle Atlantic, East North Central, West North Central, South Atlantic, East South Central, West South Central, Mountain, and Pacific. This field relates to the CENSUS_DIVISION column in the APP_STATE table. Please see http://www.census.gov/geo/www/us_regdiv.pdf for more information on selecting the correct census division.
· Active: Click to delete a state or province entry.
· Delete State or Province: Highlight the state or province that you want to remove and select this button.
State
codes can only be entered for countries where the Validate States checkbox
is checked, as highlighted above.
10. Click Save.