 FOR
HOSTED CLIENTS: Please note this step does not apply to hosted clients
as your Personify Home Pages are hosted with TMA Resources.
 To set up the Personify Home Pages, perform the following:
As discussed earlier, the Personify Home Pages delivered with Personify 7.3.1 were created using ASPX pages. This means in order to apply the Personify Home Pages to your application, you need to host the ASPX pages on your web server. You then need to enter that ASPX page’s URL into your Application Parameters in order to connect it to Personify. The instructions for doing so appear in this section.
 FOR
HOSTED CLIENTS: Please note this step does not apply to hosted clients
as your Personify Home Pages are hosted with TMA Resources.
To set up the Personify Home
Pages, perform the following:
1. Contact your Account Specialist and request the Personify Home Pages URL.
2. Enter the URL in the HOME_PAGE_URL Application System Parameter on APP008.
3. Assign a Personify Home Page to a Persona.
To apply the Personify Home Pages:
1. Using IIS Manager, make sure your Application Pool is under the .Net 4.0 Framework in Integrated Mode.
2. Navigate
to your release package and copy the Personify Home Page folder to
your Web Server.
This folder contains a script that, when ran, creates a website named “PersonifyHomePage”
on your Web Server that hosts the Personify ASPX Home Pages.
· If
you want to modify this website and folder name, open Personify.HomePage.SetParameters.xml
in a text editor and modify the red text below in the code:
<setParameter
name="IIS Web Application Name" value="Default Web Site/PersonifyHomePage"
/>
· Save and close the file.
 If you decide
to modify the website and folder name, make sure you do not modify it
to a name that already exists in your .../innetpub/wwwroot folder.
Also, if you have previously tried to apply the Personify Home Pages and
therefore already have a PersonifyHomePage folder that exists in your
... /innetpub/wwwroot folder, make sure to delete this folder before proceeding.
3. Using
MSDeploy, run the Personify.HomePage.cmd script.
If you do not have MSDeploy installed on your computer, please see the
following website for instructions on Web Deploy installation: http://go.microsoft.com/?linkid=9278654.
A copy of the Web Deploy Windows Installer Package appears in the Personify
Home Page folder in your release package.
If you are unfamiliar with running command scripts with MSDeploy, please
see “Running the Command Script” below.
4. When
complete, the script should have created the PersonifyHomePage folder.
Navigate to the following file path on your Web Server and verify the website
and folder creation:
.../innetpub/wwwroot/PersonifyHomePage
If you modified the website and folder name, it should appear with your
changes.
5. Make sure your IIS User has FULL privileges to this folder.
6. Record
the URL for this newly created website.
For example, http://[your web server name]/PersonifyHomePage/
7. In Personify, open the Application Parameters (APP008) screen.
8. Search for the HOME_PAGE_URL parameter.
9. Enter
the recorded URL for where you hosted the ASPX files for step 6 in the
HOME_PAGE_URL parameter value.
You are now able to set a Personify Home Page as the default homepage for
active personas through the Persona Maintenance (PSM004) screen.
 Keep
in mind that users will be able to modify the panel images of their Personify
Home Pages on a user basis. Images are restricted to 4MB (by default)
and save to the web server. TMA Resources does not provide virus protection
for these images.
If you are unfamiliar with running command scripts with MSDeploy, you can follow the instructions below.
To run the command script in MSDeploy:
1. Make sure you completed steps 1-3 of the previous section.
2. Open the Command Prompt with Administration privileges.
3. Access the Package folder located on your server.
4. Type
the following command into the prompt and click Enter.
Personify.HomePage.deploy.cmd
/t
Doing so will simulate the installation, but not actually deploy it. If
your application pool is not currently configured for .Net 4.0, you will
receive the following error message.
Error: The application
pool that you are trying to use has the ‘managedRuntimeVersion’ property
set to ‘v2.0. This application requires ‘v4.0’.
Error
count: 1.
5. If you did not receive this error message, please proceed to step 6. If you did receive the error message above, follow these steps to reconfigure your application pool for .Net 4.0.
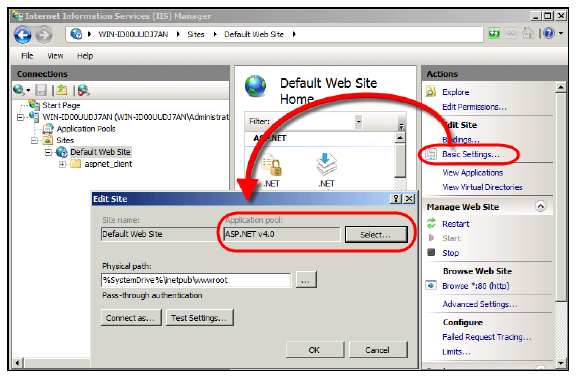
a. Open the IIS Manager.
b. From
the IIS Manager, under Actions > Edit Site, click Basic
Settings.
The Edit Site screen displays.
c. Click
Select and select ASP.NET
v4.0 from the list.

d. Click OK to complete the configuration change.
e. Back
in the Command Prompt, re-simulate the installation by typing the same
code in as in Step 4:
Personify.HomePage.deploy.cmd
/t
If no errors occur, you can proceed to the next step.
If errors do occur, determine the error
code and contact your Customer Service Representative.
6. Open the Command Prompt again and navigate back to the PersonifyHomePage package folder on your server.
7. Type
the following command into the prompt and click Enter.
This command performs the PersonifyHomePage installation.
Personify.HomePage.deploy.cmd
/y
8. Refresh
your IIS Websites list.
The PersonifyHomePage website, or whatever name you gave your website,
appears on the Websites list.