 To replace an existing address, see Adding
a New Address to a Constituent's Record in CRM360®.
To replace an existing address, see Adding
a New Address to a Constituent's Record in CRM360®.
To replace an existing address, see Adding
a New Address to a Constituent's Record in CRM360®.
To add an additional individual address for a new constituent:
1. On
the Create a New Customer screen, click Add Additional Address
from the Step 1: Customer Info tab.
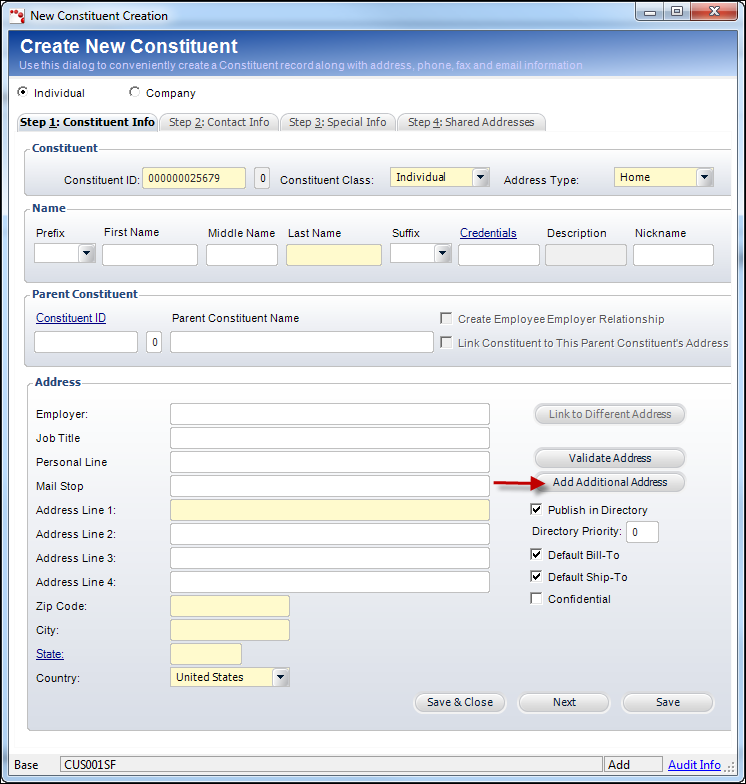
The Additional Customer Address screen displays as shown below.
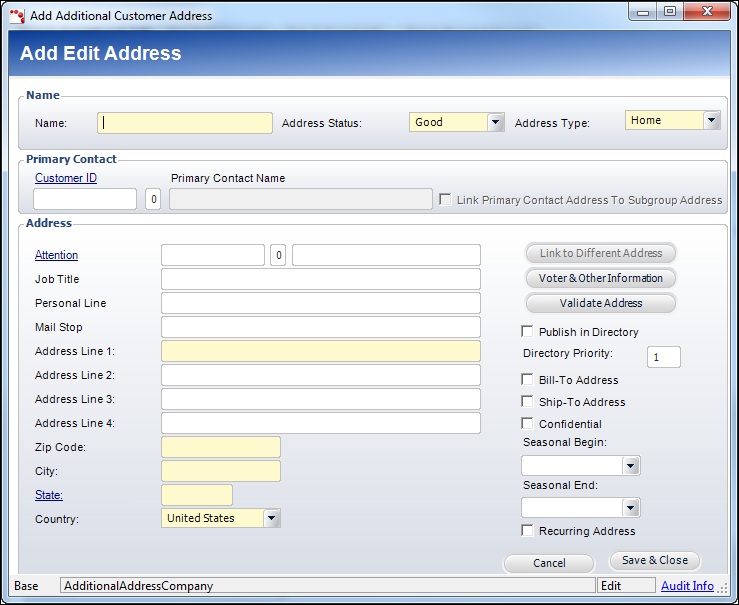
2. Change the individual’s Name, if necessary.
3. Change the Address Status, if necessary.
4. Change the Address Type, if necessary.
![]() If
you select the “Blank” value, the application ignores the required fields
from the CUS_ADDRESS_STRUCTURE table set up for the country selected,
and allows you to save an address with no data populating the Address
fields. Blank addresses are saved with an Address Status of ‘Good’.
If
you select the “Blank” value, the application ignores the required fields
from the CUS_ADDRESS_STRUCTURE table set up for the country selected,
and allows you to save an address with no data populating the Address
fields. Blank addresses are saved with an Address Status of ‘Good’.
5. From the Parent Customer section select the parent customer by clicking the Customer ID link and searching for a parent customer, if necessary.
6. If
you selected a parent customer, select the Create Employee Employer
Relationship checkbox to create an Employment relationship for the
new customer and parent customer.
This relationship will be automatically created on the Demographics tab.
7. If
you selected a parent customer, Link Customer to This Parent Customer’s
Address.
If you select this checkbox, the address fields in the Address section
will be automatically populated with the address of the selected parent
customer.
8. From the Address section, enter the name of the customer’s Employer, if necessary.
9. Enter
the customer’s Job Title, if necessary.
The job title entered here will be displayed as the customer’s Primary
Job Title on the Demographics tab.
10. Enter
a Personal Line and/or Mail Stop,
if necessary.
The personal line and mail stop are extra ways identifying the customer
for mail routing. Depending on the address structure defined by your organization,
these may be used on mailing labels.
11. Enter the customer’s Address Line 1.
12. Enter Address Line 2, Address Line 3, and/or Address Line 4, if necessary.
13. Enter
the customer’s Zip Code.
If more than one city exists for the entered zip code, a pop-up will display
from which you can select the appropriate city.
14. If the system found the zip code entered, the City and State fields will be automatically populated. Otherwise, enter the City and click the State link to search for and select the appropriate state.
15. Enter the County, if necessary.
16. Select the Country from the drop-down menu.
![]() When
an address is created for a customer that owns the address, an entry is
created in the CUS_Address_Details table and the CUS_Address table. When
a linked address is created for a customer, an entry is created in the
CUS_Address_Details table. You cannot link an address for an individual
once an unlinked address is saved because the CUS_Address table will not
be properly updated.
When
an address is created for a customer that owns the address, an entry is
created in the CUS_Address_Details table and the CUS_Address table. When
a linked address is created for a customer, an entry is created in the
CUS_Address_Details table. You cannot link an address for an individual
once an unlinked address is saved because the CUS_Address table will not
be properly updated.
17. If
the new company's information should be published in any base directory
reports, whether printed or published on the Web (e.g., XBT1202), select
the Publish in Directory checkbox.
When unchecked, the e-Business Member Directory web part excludes this
new company information.
18. Enter the priority in which the address will be listed in the directory in the Directory Priority field.
19. If the new customer is the default bill-to customer for all orders, select the Default Bill-to checkbox.
20. If the new customer is the default ship-to customer for all orders, select the Default Ship-to checkbox.
21. If the new customer does NOT want their address to display on base roster reports (e.g., MBR1212PE), select the Confidential checkbox.
22. Click Validate Address. The Address Validation screen displays with the status of the validation. Click Accept. See Validating a Customer Address for more information.
![]() To
add another address for the company, click Add Additional Address.
See Adding Additional Customer
Addresses for more information.
To
add another address for the company, click Add Additional Address.
See Adding Additional Customer
Addresses for more information.
23. If
applicable, select the Seasonal Begin and Seasonal End dates.
These dates indicate the valid begin and end dates of a seasonal address.
Typically, seasonal addresses apply when a customer wants mail sent to
a different address for a specific period of time.
24. If
the seasonal date range is recurring, select the Recurring Address
checkbox.
In this case, Personify automatically updates the range by one year after
the address has expired to renew the next season.
25. Click Save & Close.