You can add an image to a constituent's record in CRM360 in order to more quickly identify or associate with them. For individual records, this image may be a picture of the constituent. For company records, this image may be the company logo. Please note that security and/or Personas cannot control who can and cannot view a constituent's image. If the user has access to CRM360 and an image has been added to a constituent's record, then the user will see the image.
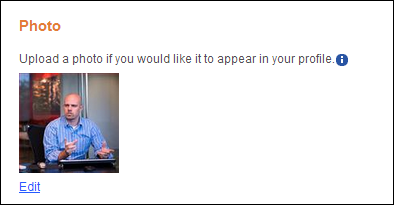
The image is also displayed on the e-Business website on the Photo Control. See Configuring the Photo Control for more information. Here, a constituent can view, edit, delete, or upload a picture to the e-Business website, as shown below.
The image is added as an entry to the APP_IMAGE table and the customer table is updated with the IMAGE_ID of the image. Once an image is added, the constituent is linked to the image. TMA Resources recommends that the image be 130x130 pixels. The default maximum size of the file is 200 kb, but can be increased in config.xml file.
Your organization can control whether or not to use constituent image by the "USE_CONSTITUENT_IMAGES" application parameter. By default, this parameter is set to "N" and images will not display in the header on the CRM360 screen. When this parameter is set to "N", the remaining information in the header on CRM360 will shift to fill in the space, as shown below.

If you want to use constituent images, change this parameter to "Y". If an image is NOT added to the constituent's record and the application parameter is set to "Y", a generic silhouette image will display, as shown below.
Individual:
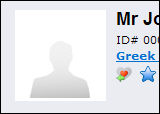
Company:

 This
application parameter also controls whether or not constituent images
will display on the Donor360®
and Volunteer Central screens.
This
application parameter also controls whether or not constituent images
will display on the Donor360®
and Volunteer Central screens.
The following setup steps must be completed in order for images to display in CRM360 and Donor360:
1. Setup the customer image service.
This windows service is used to read the image raw data from the Personify
database (APP_IMAGE table) and create a physical image file (*.png) and
store it inside the directory. The directory path is specified in an attribute
called “CUSTOMERIMAGEPATH” which is residing in the “PersonifyImageService.exe.config”
file.
2. Setup a virtual directory.
A virtual directory must be setup, which internally refers to the
physical path, which is same as “CUSTOMERIMAGEPATH” defined in step 1.
This site address is used in the APPLICATION_IMAGES_URL application parameter
in the back office client.
3. Update the PIDB Installation database.
We have introduced a new Upload root entry called “CustomerImages” which
will be pointing to the same “CUSTOMERIMAGEPATH” defined in step 1. You
need to update the “ServerConfig” column of the “T_##_AppInstance” table
by adding the following entry:
<UploadRoot Name="CustomerImages" Path="[CUSTOMERIMAGEPATH]"/>
If
the image service is not installed inside the Application Server then
please provide the enough permission for accessing the directory, which
is defined in “CUSTOMERIMAGEPATH” from the application server.
4. Setup application parameters.
· APPLICATION_IMAGES_URL: The parameter should be set the site address, which is created in step 2.
· USE_CONSTITUENT_IMAGES: This parameter should be set to “Y”.
To add an image to a constituent's record in CRM360:
1. Open the appropriate constituent in CRM360.
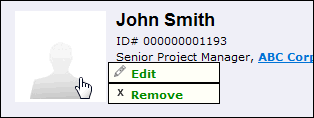
2. Point
to the silhouette image in the top, left corner of the CRM360 header.
The Edit and Remove options display, as shown below.
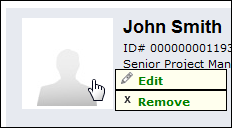
3. Click Edit.
The Open window displays to search for the image, as shown below.
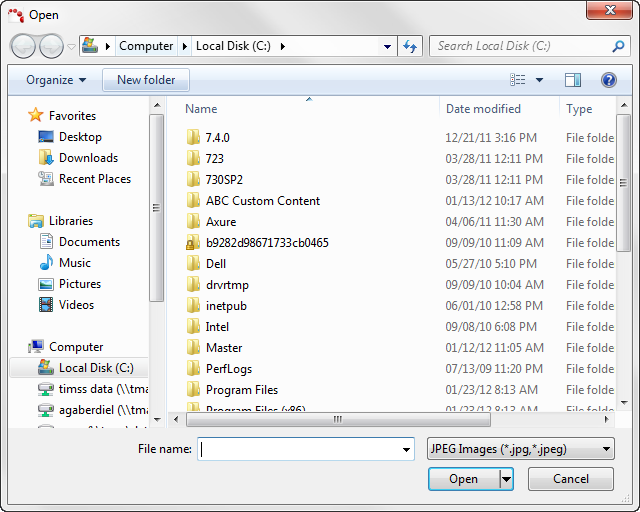
4. Navigate
to the appropriate image and click Open.
The image is added to the constituent's record.
5. Click Save.
To remove an image to a constituent's record in CRM360:
1. Open the appropriate constituent in CRM360.
2. Hover
over the image next to the constituent's name to display the Edit and
Remove options, as shown below.
3. Click
Remove.
A confirmation message displays.
4. Click Yes.
5. Click Save.