FAR700 – GL Transfer Process
Before this process can be run, you must define the
mapping of fields between Personify and your organization's GL application.
For more information, please see Defining
the GL Interface Mapping.
This batch
report generates export data files for GL interface based on the information
entered and fields defined in the Interface Mapping Definition screen.
This process can be used for all third party GL interfaces. Output from
this process includes one or two data files depending on the parameter
or two report files.
When FAR700 runs, it selects all Far_Txn_Detail records
for selected Far_Txn records; it is not intended to be run to split transactions.
Personify identifies that a transaction has been exported
to the GL by setting Far_Txn.GL_TXN_NO to a value greater than zero. When
transactions are selected by FAR700 to be exported to the GL, all transaction
detail records belonging to each selected Far_Txn transaction record are
included in the export file. The GL file export also includes all Far_Txn_Detail
records that are included in the report.
If a user filters on a value in Far_Txn_Detail, such
as account number, the export file includes all Far_Txn_Detail records
with the same FAR_TXN_NO as any selected Far_Txn_Detail record.
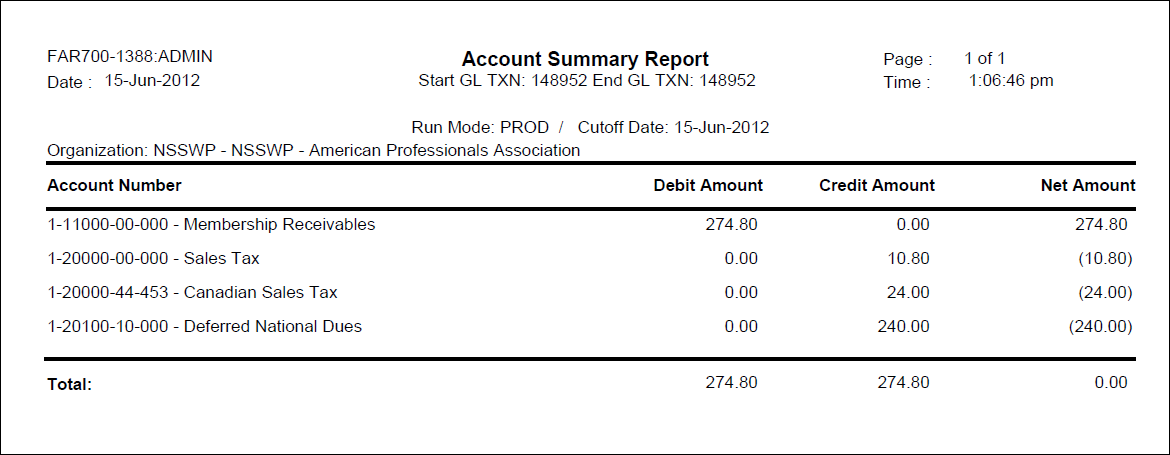
Reconciling Accounting Entries using the Account Summary Report
1. The
GL transfer process will produce an account summary report that contains
the GL accounting entries.
2. This
report will be reviewed for account balances and compared to your general
ledger system through the conversion date.
a. Matching
and reconciling these numbers is the bulk of the baseline reconciliation
process. The general approach to reconciliation will be as follows.
i. Many
times your former system works differently from Personify from a financial
perspective and it may be like “comparing apples to oranges.” The
goal is to get it to be like an “apple to apple” comparison as much as
possible.
ii. When
the numbers don’t match, they will be divided into smaller groupings to
determine if this is limited to a particular group or a pervasive discrepancy.
iii. The
next step is to review the detail and match the transactions one for one
to determine if a pattern is detected. If there is a pattern, sometimes
a script can be written to apply a change across the board.
iv. Sometimes
it will be necessary to make changes to Personify transactions one-by-one.
v. For
certain accounts, it just might be necessary to perform a reasonableness
check on the amount. A journal entry in your general ledger system
to get the amounts in sync might then be necessary.
b. Receivables
i. The
significant issue in the baseline reconciliation is whether there should
be receivable balances and how much they should be. Almost all associations
accept partial payments even if it is an exception rather than a rule.
Being an accrual-based system, the choices in Personify are that
there will be a receivable balance for the remainder of the order amount
or the entire partial payment amount will go into prepaid liability. Therefore,
there will typically be a balance in either the receivable account or
the ppl account.
ii. Some
examples of a discrepancy in the receivable balance are as follows.
· Erroneous
payments in your old system. For many clients, the reason you are
changing systems is that the financial data from your old system was unreliable.
This may require a carefully review of payments from your former
system or a business rule that can be applied to all order lines.
· If
your short pay setup is Reject, orders with partial payments should be
converted with a status of Proforma (it is up to you to pass this status
if you are converting with templates) for them to conform to the business
rules you will be using in Personify. If they are converted as Active,
the remaining balance will be in the receivable account.
c. Prepaid
liability
i. The
section on Accounts Receivable and Prepaid Liability in this workbook
contains information on the reasons for a balance in the PPL account.
ii. Unapplied
receipts are typically used in instances where you do not know what the
payment is for. These types of payments usually wouldn’t be converted.
Therefore, the unapplied receipts account should not have a balance.
d. Deferred
balance
i. The
balance remaining in deferred after running the revenue recognition processes
in Personify should match the remaining balance in the deferred account
in your general ledger.
e. Real
income accounts
i. These
accounts will typically be reviewed for a reasonableness check depending
upon how much history was converted.
3. Run
the GL Transaction Analysis (FAR504), ACCOUNT setup, for the particular
account to be reconciled. This will contain the detail transactions
for that account through the conversion date. The grand total should
match to the account summary report from FAR700.
4. Review
the details of the FAR504 run initially researching some of the order
lines in Personify to determine if you recognize the problem. If
not, compare the details on this report to the report from your general
ledger system.
Parameters
| Parameter |
Description |
Required? |
| Organization |
The Organization ID for which the report will run. |
Read-only |
| Organization Unit |
The Organization Unit ID for which the report will run. |
Read-only |
| Subtitle |
This field is used to enter in a subtitle that appears underneath
the report heading. |
No |
| Run Mode |
Mode in which the report runs:
- EDIT – Performs
record selection, prints report, and generates interface file
but no changes are made in database.
- PROD – Performs
same operations as EDIT mode however; it also updates the
database so that these transactions cannot be processed in
PROD or EDIT mode again.
- REGENERATE – Reproduces
the report and interface file. However, a rage of Starting
GL_TXN_NO and Ending GL_TXN_NO needs to be provided by users.
Purpose of this mode is to regenerate the same data file,
which has been generated previously in PROD Mode.
|
Yes |
| Setup Code |
The abbreviation and numeral definition for the user-defined
report/process setup created on the Interface Definition
Mapping (FAR100) screen. |
Yes |
| Cutoff Date |
This field determines when the batch process will stop selecting
vouchers for transfer. All vouchers prior to the date you enter
are selected for transfer.
 This field
is not necessary in REGENERATE mode. This field
is not necessary in REGENERATE mode.
|
No |
| Start Transaction Number |
This field is used to enter the first accepted AP_TXN_NO for
the original run. The batch process then only selects transactions
with AP_TXN_NOs that fall between this value and the End Transaction
Number value. This field is required if the Run Mode is "REGENERATE". |
No |
| End Transaction Number |
This field is used to enter the last accepted AP_TXN_NO for
the original run. The batch process then only selects transactions
with AP_TXN_NOs that fall between this value and the Start Transaction
Number value. This field is required if the Run Mode is "REGENERATE". |
No |
| Parameter 1,2,3,4,5 |
This space allows you to enter text that you want to appear
in the interface file. |
No |
Exception Report Logic
GL Transfer
is a process in which we are giving the journal entries from Personify
to the external GL system. For some reason in case the transactions in
Personify are not appropriate and does not meet some business/integrity
rules, it is important that Personify exclude such transactions from GL
transfer. These transactions are reported in a report format giving details
about what is wrong with the transaction.
Following are
the possible exceptions:
| Exception |
Description |
| Credits do not match debits |
In one transactions
in case credits do not match debits then this exception is raised. |
| Credits do no match debits for company: <<999999>> |
In case within one
transaction, credits do not match with debits for a company then
this exception is raised. |
| Account Number does not exists in Account Master table |
In case account number in FAR_TXN_DETAIL does not exists in
the FGL_ACCOUNT_MASTER table then this exception is raised. |
Data File Generation Logic
GL transfer data files have data from following 3 tables.
1. FAR_TXN
2. FAR_TXN_DETAIL
3. FGL_ACCOUNT_MASTER
(to bring the name of account)
Basic flow for the process is to deal with the data in these 3 tables
plus some constants provided by users either in the mapping or via process
parameters discussed above.
However, the key is to arrange data in the desired format which can
be in flat simple form or in some cases Master Detail form with a grouping
i.e. by BATCH, TXN_DATE or Just by BATCH etc. The approach taken in the
process is that it will always fetch data from these three tables via
a view called FAR_GL_INTERFACE_VW.
This view will return Data from FAR_TXN and FAR_TXN_DETAIL tables joined
on FAR_TXN_NO. The
process will form an order by clause based on the Group Order specified
for each column in the mapping. Thus fetching all the rows in the desired
order.
The process then will loop through these rows one by one maintain the
unique account and amount array. Thus,
at the end of each grouping, the process will have one master row and
multiple rows for unique accounts with the amount.
If there is no grouping mentioned it is going to print the accounts
for Each FAR_TXN_NO level as this is the lowest grouping available for
the accounts.
Select
FT. *,
FTD.FAR_TXN_NO
FTD.ORG_ID
FTD.ACCOUNT
FTD.TXN_FUNCTION_CODE
FTD.ORDER_NO
FTD.ORDER_LINE_NO
FTD.COMPANY_NUMBER
FTD.BASE_AMOUNT AS
Base_Amount
Case when FTD.base_amount < 0 then
FTD.base_amount else 0 end as CR_BASE_AMOUNT,
Case when FTD.base_amount > 0 then
FTD.base_amount else 0 end as DR_BASE_AMOUNT,
ACCT.Dscription
FROM
FAR_TXN FT, FAR_TXN_DETAIL FTD, FGL_ACCOUNT_MASTER ACCT
Where ft.far_txn_no = ftd.far_txn_no
And ftd.account
= acct.account
and Exclude
all records which are in exception
The process will add additional “Where” clause, as mentioned below.
Processing Logic
This process performs general validations to make sure all the parameters
are proper (per definition in parameter section).
The process will check to see if there is an entry for the SETUP CODE
given as parameter. If not, the process will report an error.
Select * from
FAR_INTERFACE_MAP_MASTER
WHERE SETUP_CODE = Parameter value and
Valid_flag = ‘Y’
Prepare
Main Cursor
1. Prepare
Order by Clause:
2. Select
All DB columns from flg_map_interface_detail
table order by grouping order.
3. Make
a real order by string using these columns separated by commas.
4. If
a DB column is supposed to be fetched using SUBstring include this column
with substr or substring clause. Make sure this column is also included
as is in the select list of columns.
5. Continue
with Main Cursor preparation and add the where clause, as mentioned below:
Select * from FAR_GL_INTERFACE_VW
Where
Posted_flag <> Null And TXN_DATE < = Cutoff
Date
6. And
any additional Filter given in Parameter. Plus add following where clause
as per the mode:
· EDIT
Mode: AND GL_TXN_NO
IS NULL
· REGENERATE
Mode: AND GL_TXN_NO
Between Start GL_TXN_NO and End GL_TXN_NO
7. Order
by the column list prepared in above step.
8. See
if one data file or two Data files are required.
9. Select
MASTER_DETAIL_FILE_CODE from FAR_INTERFACE_MAP_MASTER for the setupcode.
10. If
single, create one data file from the data of main cursor.
11. If
multiple, create two data file splitting the records for MASTER and DETAIL
based on the RECORD_TYPE value.
12. Open
Main Cursor (Recordset).
13. Hold
the values of All columns used in ORDER by Clause – This becomes the Unique Group.
14. Loop
until Any of the value changes (I.e. the grouping changes).
UNIQUE
Group Loop
1. Read
the Data Fields information for master record from MAP_DETAIL Table.
2. Prepare
an Array of Account and specified amount (i.e. Base Amount or CR/DR base
Amount).
This array will hold sum of Amount for each account with in the group.
3. IF
Mode is PROD Generate GL_TXN_NO -
Once per Unique Group Only.
 Though
an update is shown here, make sure record gets updated through recordset
at the very end of processing and rolls back if there is an error.
Though
an update is shown here, make sure record gets updated through recordset
at the very end of processing and rolls back if there is an error.
4. Prepare
one Record for the Master
using Data + constants + Fixed value.
5. Write
a record in Master file
6. Prepare
multiple record using the Account array for DETAIL.
7. Write
the detail records.
8. Set
GL_TXN_NO of All of the above transaction = (The Next no generated above
from sequence) (All transactions
of the previous grouping) Continue until the end of main Cursor.
9. Format
the master record and detail record based on the mapping.
For example, if FAR_INTERFACE_MAP_DETAIL.FIELD_TYPE_CODE = DBFIELD then
read the value from the voucher recordset, and create recordset for file
master or detail record. Else if FAR_INTERFACE_MAP_DETAIL.FIELD_TYPE_CODE
= FIXED then read FAR_INTERFACE_MAP_DETAIL.FIXED_VALUE and put the value
as it is in the master or detail recordset. Else read FAR_INTERFACE_MAP_DETAIL.PARAMETER_CODE
then read FAR_INTERFACE_MAP_DETAIL.PARAMETER_NAME and put the value as
it is in the master or detail recordset.
10. Feed
the same data to Reports passing GL_TXN_NO if it is in PROD mode.
Sample Report