 Defining the interface
is only performed once.
Defining the interface
is only performed once.
Personify interfaces with the general ledger (GL) and the accounts payable (AP) systems and maps customer and vendor information to the Personify database. To define the interface, you must have knowledge of the fields and how they are used in your GL and AP systems.
Defining the interface
is only performed once.
The process of interfacing to your third-party vendor involves mapping information using this screen and then submitting the process job that creates the physical file to be used by your third-party vendor. Run the FAR700 batch process to generate export data files for GL interfaces based on the information entered on the GL Interface Mapping screen.
Using this screen, you can define the structure of the file that the GL is expecting. You identify the format and fields of the GL and accounts payable files that are created by each interface program.
To set up a new GL interface definition:
1. On the GL Accounts Maintenance screen, click GL Interface Definition from the GL Maintenance task category.
2. Click
Create New.
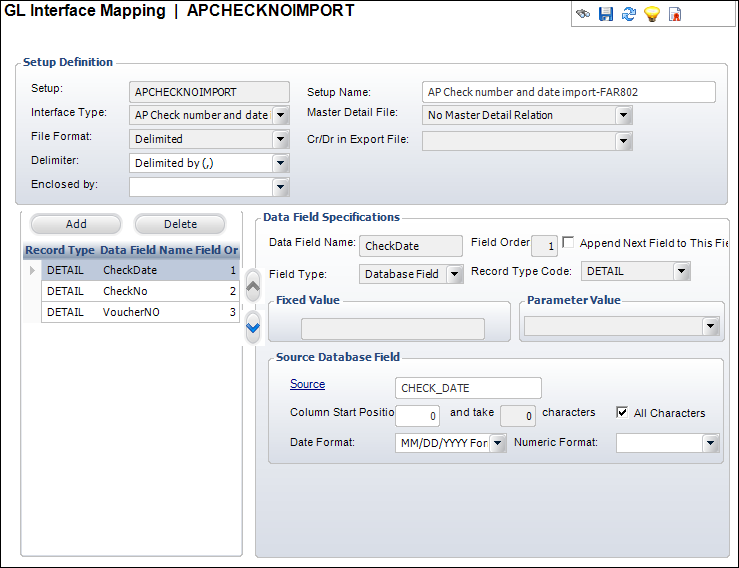
The GL Interface Mapping screen displays, as shown below.
3. Enter a Setup code.
4. Enter a Setup Name.
5. Select the Interface Type from the drop-down.
6. Select the File Format from the drop-down. If you select “Delimited” as the value, perform the following:
a. Select the Delimiter from the drop-down.
b. Select the Enclosed By punctuation mark.
7. If necessary, perform the following:
a. Select the Master Detail File from the drop-down.
b. Select the Cr/Dr in Export File from the drop-down.
c. Select whether or not you want to create two records for each voucher in export file.
8. Click
Add.
The Data Field Specifications fields are enabled.
9. Enter the Data Field Name.
10. Select the Field Type from the drop-down.
11. Select the Record Type Code from the drop-down.
12. If necessary, check the Append Next Field to This Field checkbox.
13. If you selected “Fixed Value” as the Field Type, enter the Fixed Value.
14. If you selected “Parameter” as the Field Type, select the Parameter Value from the drop-down.
15. If you selected “Database Field” as the Field Type, perform the following in the Source Database Field section:
a. Click
the Source link.
The Generic Chooser displays to select a column name from the FAR_GL_INTERFACE_VW
as the source.
b. Enter the Column Start Position and number of characters.
c. Select the Date Format from the drop-down.
d. Select the Numeric Format from the drop-down.
e. If necessary, check the All Characters checkbox.
16. In the Fixed File Format Specifications section, perform the following:
a. Enter the Fixed Start Position and Fixed End Position.
b. Select the Fixed Format Alignment from the drop-down.
17. Click Validate Setup in the Interface Setup task category.
18. Click Save.
| Screen Element | Description |
|---|---|
Setup Definition |
|
| Setup | Text box. A unique, user-defined setup code that serves as the parameter used in batch processes and upload processes. |
| Setup Name | Text box. The user-defined description name of the setup. |
| Interface Type | Drop-down. The type of interface. Values are populated based
on the fixed FAR "INTERFACE_TYPE" system type. The codes
include:
|
| File Format | Drop-down. The format of the file that needs to be imported/exported. Values are populated based on the fixed FAR "FILE_FORMAT" system type. The codes include FIXED, DELIMITED, or XML. |
| Delimiter | Drop-down. A delimiter is an indicator of the beginning or end of a string statement or numerical value. For example, Comma, Tab, or Tilda. This field is only enabled if “Delimited” is selected as the File Format. |
| Enclosed by | Drop-down. This indicates that the string statement or numerical value is enclosed by a delimiter. This field is only enabled if “Delimited” is selected as the File Format. |
| Master Detail File | Drop-down. The format the GL package is expecting. For example, Separate Files for Master and Detail Records, No Master Detail Relation, or One File for Master and Detail Records. This field is only enabled if “AP Voucher Export” or “General Ledger” is selected as the Interface Type. |
| Cr/Dr in Export File | Drop down. How the Detail records in the data file will show
the Debit and Credit amount for account transactions. This
does not affect the Master record, which will always show the
actual total for debits and credits separately. Values include:
|
| Create two records for each voucher in export file | Checkbox. When checked, indicates that the system will upload both sides of an AP voucher entry. The sides typically are AP clearing (debit) and AP (credit). This field is only enabled if “AP Voucher Export” is selected as the Interface Type. |
| Add | Button. When clicked, a row is added to the table and the corresponding fields are enabled to add data field specifications. |
| Delete | Button. When clicked, the highlighted row from the table is deleted. |
Data Field Specifications |
|
| Data Field Name | Text box. The unique, user-defined name of the data field. If the file format is XML, this would be used as a tag for the XML file. |
| Field Type | Drop-down. The data field type. Values populate based on the
fixed FAR "INTERFACE_FIELD_TYPE" system type. The codes
include:
|
| Field Order | Text box. The order in which this field exists in the input/output file. This number is a system-generated sequence starting from 1 and incrementing by 1 and cannot be changed. |
| Append Next Field to This Field | Checkbox. When checked, indicates the data field is appended to the previous field without adding a delimiter. This allows the user to link the fields. |
| Record Type Code | Drop-down. The type of record for the Data Field. For example, Master, Detail, or Footer. |
| Fixed Value | Text box. The value from the data file. The field is only enabled if the Field Type is “FIXED.” |
| Parameter Value | Drop-down. The value for this field can be PARAMETER1 to PARAMETER5. This is provided so users can pass different values through the TRS process without changing the setup. The field is only enabled if the Field Type is “PARAMETER.” |
Source Database Field *This section is only enabled when the Field Type is "Database Field". |
|
| Source | Link. The name of the database field from which the field name gets its values. Select the column name (database field) as it pertains to the view represented. |
| Column Start Position and take characters | Text boxes. The exact position where the file inserts the column and the number of characters beginning from this start position. This is used when the value of a database column needs to be taken selectively. |
| Date Format | Drop-down. The format in which the date will display. |
| All Characters | Checkbox. When checked, indicates from the start position that all characters need to go in the file starting with the DbStartPosition. |
| Numeric Format | Drop-down. When the content of the source database field references a number (receipt number, voucher number, or invoice number), Personify defines the format of this field in terms of a decimal or account number. |
Interface Setup |
|
| Validate Setup | Task. From the Interface Setup task category, this task is
responsible for updating the FAR_MAP_MASTER.VALID_FLAG. When a
new setup is created, it has VALID_FLAG = ‘N’. A red X displays
to the left of this task if the interface mapping has not been
validated. When clicked, basic validations are performed in order
to make sure that necessary information to run interface process
is specified in the mapping. For example, in case of Check import,
if there is no mapping for check number/check date and voucher
number it cannot be a valid setup.
This task performs the following checks: Common Checks (Applies to all the interfaces):
APVOUCHER
APVEN
APCHECK
APVENUPDATE
|