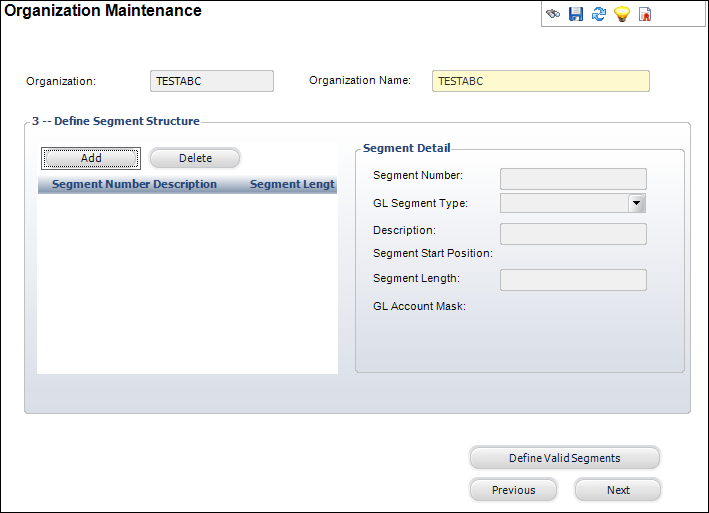
The Define Segment Structure screen displays, as shown below.

To define segment structure:
1. Select System Admin > Organization Structure > Create New Organization from the toolbar.
2. Search for and select the appropriate organization or create a new organization.
3. Click
Next.
The Defining Organization Units screen displays.
4. Click
Next.
The Define Segment Structure screen displays, as shown below.

5. Click
Add.
The Segment Detail fields are enabled and a new row displays.
 Segment
Number will pre-populate, so there is no need to enter it.
6. Select the GL Segment Type from the drop-down.
7. Enter a Description of the segment.
8. Enter the Segment Length.
 Each
time you click Add, you will note the GL Account Mask field provides you
with a visual example of your account code structure.
9. Repeat steps 2-5 until each of your GL segments have been defined.
10. Click Save.
Screen Element |
Description |
|---|---|
Add |
Button. Click to add a segment structure to the organization. |
Delete |
Button. Click to delete the highlighted segment structure from the organization. |
Segment Number |
Text box. A system-generated number associated with the segment structure. |
GL Segment Type |
Drop-down. The category of the segment. For example, Company, Department, Project, or Natural Account. |
Description |
Text box. The description of the segment structure. |
Segment Start Position |
Read-only. The start position of the segment. It automatically calculates based on the length and the separator. |
Segment Length |
Text box. The length of the segment. The minimum value is one and the maximum value is 999. The sum of the length of all the segments plus the separators cannot exceed the GL Account Length. |
GL Account Mask |
Read-only. Provides a visual example of your account code structure. |
Define Valid Segments |
Button. When clicked, the GL Account Segments Maintenance screen displays to add values to the segment structure. See the Maintaining GL Account Segments section below for more information. |