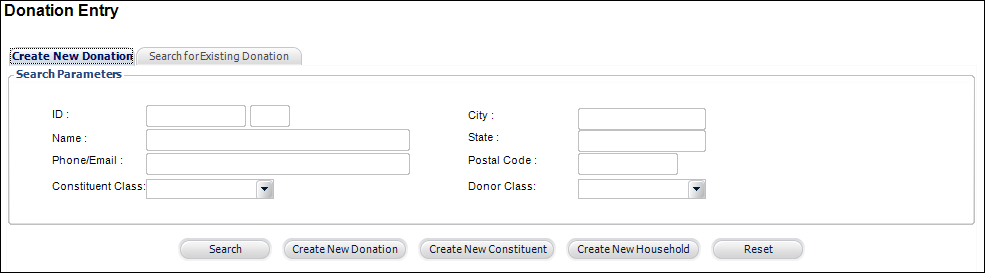
The Donation Entry search screen displays, as shown below.
Using the Donation Entry screen (shown below), you can enter more than one gift and add additional information about the gift. Depending on the type of gift added, new related tabs display.
Depending on the type of gift, you may need to add the following information:
· Additional Donation Information
· Premiums
To access this screen, perform one of the following:
· Select Take Donations > Flexible Donation Entry from the toolbar.
· On the Fundraising Launch screen, click Create a Flexible Gift from the Gift Giving task category.
· On the Fundraising Launch screen, click New Flexible Gift from the Quick Create task category.
To create a flexible gift entry:
1. From
the Personify main toolbar, select Take Donations > Flexible Donation
Entry.
The Donation Entry search screen displays, as shown below.
2. Search
for the appropriate constituent and click Create
New Donation. Alternatively, if you do not find the constituent
you are looking for, click Create New
Constituent. Additionally, as of 7.4.2, if the USE_HOUSEHOLDING
application parameter is set to "Y", click Create New Household
to create a new household for which to create a donation.
The Donation Entry screen displays, as shown below.
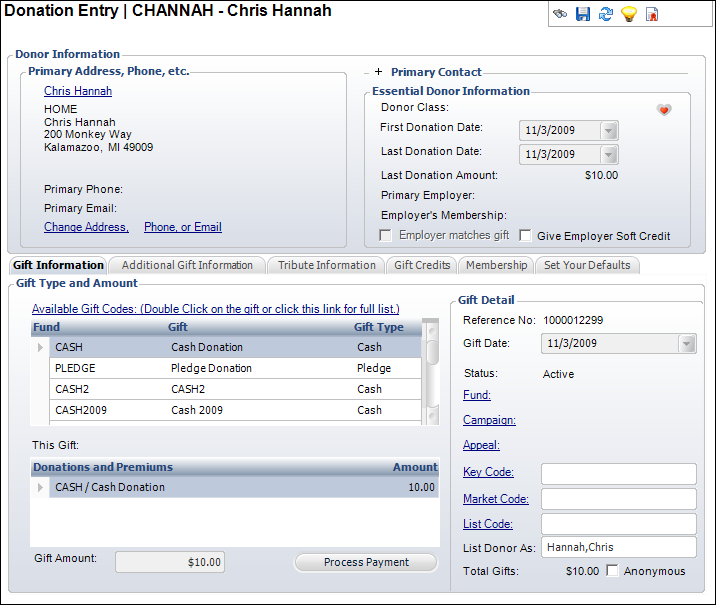
3. If
necessary, check the Give Employer Soft Credit checkbox.
Soft credits can be given to the employer linked to the donor for Cash
and Pledge fundraising products. All other fundraising products (including
credits entered manually) are considered soft credits.
4. On
the Gift Information tab, double-click the default donation type in the
table or click the Available Gift Codes link to select from a list
of all donation types.
Depending on the type selected, different tabs display.
 If
you add a gift in error, you can right-click the line item and select
Delete.
If
you add a gift in error, you can right-click the line item and select
Delete.
5. The
Gift Amount
automatically populates based on the selected Gift Code. If
necessary, change this.
The gift amount must be greater than zero.
If
the selected gift is a FND "CASH" product with an agency discount,
the Amount field is read-only and will be updated when payment is applied.
6. If
necessary, change the Status.
The Status cannot be changed for “Cash” Gift Types. By default, cash gifts
are created as Proforma.
7. If
necessary, select the Fund/Campaign/Appeal for which
the gift was made.
Please note that if the selected appeal has defined premiums, the Premiums
tab will display. Please see Adding
a Premium to a Donation for more information.
8. If necessary, select the Key Code, Market Code, or List Code related to the gift.
9. Enter the List Donor As name, which is how the donor’s name will appear in a list of donors.
10. Select
whether the donor wishes to remain Anonymous.
When checked, the List Donor As field automatically populates with “Anonymous.”
11. Click
Process Payment.
If a batch is not already opened, the system prompts you to open a batch.
As
of 7.4.0SP1, if your donation contains more than one cash product, the
Receipt Entry screen will display when you click Process
Payment, as shown below. This screen will also open from Order
Entry.
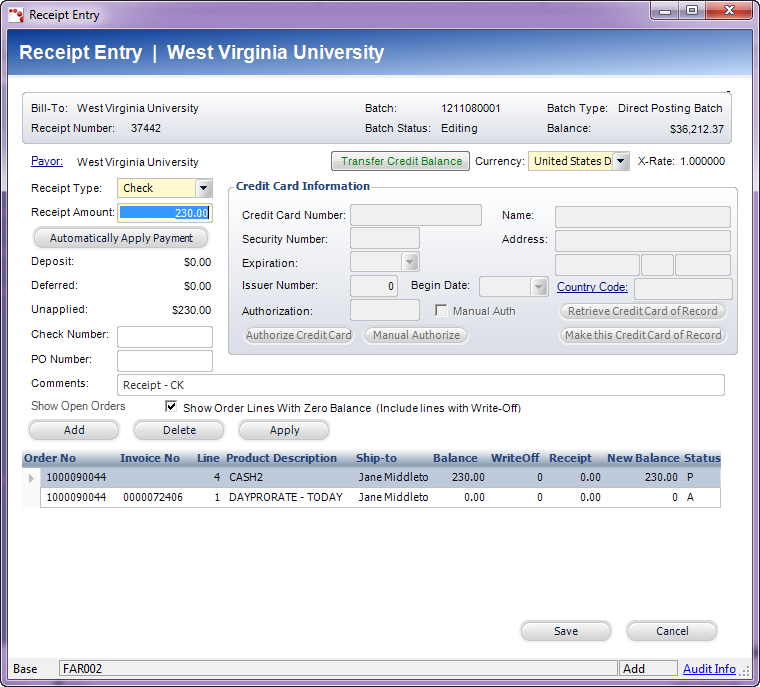
By default, the Show Order Lines With
Zero Balance checkbox is selected. Click Automatically
Apply Payment to distribute the payment to all fundraising products
in the order in order by line number. For cash product order lines, an
amount equal to the base total amount of the order line will be updated
to the Receipt column. If there is money remaining after all of the fundraising
order lines have had a receipt amount allocated to the order line, the
remaining payment amount will be applied to the first cash fundraising
order line. If there is not enough money to distribute the full amount
of the order line base total amount for each cash fundraising product
order line, the system will distribute the full amount, if possible, to
the first cash fundraising product order line, then as much as possible
to each remaining cash product order line up to the base total amount
of each order line. If one, some, or all fundraising cash product order
lines have a price of $0, the system will distribute the payment to each
fundraising cash product order line that has a base total amount >
$0, and then the remaining payment will be applied to the first fundraising
cash product order line where the price = $0.
The Quick Pay screen displays, as shown below.
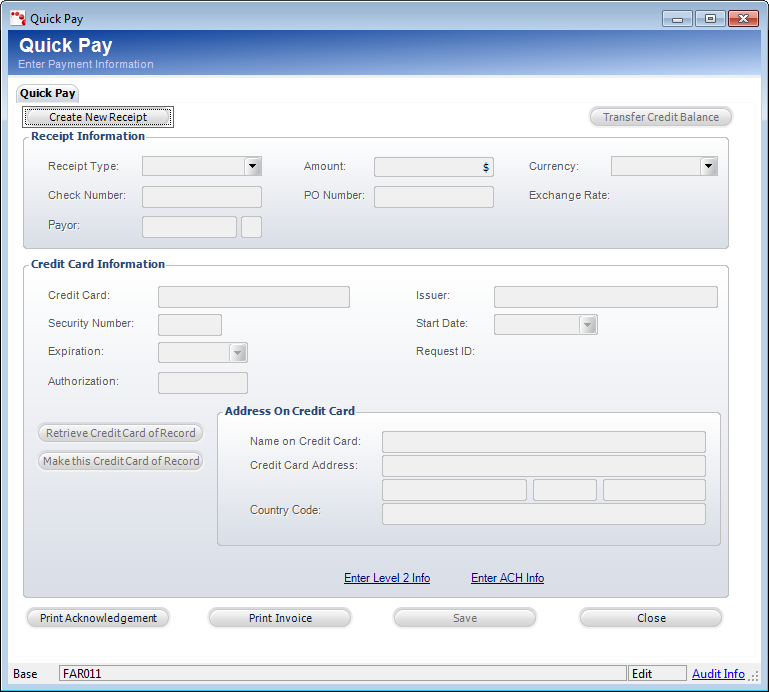
12. Perform the following:
a. Click Create New Receipt.
![]() If applicable,
click Transfer Credit Balance to view any unapplied receipts or
credit balances for the bill-to customer and apply the amount(s) available
to the order. Only posted receipts will display.
If applicable,
click Transfer Credit Balance to view any unapplied receipts or
credit balances for the bill-to customer and apply the amount(s) available
to the order. Only posted receipts will display.
b. From the Receipt Information section, enter the appropriate information:
i. Select
the Receipt Type from the drop-down menu.
The Receipt Type is a non-fixed code.
ii. Verify the Amount is correct.
iii. Change the Currency, if necessary.
iv. If you selected “Check”, enter the Check Number.
v. If you selected “Check” or “Cash”, enter the PO Number.
vi. Enter
the Payor or click the link and search for a payor.
The payor is the individual, customer, company, or committee who pays for
the order, who may not necessarily be the customer.
vii. Enter any Comments as necessary.
c. From the Credit Card Information section, enter payment information if a credit card was selected as the Receipt Type:
i. Verify that the appropriate credit card is selected as the Receipt Type in the Receipt Information section above.
![]() Alternatively,
if credit card information is on file for the customer, click Retrieve
Credit Card of Record to automatically populated the appropriate information.
Alternatively,
if credit card information is on file for the customer, click Retrieve
Credit Card of Record to automatically populated the appropriate information.
ii. Enter the Credit Card number.
iii. Enter the Issuer.
iv. Enter the Security Number. This number is typically three digits and is located on the back of the credit card.
v. Select the Start Date and Expiration date from the drop-down menus.
vi. Enter the Authorization number.
vii. Verify the Address on Credit Card is correct. If not, then modify it.
d. Click Save.
13. Click Save.