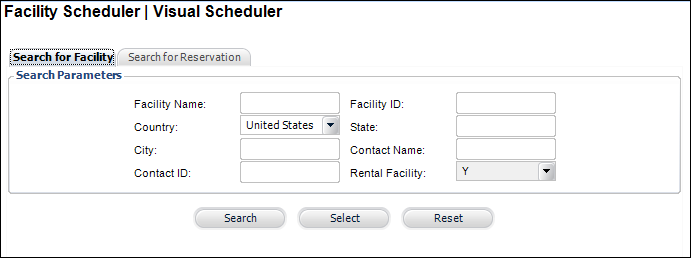
The Visual Scheduler search screen displays, as shown below.

Room reservations are put on hold for a number of reasons. The primary use for this functionality is to block off a specific time period for a client that is not one hundred percent committed to placing a room rental order. This is done so that the time period is not blocked off afterwards by another internal room reservation or room rental order.
To place a room reservation on hold:
1. From
the menu bar, select Facilities >
Visual Scheduler.
The Visual Scheduler search screen displays, as shown below.

2. Search
for and select a facility.
The Facility - [Company Name] screen
displays.
3. Double-click
on a time period on the calendar.
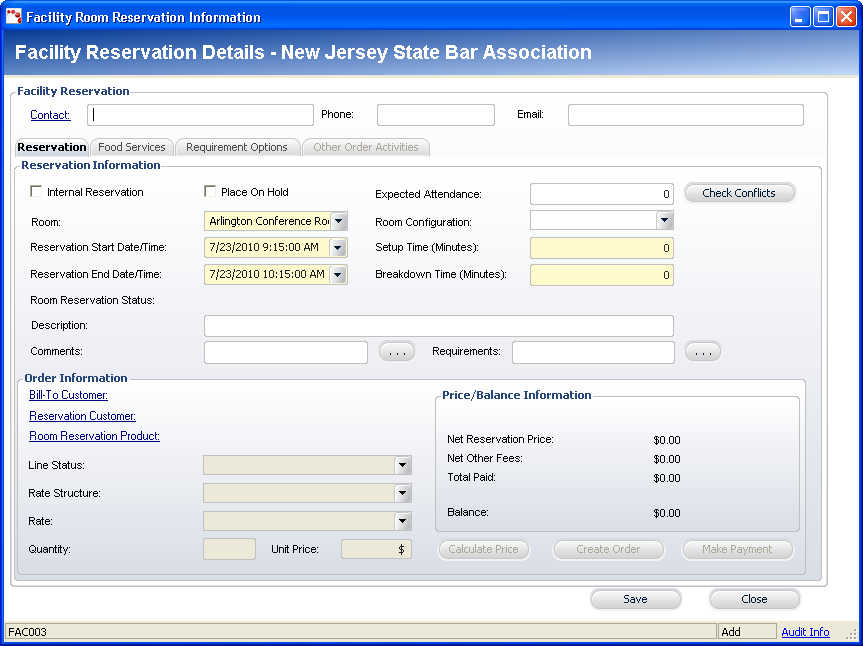
The Facility Room Reservation Information screen displays, as shown below.

4. From
the Reservation Information tab, check the Place
On Hold checkbox.
The Room Reservation Status changes
to “On Hold”.
5. Select
the Room from the drop-down.
These are the rooms currently available for use within the facility you
selected in the previous search screen. The rooms available here can be
configured in Facility Maintenance.
6. Select
the Reservation Start Date/Time
from the drop-down.
The Reservation Start Date/Time is the specific time for which you want
to start the room reservation. Any changes made here will reflect back
on the Visual Scheduler screen.
7. Select
the Reservation End Date/Time
from the drop-down.
The Reservation End Date/Time is the specific time for which you want to
end the room reservation. Any changes made here will reflect back on the
Visual Scheduler screen.
8. If
necessary, enter in the Expected Attendance.
The Expected Attendance is the number of people you believe will be using
the room for the specified room reservation. This field is mainly used
for statistics information.
9. If
necessary, select the Room Configuration from
the drop-down.
The Room Configuration drop-down will list any available setups for the
selected room. Examples of this include “Conference Room”, “Classroom”,
“Roundtable”, etc. The Room Configuration generally refers to how tables,
chairs, and other equipment are setup within the room. You can manage
the available room configurations using Facility Maintenance.
10. Enter
in the Setup Time.
Setup time refers to the amount of time (in minutes) it will take an individual
to configure the room before it is used for the reservation. Some reservations
might require this if a lot of things need to be moved around before the
reservation begins. You can set this field to “0” if no setup time is
needed. Any additional time entered here will extend the reservation block
display on the Visual Scheduler screen.
11. Enter
in the Breakdown Time.
Breakdown time refers to the amount of time (in minutes) it will take an
individual to restore the room to its original state before it was used
for the reservation. You can set this field to “0” if no breakdown time
is needed. Any additional time entered here will extend the reservation
block display on the Visual Scheduler screen.
12. If
necessary, enter in a Description.
This is a basic description of the room reservation. This is commonly used
to include a general header or reservation title. For example, if the
room reservation is being used for an important divisional meeting, you
could specify “Monthly Divisional Meeting”. The description entered here
will display in the room reservation block on the Visual Scheduler screen.
13. If
necessary, enter in any Comments or
click the ... button to open the
Comments screen to enter additional comments.
This field is used to store any important notes or comments that may need
to be remembered or associated with this room reservation. For example,
if you are scheduling the room reservation for a yoga class, you could
add “also meets on Tuesdays and Thursdays”.
14. If
necessary, enter in any Requirements
or click the ... button to open
the Requirements screen to enter additional requirements.
Requirements specified here are generally used as “heads-up” notes or reminders
to include specific items with the room reservation, such as food or a
projector.
15. If
necessary, click Check Conflicts
to verify that the internal room reservation does not coincide with any
other scheduled meetings.
Clicking this will refer back to the Visual Scheduler screen (checks the
database) to make sure that there are no other room reservations or room
rentals scheduled alongside the room reservation you are currently entering.
16. Review
your entered information and click Save.
The room reservation will display on the Visual Scheduler with the status
of “On Hold”.