You can change the address of the customer using this screen. Additionally, you can also view the address history, mark an address as “bad,” select a primary address from a list of addresses, delete an address, and create a new address.
When Personify displays a single address associated with a customer (assuming no other considerations apply, such as for directory use or for billing or shipping purposes), the address displayed is the primary address. If a customer has only one address, then that address is considered the primary address by default. If a customer has more than one address, then the addresses are ranked in order using to the Priority Sequence field. The address with the lowest Priority Sequence number is used as the primary address.
Every order in Personify requires a Bill-To address and a Ship-To address. Each customer must have one address designated as the Bill-To address and one address designated as the Ship-To address. These addresses are used as the default addresses when an order is created for the customer.
· If the customer has only one address, then this address will be, by default, both the Bill-To and the Ship-To address.
· If the customer has more than one address, then the Bill-To address may be the same address as the Ship-To Address, or they may be different addresses from each other.
When an order is created for a customer, the Bill-To address for the customer is used as the Bill-To address for the order, and likewise for the Ship-To address. At any time, whether when creating the order or some later point, the Bill-To and Ship-To addresses for the order may be changed to any other address, even to an address for a different customer.
![]() If
you update or delete the Job Title on the primary address, the
system will ask if you want to update or delete the primary job title
of the customer. If you select “Yes”, the Primary Job Title on
the Demographics tab will be updated.
If
you update or delete the Job Title on the primary address, the
system will ask if you want to update or delete the primary job title
of the customer. If you select “Yes”, the Primary Job Title on
the Demographics tab will be updated.
Access the Address Chooser (shown below) from one of the following ways:
· On the Customer Central screen, select the Common Tasks task category and click Change my Address.
· From the Customer Details tab in Customer Central, click Change Address.
· On the Call Center screen, select the Demographics task category and click Change my Address.
· On the Subgroup Central screen, select the Subgroups as Customers task category and click Change subgroup address.
· From
the Subgroup Information tab in Subgroup Central screen, click Change
the Address.
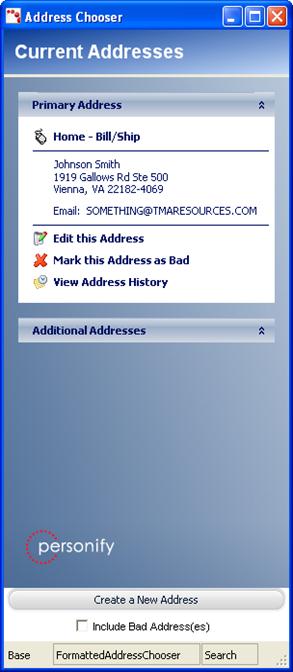
From the Address Chooser screen (shown above), perform any of the following tasks:
· Edit this Address – Displays the Additional Address screen to edit the selected address. See Adding Additional Addresses for more information about this screen. When finished, click Save and Close. You cannot link an existing address to another address. You can only link a new address to another address.
![]() If
you edit an address, make sure to validate the new address by clicking
Validate Address. See Validating
a Customer Address for more information.
If
you edit an address, make sure to validate the new address by clicking
Validate Address. See Validating
a Customer Address for more information.
· Mark this Address as Bad – Click to mark the current address as bad. For example, you would mark an address as bad if the address is returned as undeliverable. This address will remain associated with the customer via address history, but other users will know to not use this address.
![]() If
you update a bad address and save it, the address automatically updates
to a “good” status.
If
you update a bad address and save it, the address automatically updates
to a “good” status.
· Mark Bad & Add New – (only available for subgroups) Click to mark the current address as bad and open the Customer Chooser screen to select a customer who will be selected as the Primary Contact for the subgroup, thus linking the customer's address to the subgroup.
· Make this the Primary Address – Click to make the above address the primary address. As of the 7.2.3 release, if current or unfulfilled orders refer to the previous primary address, then the Primary Address Propagation screen displays. Please see the Propagating the Primary Address to Orders section for more information.
![]() This
option is not available for One-Time addresses.
This
option is not available for One-Time addresses.
· Delete this Address – Click to delete the address.
· View Address History – Click to view the history of addresses for the customer. See Viewing Address History for more information.
· Create a New Address – Click to create a new address for the customer. See Adding Additional Addresses for more information.
· Include Bad Addresses – Select this checkbox to view the bad addresses as well as the good addresses.
![]() If
you want to copy the address to another document, right-click the address
and select Copy.
If
you want to copy the address to another document, right-click the address
and select Copy.