Adding a Constituent's Primary Family Contact in CRM360®
As of 7.4.0SP1, organizations
that deal with families are now able to designate one person in the family
as the primary contact for the family. Your organization may refer
to that person sometimes as “primary family member”, “head of household”,
“family billing contact”, and etc.
Personify
currently has a FAMILY relationship type. Rather than forcing you to use
a specific term to identify the family’s head of household, you are now
able to flag FAMILY relationship code(s) that qualify as a primary family
contact. For
example, SPOUSE and PARENT are examples of family relationship codes that
would qualify to be designated as primary family member. Each family
member can only have one primary family contact.
In order to refer to the primary
family contact using terminology already used by your organization, a
new CUS application parameter will need to be created called “PRIMARY_FAMILY_CONTACT_DESIGNATION”.
The Parameter Value entered will be displayed on the link at the
bottom of the Relationships screen to open the Family Relationships screen.
On the Family Relationships screen, field titles and column headings will
change to display this text. For the purposes of this documentation, we
will refer to this designation as "primary family contact".
To manage
family relationships:
1. From the Relationships task category
in CRM360, click Primary
Family Contact.
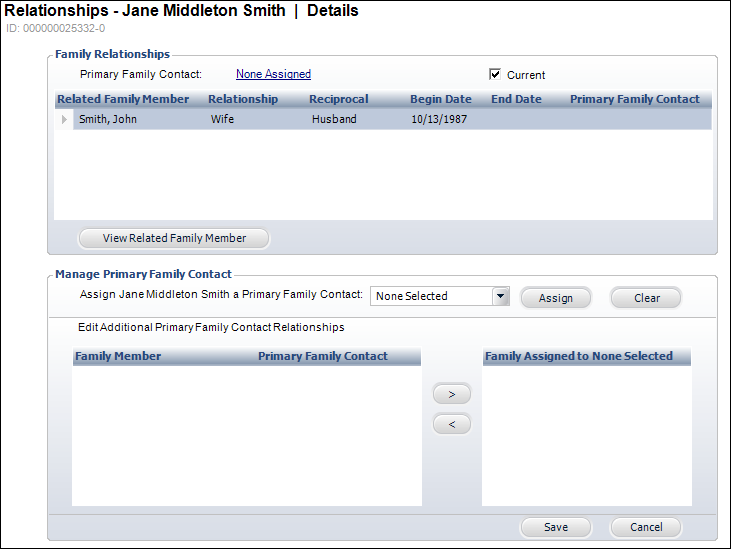
The Relationships screen opens in a new tab, as shown below.

The Family Relationships grid
at the top of the screen lists all "Family" relationships for
the customer you are viewing. Initially, the Primary Family
Contactlink
will say "None Assigned". After the Primary
Family Contact is selected in the Manage Primary
Family Contact section, his/her name will display in this link.
The Assign [Constituent’s
Name] a Primary Family Contact drop-down
will initially display "None Selected". Select the drop-down
to view the family members displayed in the grid at the top of the screen.
Depending on the customer you select, the appropriate family member related
to that customer will display in the Family Members grid below.
2. If
necessary, uncheck the Current checkbox to view family relationships that
have ended, as shown below.

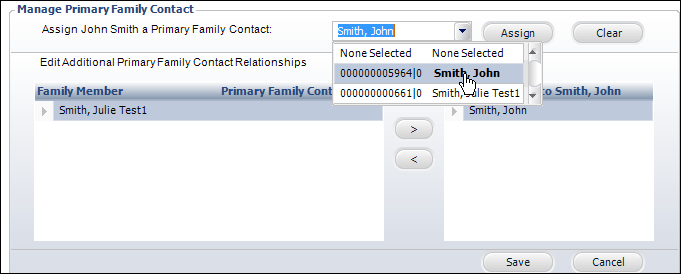
To
assign the customer you are viewing as his/her own Primary
Family Contact, perform the steps listed below. For example, if you
are viewing John Smith's record and you want to assign John Smith as the
Primary Family Contact of
himself.
a. Select
the customer you are viewing from the Assign [Constituent’s
Name] a Primary Family Contact
drop-down,
as shown below.

b. Click Assign.
c. Click Save.
The
Primary Family Contact link
changes to the name of the customer you are viewing. Additionally, the
Primary Family Contact link
in the Essential Information
section on the Customer Details tab changes to the name of the customer
you are viewing. To
assign the customer you are viewing as the Primary
Family Contact for one of his/her family members, perform the
steps listed below. For example, if you are viewing John Smith's record
and you want to assign him as the Primary Family Contact for his wife,
father, son, and etc.
3. Select
the customer you are viewing from the Assign [Constituent’s
Name]
a Primary Family Contact drop-down.
His/her family members display in the grid below.
a. Select
the appropriate family member(s) and click the right arrow (>)
to add the selected family member to the Family
Assign to [Constituent’s
Name] grid to the right.
b. Click Save.
c. Select
the family member from Related
Family Member and click View
Related Family Member to open that customer in CRM360.

 Notice that
the Primary Family Contact
link in the Essential Information section on the Customer
Details tab changes to the name of the customer in which you assign
as the Primary Family Contact.
4. To
assign a Primary Family Contact
to the customer in whom you are viewing, perform the steps listed
below. For example, if you are viewing Cynthia Smith and you want to assign
her husband, John Smith, as her Primary
Family Contact.
a. Select the customer you are assigning as
the Primary Family Contact
from the Assign [Constituent’s
Name]
a Primary Family Contact drop-down.
b. Click
Assign.
c. Click
Save.
d. Select the family member from Related Family Member and
click View Related Family Member
to open that customer in CRM360.
 Notice that
the Primary Family Contact
link in the Essential Information section on the Customer
Details tab changes to the name of the customer in which you assign
as the Primary Family Contact.


 Notice that
the Primary Family Contact
link in the Essential Information section on the Customer
Details tab changes to the name of the customer in which you assign
as the Primary Family Contact.