Integrating SSO and IMS with Personify e-Business
1. Update
the connection string in Web.config
file of e-Business site with the SSO database credentials:
<add name="IMSConnectionString"
connectionString="Server=[DBServer];Database=[SSO_DBName];uid=[UserID];pwd=[Password];"
providerName="System.Data.SqlClient" />
2. Update
the following lines to the web.config file:
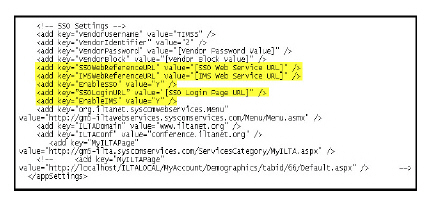
<add key="VendorUsername"
value="TIMSS" />
<add key="VendorIdentifier" value="7" />
<add key="VendorPassword" value="Enter Vendor Password"
/>
<add key="VendorBlock" value="Enter Vendor Block"
/>
<add key="SSOWebReferenceURL" value=" SSO Web Service
URL " />
<add key="IMSWebReferenceURL" value=" IMS Web Service
URL " />
<add key ="LoginMode" value="INLINE"/>
<add key="SSOLoginURL" value="http://[WebServerName]/[SSOSiteName]/login.aspx"
/>
<add key="SSO_BASE_URL" value="http://[WebServerName]/[SSOSiteName]"
/>
· Replace
[WebServerName] with the web server computer name where SSO web site is
installed.
· Replace
[SSOSiteName] with the virtual directory name where SSO web site is installed.
· Replace [IMSSiteName] with the virtual
directory name where IMS web service is installed.
 If
your association currently runs on IIS 7, you must also go to the bottom
of the web.config XML file and add the following line of code to the <httpModules>
section:
If
your association currently runs on IIS 7, you must also go to the bottom
of the web.config XML file and add the following line of code to the <httpModules>
section:
<add name="SSOLoginManager"
type="SSOAuthentication, Personify.SSOAuthentication" preCondition="managedHandler"
/>