 To
force SSO integration between vendor sites, you need to include the SSO
Force parameter (SSO Force = Y) query sting in the vendor site URL.
To
force SSO integration between vendor sites, you need to include the SSO
Force parameter (SSO Force = Y) query sting in the vendor site URL.
The SSO web service dlls and required files are located under the SSO web application. These Web services will follow the web.config settings from the SSO web application. The service.asmx is the main page that should be provided in the URL.
The SSO web service can only be installed once the SSO application is set up. For example, if your site name is “www.abc.com/sso/login.aspx”, then your SSO Web Service name should be “www.abc.com/sso/webservice/service.asmx”.
To
force SSO integration between vendor sites, you need to include the SSO
Force parameter (SSO Force = Y) query sting in the vendor site URL.
To install the SSO application:
1. Restore SSO.bak to your database and configure the database user role.
2. Copy the SSO_WEBSITE folder from [Release Package Path]\Package\WebApplications\SSO_IMS\SSO_WEBSITE to your Web folder.
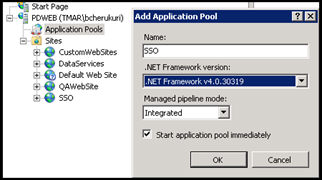
3. Create a new application pool in IIS.
a. Right-click on Application Pools and select Add Application Pool.
b. Enter
the required information, as shown below.
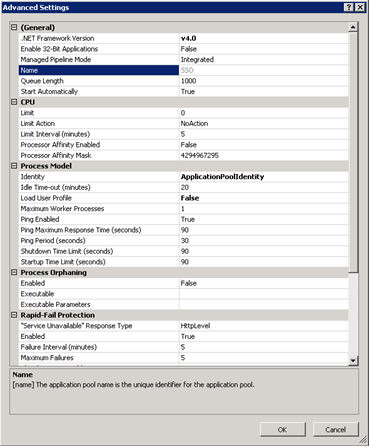
4. After successful creation of new application Pool, select the newly created application pool from middle pane of Application Pools. Right-click on the application pool and select Advanced Settings.
5. Update the settings
in Advanced Settings window according to your requirement.
5. Modify the web.config file for the SSO_WEBSITE.
a. Set
the SSO database Connect string parameters in the <appSettings>
section.
<add key="SSO.ConnectionString"
value="user id=[username};password=[password];Initial
Catalog=[DatabaseName];Data Source=[Server name]" />
b. Set
the SMTP Server name to send an email server name to allow your customers
to retrieve their password.
<SmtpMessageTransportServer>[SMTP
SERVER NAME]</SmtpMessageTransportServer>
<network host="[SMTP SERVER NAME]" port="25" defaultCredentials="true"
/>
c. Set
the email address in the <ExceptionManager> section. If the email
should go to multiple people, separate the email addresses by a semi colon.
For example, admin@association.org; manager@association.com.
<EmailAddresses>[LIST
OF EMAIL ADDRESSES]</EmailAddresses>
<FromEmailAddress>[SENDER EMAIL ID]</FromEmailAddress>
<smtp from="[SENDER EMAIL ID]">
<KeyValue Key="PasswordResetFromEmailAddress" Value="[SENDER
EMAIL ID]" />
d. Set
the SSO website URL information to send the email when a customer requests
for the reset of their login credentials.
<KeyValue Key="DefaultAssociationLoginURL"
Value="http://[WEBSERVERNAME]/[EBUSINESS SITE NAME]/default.aspx"
/>
e. Set
the Default Association Login URL - This is needed if Reset Password call
is initiated from the Personify back office. In this case, an email is
sent to the user and after the user clicks on the link and resets the
password, he will be redirected to this page. Ideally, this page should
be the login page for your web site.
<KeyValue Key="DefaultAssociationLoginURL"Value="http://...../default.aspx"
/>
f. Update/add
the following node in web.config to enable the SQL Server Session state.
When no database name is specified in the connection string default database
ASPSTATE will be taken. Please also ensure that, you already having the
ASPSTATE database exist in the SQL Server.
<sessionState mode="SQLServer"
timeout="720" cookieless="false" sqlConnectionString="Data
Source=[SERVERNAME];User ID=[USERNAME];Password=[PASSWORD]" />
If ASPSTATE database is not already present in your database server, then
please find the following URL to create the database in Persistance mode.
Command line parameters:
- aspnet_regsql.exe -S “[SQL SERVER NAME]” -E -ssadd -sstype p
Microsoft Help URL: - http://msdn.microsoft.com/en-us/library/ms229862(v=vs.100).aspx
g. Set
the Password Strength Regular Expression - This regular expression will
enforce the strength of password for your web site.
<KeyValue Key="
PasswordStrengthRegularExpression " Value=”Enter Value Here"
/>
|
h. Set
the option to enable or disable Remember Me functionality - From 7.4.1,
we will not be creating a cookie every time a user logs into SSO. Cookie
will be created on the client's machine only if the user uses the Remember
Me option.
<KeyValue Key="EnableRememberMeFunctionality"
Value="True" />
i. SessionMonitor_SleepTimeInMilliseconds
Session Monitor is a process which cleans up the expired sessions
from the SSO database. This setting specifies the frequency with which
the session monitor runs. Recommended value can range from 5 minutes to
60 minutes depending on the web site usage.
j. CustomSessionValidDurationInMinutes
This value specifies the duration for which the customer session will be
active. Default value is 60 minutes.
k. CustomSessionValidDurationRememberMeInDays
The value specifies the session valid duration if the user selects the
remember me option. The value for this property is set to 90.
6. As of 7.4.2, to configure reset password and username settings, perform the following:
a. If you want to modify the base HTML message sent to users when they choose to reset their username or password, configure the following values in the SSOMessages.resx file:
· PasswordResetText
<BR/>Please click the link below to reset your password.<BR/><a
href ="{0}">Click here to reset password </a><BR/><BR/>
· UsernameResetText
<BR/>Please click the link below to reset your user name.<BR/><a
href ="{0}">Click here to reset user name</a><BR/><BR/>
7. Update
the Setting.xml file from “[SSO WebSite Folder Path]\LoginTemplates\SSOSetting.xml”
to set the Activate account feature.
<ActiveAccount
Enable="False" ActiveURL="http://[WEB SERVER NAME]/[EBUSINESS
SITE NAME]/">