Creating and Mapping Receipt Types
Cash accounts are defined for each financial company
for different receipt types. These are used for payment and refund transactions.
Each accepted credit card needs to have a corresponding receipt type.
When using the multi-currency functionality, a separate receipt type will
need to be defined for each currency that is accepted by your organization.
 A
unique receipt type must be set up for each financial company and currency
combination. For example, if you work with 3 financial companies, and
each of these has 2 different currencies, a unique receipt type must be
set up for each combination (6 unique receipt types, in this instance).
A
unique receipt type must be set up for each financial company and currency
combination. For example, if you work with 3 financial companies, and
each of these has 2 different currencies, a unique receipt type must be
set up for each combination (6 unique receipt types, in this instance).
To define cash accounts:
1. From
the Default GL Accounts task category, click Receipt
Types and Cash Accounts.
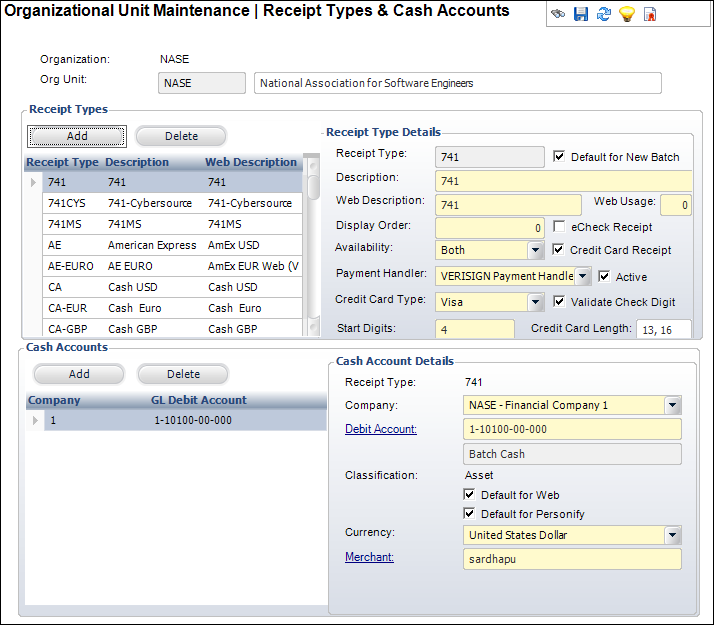
The Organizational Unit Maintenance: Receipt Types and Cash Accounts screen
displays, as shown below.
2. To
add a receipt type, perform the following in the Receipt Types section:
a. Click
Add.
The Receipt Type Details fields are enabled.
b. Enter
the Receipt Type name.
c. Enter
the Description of the receipt
type.
The Web Description defaults to the same text, but you can change it, if
necessary.
d. If
necessary, check the Default for New
Batch checkbox.
e. Select
the Availability of the receipt
type from the drop-down.
f. If
necessary, check the Credit Card Receipt checkbox.
If checked, select the Payment Handler
from the drop-down.
g. If
necessary, check the Validate Check Digit checkbox.
This field is only enabled if the Credit Card Receipt checkbox is checked.
h. Enter
the Display Order.
i. Enter
the Web Usage.
j. Enter
the Start Digits.
k. If
necessary, enter the Credit Card Length.
3. To
map a cash account to a receipt type, perform the following in the Cash
Accounts section:
a. Highlight
the appropriate receipt type and click Add.
The Cash Account Details fields are enabled.
b. Select
the Company from the drop-down.
c. Click
the Debit Account link to search
for a debit account.
d. If
necessary, check the appropriate checkboxes:
· Default
for Web
· Default
for Personify
e. Select
the Currency from the drop-down.
The currency specified here will be the default currency for the cash
account selected.
f. Click
the Merchant link to search
for a merchant associated with the cash account.
4. Click
Save.
Screen Element |
Description |
Receipt Types |
Add |
Button.
When clicked, a row is added to the table and the corresponding
fields are enabled to add a receipt type. |
Delete |
Button.
When clicked, the highlighted row from the table is deleted. |
Receipt Type |
Text
box. The receipt type associated with the organization unit. For
example, Check or MasterCard. Once the receipt types are defined,
you can associate them with cash accounts. |
Default for New Batch |
Checkbox.
When checked, indicates the receipt type is the default when a
batch is created. If you select a default receipt type, you do
not need to click “Add” on the Batch Control screen. |
Description |
Text
box. The description of the receipt type. |
Web Description |
Text
box. The description of the receipt type on the Web. This field
automatically populates based on the description entered, but
you can change it. |
Availability |
Drop-down.
Select whether this receipt type will be available for Personify,
the Web, both, or none. |
Credit Card Receipt |
Checkbox.
When checked, indicates the highlighted receipt type will produce
a credit card receipt, so you must select a Payment Handler. |
Validate Check Digit |
Checkbox.
When checked, indicates the receipt type will validate the check
digit of the credit card number. This is used for Visa, MasterCard,
and American Express. |
Display Order |
Text
box. When a list of receipt types is displayed, this is the order
in which the highlighted receipt type is displayed. For example,
a receipt type with the display order of “1” will display before
the receipt type with the display order of “2” in a listing. |
Web Usage |
Text
box. When a list of receipt types is displayed on the Web, this
is the order in which the highlighted receipt type is displayed.
For example, a receipt type with the display order of “1” will
display before the receipt type with the display order of “2”
in a listing. |
Payment Handler |
Drop-down.
The third-party application used to handle payments. For example,
CyberSource, PayPal (formerly VeriSign), and Wells Fargo. This
is only needed if the Credit Card Receipt checkbox is selected. |
Start Digits |
Text
box. The first digits of the credit card number. Certain credit
card types have the same start digits for all of their credit
cards. This is only needed if the Credit Card Receipt checkbox
is selected. |
Credit Card Length |
Text
box. Enter the amount of numbers in the credit card (if the receipt
type is a credit card). This is only needed if the Credit Card
Receipt checkbox is selected. You can distinguish between a range
using a hyphen or a list using a comma. |
Cash Accounts |
Add |
Button.
When clicked, a row is added to the table and the corresponding
fields are enabled to add cash accounts. |
Delete |
Button.
When clicked, the highlighted row from the table is deleted. No
transactions can exist for this account for it to be deleted. |
Company |
Drop-down.
The company associated with the cash account. |
Debit Account |
Link.
The debit account that is used for cash transactions of the associated
receipt type. This should be unique within the organization, organization
unit, company, and receipt type. |
Default for Web |
Checkbox.
When checked, indicates the cash account is the default for the
receipt type when creating an e-commerce batch. |
Default for Personify |
Checkbox.
When checked, indicates the cash account is the default receipt
type when creating a non e-commerce batch. If only one account
is listed, check this checkbox so you do not need to select the
account every time a non e-commerce batch is created. |
Currency |
Drop-down.
Select the currency associated with the cash account. |
Merchant |
Link.
The merchant ID that is used to process credit cards. The selected
credit card merchant must be assigned the same currency code as
the receipt type code. New credit card transactions are verified
using this merchant ID. |