The Basis Dues Schedule Maintenance screen displays, as shown below.
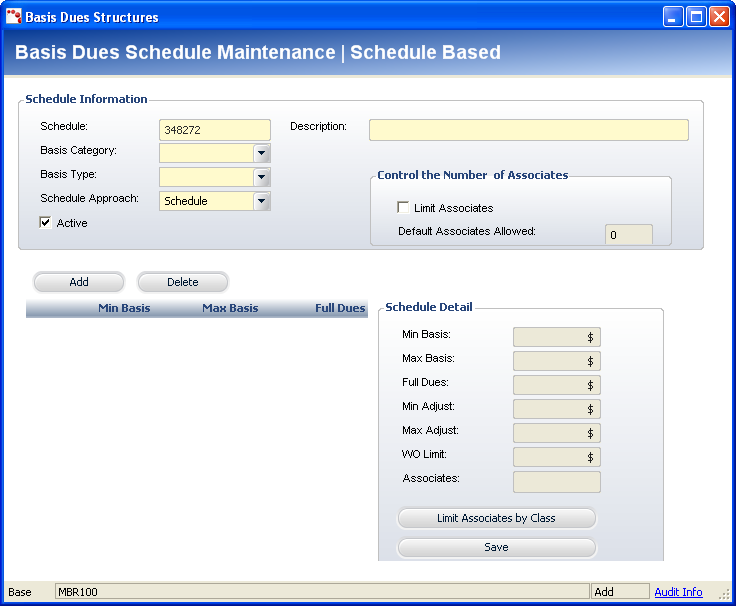
The Basis Dues Schedule Maintenance screen lets you define membership structures as dependent on a schedule rather than a fixed amount. This schedule may be based on the number of members, size of the staff, revenue numbers, etc. For instance, if the company has 100 staff members, they must pay $500, or if the company has sales of $10,000,000, they must pay $5,000. Dues schedules are completed against a basis number which may be the number of staff or size of revenue.
There are two kinds of scheduled that can be setup: Schedule and Commission.
Schedule: the dues amount is a fixed value based on the dues basis range. This is the most popular method of setting up the dues basis range table.
Commission: the dues are calculated by percentage of the basis value that is selected in the basis value range table. A major feature includes the ability to assign an amount for each portion of the whole dues basis and adding them up, which is called Cumulative dues. For example, if there are four ranges, each of 1,000, and the dues basis is 4,000, then for each of the 1,000s the percentage can be different and calculate an amount for each row that is then added together.
To define a basis dues schedule:
1. On
the Rates and Pricing screen, check the Price
Membership by Schedule checkbox and click the Schedule link.
The Basis Dues Schedule Chooser search screen displays.
2. Click
Create New Dues Schedule.
The Basis Dues Schedule Maintenance screen displays, as shown below.
3. In
the Schedule Information section, enter the Schedule code.
Personify automatically assigns a Schedule code, but it can be changed.
4. Enter a Description.
5. Select the Basis Category from the drop-down.
6. Select the Basis Type from the drop-down.
7. Select
the Schedule Approach from the
drop-down.
The fields on this screen will change according to the option selected.
See the appropriate section of the table below for more information.
8. Check the Active checkbox, if necessary.
9. To control the number of associates that can use the basis dues schedule, check the Limit Associates checkbox and enter the Default Associates Allowed.
10. Click Add to add a schedule detail.
11. Enter the appropriate information in the Schedule Detail section.
12. Click Save.
Screen Element |
Description |
|---|---|
Schedule Information |
|
Schedule |
Text box. This value is automatically generated by Personify. It is a unique ID number associated with the schedule. |
Basis Category |
Drop-down. Indicates this schedule will be based on a history of the customer’s reported revenue. Other categories often include Staff Size and Graduation Date. The values are populated by the BASIS_CATEGORY non-fixed system type. |
Basis Type |
Drop-down. Indicates that the dues assessment will be based on a number provided by the customer. The options include Basis Date and Basis Value. The values are populated by the BASIS_TYPE fixed system type. |
Description |
Text box. A description of the Schedule ID. |
Schedule Approach |
Drop-down. The descriptive name associated with the Schedule code, indicating that the membership rates will be based on this approach. For example, Schedule or Commission. The fields in the Schedule Detail section changes based on the option selected. The values are populated based on the SCHEDULE_APPROACH fixed system type. |
Active |
Checkbox. When checked, it signifies the schedule is active. |
Control the Number of Associates |
|
Limit Associates |
Checkbox. When checked, the Default Associates Allowed field is enabled and only a limited number of associates can receive member benefits. For example, if your association has 500 employees, then you can receive two associates. |
Default Associates Allowed |
Text box. Only enabled if the Limit Associates checkbox is selected. This allows you to specify the default limit of associates receiving member benefits. This number defaults in the “Associates” field in the Schedule Detail section of this screen. |
Schedule Details |
|
Add |
Button. When clicked, a row is added to the Schedule Detail table and the corresponding fields are enabled to add a schedule. |
Delete |
Button. When clicked, the selected row is removed from the Schedule Detail table. |
Limit Associates by Class |
Button. When clicked, the Associate Limits within Dues Schedules screen displays. See the Defining Associate Limits within Dues Schedules section for more information. When clicked, the MBR_DUES_SCHEDULE_DETAIL_ASSOCIATE table is populated. |
Schedule Detail (Schedule) |
|
Min Basis |
Text box. Indicates the minimum dues basis for the first range (in number of months). |
Max Basis |
Text box. Indicates the maximum dues basis for the first range (in number of months). |
Full Dues |
Text box. Indicates the dues amount assessed by a member in this basis range. |
Min Adjust |
Text box. Indicates the minimum amount that is required to activate the active member product. |
Max Adjust |
Text box. Indicates that no more than this amount will be accepted as payment for the active member product. |
WO Limit |
Text box. Indicates the maximum dues write-off available to the active basis range. |
Associates |
Text box. This allows you to specify the limit of associates receiving member benefits. When the associates are limited by class, the total of associates allowed are set here across all classes for that level. |
Schedule Detail (Commission) |
|
Min Basis |
Text box. Indicates the minimum dues basis for the first range (in number of months). |
Max Basis |
Text box. Indicates the maximum dues basis for the first range (in number of months). |
Base Amount |
Text box. A default amount that is assigned for this row before the percentage basis is calculated. This amount is optional. |
Percentage |
Text box. Used in the calculation to multiple against the whole dues basis amount if it falls into a range row. If Cumulative is selected for this row, then multiply only that portion of the dues basis that falls into this row. |
Cumulative |
Checkbox. This determines if the dues basis amount is a graduated pricing scheme. All rows must have this checkbox selected, except the last row is not required. If it is not required in the last row you would use a base amount for the highest range. |
See Also: