Creating a New List Mapping Template
After analyzing your upload list and determining what changes need to
be made in order to make the upload process easiest, you can begin creating
your List Mapping Template.
The External Prospect List Mapping screen serves as the basis for the
upload processing of purchased lists and formats. It also maps marketing
lists for incorporation into Personify.
The screen can also delineate a list and allow you to perform the following
activities, all of which are described in the proceeding steps:
· Create
and store a mapping scheme for the standardized lists
· Define
default data-level mapping rules
· Provide
duplicate checking against the prospect and customer database tables with
optional verification against a prospect user field or customer field
· Define
the rules for list usage
To define the List Mapping template:
1. From the toolbar, select Marketing
& Communication > Prospect List Mapping.
The External Prospect List Mapping search screen displays, as shown below.

2. Click
Create New List Mapping.
The External Prospect List Mapping screen displays.
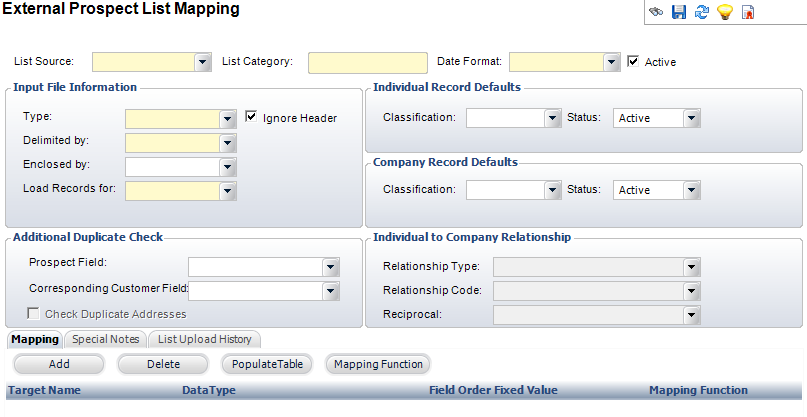
3. Select
the List Source from the drop-down.
4. Enter
the List Category.
5. Select
the Date Format from the drop-down.
6. If
applicable, uncheck the Active
checkbox.
7. In
the Input File Information section, perform the following:
a. Select
the Type from the drop-down.
If you select “Fixed,” then proceed to Step 7d.
b. Select
the Delimited by format from
the drop-down.
c. If
applicable, select the Enclosed by format
from the drop-down.
d. Select
the Load Records for customer
type from the drop-down.
The value you select from this drop-down will determine which fields you
can edit in other sections.
e. If
applicable, uncheck the Ignore Header
checkbox.
8. In
the Additional Duplicate Check section, perform the following:
a. Select
the Prospect Field from the
drop-down.
b. Select
the Corresponding Customer Field
from the drop-down.
c. If
applicable, uncheck the Check Duplicate
Addresses checkbox.
9. In
the Individual Record Defaults section, select the Classification and
the Status of the individual
customer from the drop-downs.
These fields are only enabled when “Individual” or “Both Individual and
Companies” is selected in the Load Records for field.
10. In
the Company Record Defaults section, select the Classification and
the Status of the company
customer from the drop-downs. These fields are only enabled when “Companies”
or “Both Individual and Companies” is selected in the Load Records for
field.
11. In
the Individual to Company Relationship section, perform the following:
a. Select
the Relationship Type from the
drop-down.
b. Select
the Relationship Code from the
drop-down.
c. Select
the Reciprocal from the drop-down.
 These fields
are only enabled when “Both Individual and Companies” is selected in the
Load Records for field.
These fields
are only enabled when “Both Individual and Companies” is selected in the
Load Records for field.
12. Click
Save.
13. Now,
you can add
mapping function information, add
special notes, and view
upload history.
| Screen Element |
Description |
| List Source |
Drop-down. The organization from which the list was purchased. |
| List Category |
Text box. The vendor’s designation for the list. The field
is forced upper case but not validated against the code table. |
| Date Format |
Drop-down. This indicates the format of dates being passed
into the program by the source file. |
| Active |
Checkbox. When checked, activates the List Source, List Category,
and Date Format. It is checked by default. |
Input File Information |
| Type |
Drop-down. This indicates whether the format is comprised of
fixed length records (requiring a specific begin and end position
for each field in the mapping functions) or records delimited
by a comma, pipe, or other delimiter. |
| Delimited by |
Drop-down. This is a blank space, character, or other symbol
that separates the beginning of the format or character string
from the end. This field is only enabled if “Delimited” is selected
as the Type. |
| Enclosed by |
Drop-down. For a comma-delimited file, this identifies the
mark(s) that surround the fields or other file features. For example,
the fields in the file may be enclosed by quotation marks. This
field is only enabled if “Delimited” is selected as the Type.
|
| Load Record for |
Drop-down. This includes the following values:
· Individuals.
The process creates or loads individual records (Record Type =
I) where the name of the individual is not null. No company records
are created.
· Companies.
The process creates company records where the name of the company
is not null. No individual records are created.
· Both
Individuals and Companies. The process creates, where possible,
both individual and company records, depending on whether the
Label Name and Company Name fields are populated and available.
For example, any input record where a name and a company are specified,
this results in two records with the same address but different
record types. If both are loaded, then the defaults for the Classification
and Status fields are user-entered for the company and individual
record. |
| Ignore Header |
Checkbox. Selection this option if the list you are using includes
header information. When checked, the system ignores the information
in the header. It is checked by default. |
Additional Duplicate Check |
| Prospect Field |
Drop-down. This lists all of the fields from the Prospect table
for use in additional duplicate checking. For example, if the
Social Security Number field is always uploaded into the Prospect
Social Security number, then the social security number is compared
to the other prospects as part of the duplicate checking process.
If customers have the same email, for example, the duplicate record
will be deleted. |
| Corresponding Customer Field |
Drop-down. When Personify performs duplicate checking, this
field is compared against the Corresponding Customer field in
the Customer table for duplicate checking. |
| Check Duplicate Addresses |
Checkbox. Personify must at least perform address duplicate
checking. This field is only enabled if the Prospect Field AND
Corresponding Customer fields are selected. If checked, the process
includes checking by address as well. If unchecked, you can use
only the two Prospect and Corresponding Customer comparison fields.
If both the Prospect and Corresponding Customer fields are null,
then the Check Duplicate Addresses checkbox is checked and disabled. |
Individual Record Defaults |
| Classification |
Drop-down. The customer classification for all individual
records. This field is only enabled when “Individual” or “Both
Individual and Companies” is selected in the Load Records for
field.
For example, Student or Prospect. |
| Status |
Drop-down. Customer status for all individual records. This
field is only enabled when “Individual” or “Both Individual and
Companies” is selected in the Load Records for field.
For example, Active or Inactive. |
Company Record Defaults |
| Classification |
Drop-down. The customer classification for all company records.
This field is only enabled when “Companies” or “Both Individual
and Companies” is selected in the Load Records for field.
For example, Agency or Advertiser. |
| Status |
Drop-down. Customer status for all company records. This
field is only enabled when “Companies” or “Both Individual and
Companies” is selected in the Load Records for field.
For example, Active or Inactive. |
Individual to Company Relationship |
| Relationship Type |
Drop-down. The type of relationship. This field is only enabled
when “Both Individual and Companies” is selected in the Load Records
for field. The relationship between the individual and the company
is specified using the relationship type. For example, the relation
type could be “Employment” with the individual working for the
company. The Relationship Code and Reciprocal Code fields are
enabled if a value is selected here. |
| Relationship Code |
Drop-down. The code for the relationship. This field is only
enabled when “Both Individual and Companies” is selected in the
Load Records for field. For example, if the Relationship Type
is “Employment,” then the Relationship Code would be “Employer.” |
| Reciprocal |
Drop-down. The reciprocal code for the relationship. Used in
conjunction with the Relationship Code. This field is only enabled
when “Both Individual and Companies” is selected in the Load Records
for field. For example, if the Relationship Code is “Employer,”
then the Reciprocal code would be “Employee.” |
|