Configuring the Login Web Module
The Login web module is necessary for customers, hosts, or administrators
to log on to the application.
This web module lets you enter a valid user name and password to access
Personify e-Business. Additionally, you can use this web module to remember
your login for later use through the use of a cookie. Should you forget
your password, you can recall it using the Forgotten Password link available
using the Login web module. The Forgotten Password link takes you to a
Request Password page where the user’s ID and Email Address are requested.
Once the user enters a valid User ID and Email Address, the system sends
an email to the user with the password.
An additional piece of security is also available in the event of a
forgotten password. After the User ID and Email Address is entered, the
system will then ask the user for the answer to a Hint Question. The user
is then required to correctly answer this question before the email with
the user’s password is sent.
 The
Hint Question is determined at the time of registration. An extra section
has been added to the Customer Registration web module to allow for the
setting of the Hint Question. The Hint Question and subsequent answer
are stored in the Web User Table for each web user. The Hint Question
can also be deactivated, if desired, by editing the Name & Contact
Preferences module settings.
The
Hint Question is determined at the time of registration. An extra section
has been added to the Customer Registration web module to allow for the
setting of the Hint Question. The Hint Question and subsequent answer
are stored in the Web User Table for each web user. The Hint Question
can also be deactivated, if desired, by editing the Name & Contact
Preferences module settings.
Finally, if you need to register an account, a link to the Registration
web module is also provided via the Login web module.
The Login web module now features an additional security feature called
Captcha; when logging on to your site, a rectangle appears with a series
of letters and numbers. You must correctly enter the series of characters
shown in the rectangle to validate your login. This security feature guarantees
that a human is accessing the web-site, and is not a compromise of site
security. Captcha is not case-sensitive. The web module also allows newly
registered users to activate their account through a link.
To configure the Login web module:
1. Log
into your site as Host.
2. Navigate
to the appropriate page on your site where you want to add the Login web
module.
3. From
the Host toolbar, select the “Personify-Login” from the Module drop-down.
4. Click
Add Module To Page.
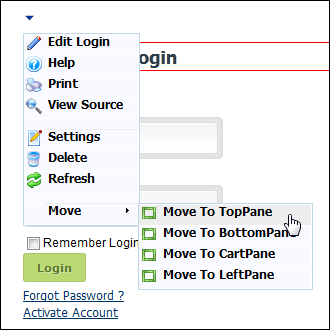
5. Move
the web module to the appropriate place on the page, as shown below.
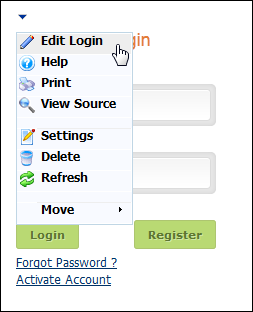
6. From
the web module menu, click Edit Login.
The following page displays:
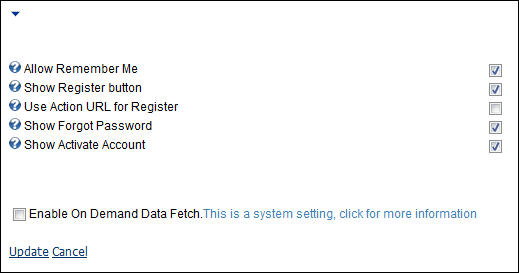
7. Configure
the appropriate module settings as described below:
· Allow Remember Me - Checkbox. When
checked, a checkbox displays at login, allowing the user to save their
login information for future use. Personify e-Business uses a cookie to
store your login information for future use. This prevents customers from
having to log in each time they wish to use Personify e-Business.
If
you are using a public or work computer, you should not use this feature
for security reasons. This cookie remains in place until the web browser’s
cache is cleared.
· Show Register Button - Checkbox.
When checked, the Register link displays to the user. This allows unregistered
users to create an account.
· Use Action URL for Register - Checkbox.
This setting only displays if the Show Register Button checkbox is checked.
If it appears, you must select it for the Customer Registration Action
URL setting to appear.
· Show Forgot Password - Checkbox.
This setting allows you determine whether or not to display the Forgot
Password link. After you click the link, simply enter your user name and
an Email is sent to the Email address associated with the user name.
When
one of your customer’s uses the “Forgot Password?” feature, they will
be sent a notification email with their password. To modify the look and
feel of the notification email, you must edit the “EmailTemplate.xsl”
file found in your “...E-Business\Source\WebParts\RequestPassword\Templates”
folder
· Show Activate Account - Checkbox.
This setting allows you determine whether or not to display the Activate
Account link.
8. Click
Update.
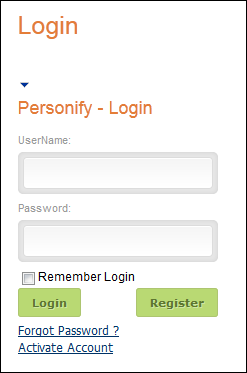
Customer Impact
After setting up the Login web module, your customers will see the module
as displayed below.
The
Login module looks the same to customers as it does to the host.