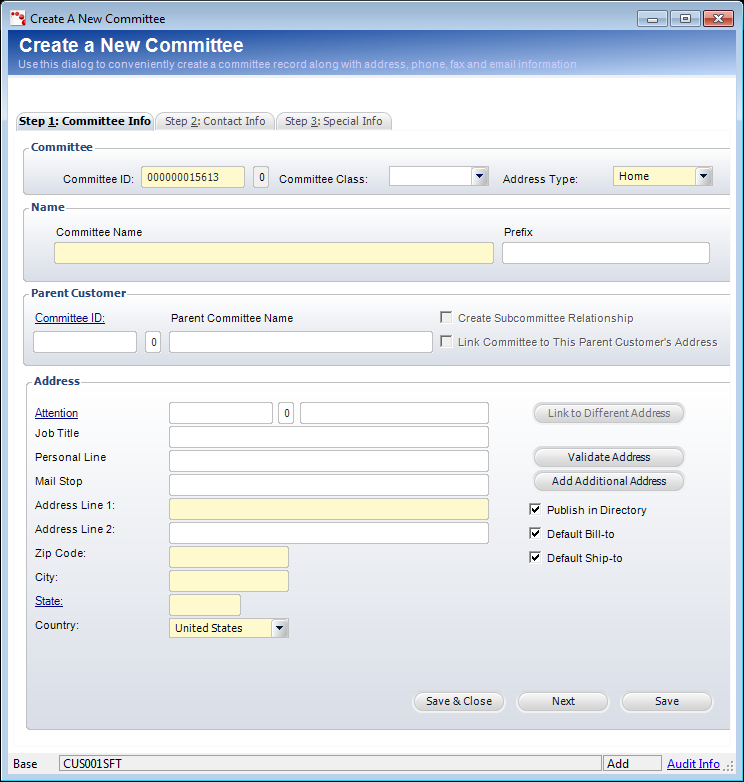
The Create a New Committee screen displays, as shown below.

To create a new committee:
1. From
the Personify main toolbar, select Customers > Committee Central.
Committee Central displays.
2. From
the Committee Central screen, click Create New Committee.
The Create a New Committee screen displays, as shown below.

3. The Committee ID is system-generated, but it can be changed if necessary.
4. If necessary, select the Committee Class from the drop-down.
5. Select the Address Type from the drop-down.
6. Enter the Committee Name (60 character maximum).
7. If necessary, enter the Prefix.
8. From the Parent Customer section, if necessary, select the parent customer by clicking the Customer ID link and searching for a parent customer.
9. If you selected a parent customer, you can then select to Create Subsidiary Relationship or Link Company to This Parent Customer’s Address.
10. From the Address section, enter the contact information and address.
11. Check the appropriate checkboxes:
· Publish in Directory – When checked, indicates the new customer’s information will be published in directory reports (whether printed or published on the Web). When unchecked, the e-Business Member Directory web part excludes this new customer information.
· Default Bill-to – When checked, indicates the new customer is the default bill-to customer for all orders.
· Default Ship-to – When checked, indicates the new customer is the default ship-to customer for all orders.
12. Click Validate Address. The Address Validation screen displays with the status of the validation. Click Accept. See Validating a Customer Address for more information.
 To
add another address for the company, click Add Additional Address.
13. Click
Next.
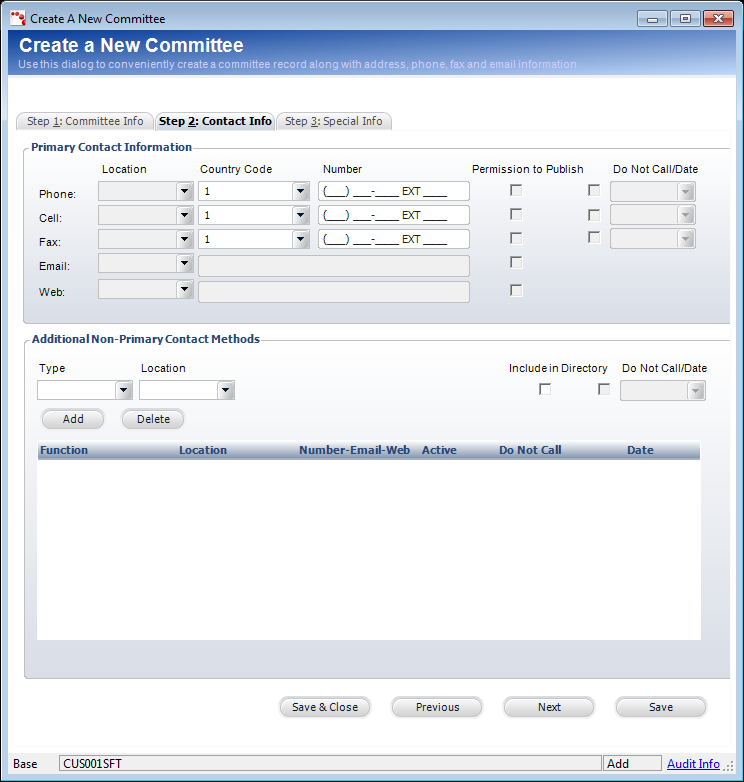
The Step 2: Contact Info tab displays, as shown below.

14. On the Contact Info tab, enter the contact information, including Location, Country Code, and Number. The options include:
· Phone
· Cell
· Fax
· Web
15. If necessary, check the Permission to Publish checkbox next to the appropriate contact information. When checked, this indicates the new company gives permission to publish the selected contact information.
16. If necessary, check the Do Not Call checkbox next to the appropriate contact information. Today’s date is automatically selected as the start date in which the contact information cannot be called. The contact information cannot be called for purposes of soliciting or promoting a product, service, membership, etc.
 The
“Do Not Call” fields do not display for the Email and Web contact types
because those types are controlled by the solicitation flags on the Special
Info tab and the Solicitation Preferences task on the Customer Central
screen.
17. In the Additional Non-Primary Contacts Methods section, select the Type from the drop-down, fill out the appropriate fields, and click Add. The fields in this section change depending on the Type selected. You can also select whether you want to include the contact in the directory. Once you add the contact, you can select the Do Not Call checkbox in the table cell.
18. Click
Next.
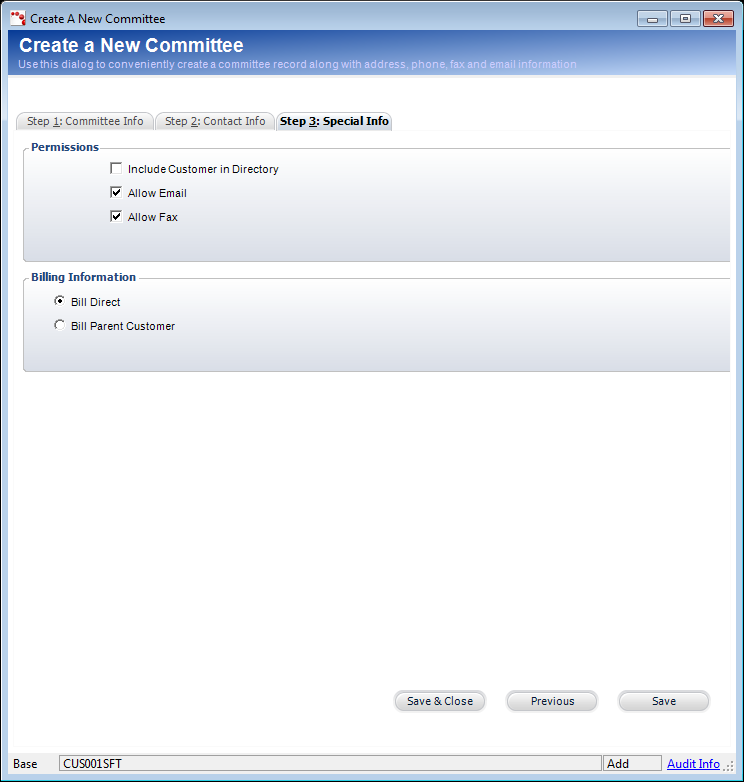
The Step 3: Special Info tab displays, as shown below.

19. On the Special Info tab, select the appropriate permissions. The options include:
· Include Customer in Directory – When checked, indicates the new customer’s information will be published in directory reports (whether printed or published on the Web). When unchecked, the e-Business Member Directory web part excludes this new customer information.
· Allow Email – When checked, indicates emailed communications can be sent to this customer. When unchecked, no emailed communications can be sent to this customer, with the exception of automated system notifications.
· Allow Fax – When checked, indicates faxed communications can be sent to this customer. When unchecked, no faxed communications can be sent to this customer, regardless of whether the communication is considered promotional solicitation or not.
20. From the Billing Information section, select the appropriate billing information method, either by Bill Direct or Bill Parent Customer.
21. Click Save & Close.