All the icons under BusinessObjects Enterprise will change to

Use the procedure below when running a Custom or Expand installation type to only install the BusinessObjects Enterprise Web Tier Components.
1. Left-click on the icon beside BusinessObjects Enterprise in the "Select Features" screen.
2. Select
Entire feature will be unavailable.
All the icons under BusinessObjects Enterprise will change to
3. Left-click on the Web Tier Components icon.
4. Select
Will be installed on local hard drive.
The Web Tier Components icon will
display as  .
.
5. If you want to install Apache Tomcat as your web application server skip to step 6. Expand Web Tier components if you want to use your existing web application server.
a. Left-click on the icon beside Tomcat.
b. Select Entire Feature will be unavailable.
6. Click
Next to continue with the installation.
The "CMS Clustering" screen is displayed.
When you only install Web Tier components as part of a custom or expand installation, you need to specify an existing CMS. Use the "CMS Clustering" screen to provide information on CMS to which you want to cluster your web tier components.
1. Enter information on your existing CMS in the fields provided.
· Existing CMS Hostname
· Existing CMS Port
· CMS Administrator Password
 The
CMS Hostname defaults to your local computer name.
The
CMS Hostname defaults to your local computer name.
2. Click
Next to continue.
The installation program will attempt to communicate with your existing CMS
cluster using the information you provided.
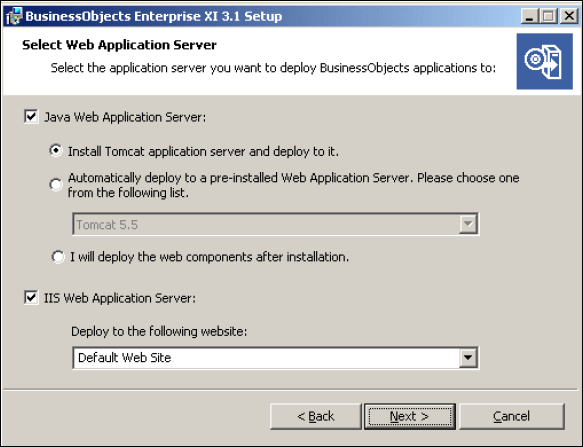
You now need to configure your web application server.
The web application server runs Business Objects web applications such as InfoView, the Central Management Console (CMC), and custom web applications. Use the "Select
Web Application Server" screen to choose to:
· Install and/or deploy to a Java web application server, such as the Tomcat web application server included with BusinessObjects Enterprise.
· Install and deploy to the IIS web application server installed as part of your Windows operating system.
If
you are using the 64-bit version of IIS 7, you must ensure that:
ASP.NET is enabled.
The advanced IIS setting Enable 32-bit
Applications is set to "True".
The advanced IIS setting .NET Application
Pool is set to "Classic" mode.
If the IIS Web Application Server
option is not selectable, ensure that ASP.NET v1.1 and IIS are both
installed.
To configure a Java web application server for BusinessObjects Enterprise you will need the web application server administrator account name and password, as well as the listener port number.
1. To use a Java web application server, select Java Web Application Server and choose one of the following options:
· Install Tomcat application server and deploy to it. This will automatically install and configure Tomcat.
· Automatically deploy to a pre-installed
Web Application Server.
This will prompt you to enter the configuration
and authentication information on the next screen.
2. To use the IIS web application server included as part of your Windows operating system, choose IIS Web Application Server, then select the website to use for deployment from the drop-down list.
3. Click
Next.
Depending on your selection, you can now proceed to either configure your
web application server, or start the installation process.
A Web Application Container Service (WACS) will automatically be installed if
the setup program determines that no Java web application server will
be used.
You must enter a port number for the HTTP listener.
· Enter
the port number into the HTTP Port field. The default port number is 6405.
The WACS will listen for HTTP requests on the port you enter.
The "Configure Tomcat" screen displays during installation if you choose to install Tomcat as the web application server for your BusinessObjects Enterprise installation. Use this screen to configure Tomcat.
1. Accept the default values or specify new port numbers for Connection port, Shutdown port, and Redirect port.
2. Click Next to continue with the installation.
If the port numbers you specified are in use, a warning message is displayed.
To continue you will have to specify unused and valid port numbers.
The "Start Installation" screen is displayed.
The "Configure Web Application Server" screen displays during installation after you specify an existing server in the "Select Web Application Server" screen. To properly install web components on your web application server, you must provide specific configuration information about your existing web application server.
The
setup program may not provide the option to perform an automatic deployment
of web applications to a supported web application server. Under these
circumstances, web applications must be deployed manually, or with the
wdeploy command-line tool. For information on how to deploy web applications
manually or with the wdeploy tool, see the SAP BusinessObjects Enterprise
Web Application Deployment Guide.
1. Select your existing web application server from the drop-down list of web application server types.
2. Click
Next to continue with the installation.
The following table summarizes the information required for supported web
application servers.
| Web application server | Information required |
|---|---|
| Tomcat 5.5 | · Server Instance: Name of the current web application server instance (for example “localhost”). · Service Name: Name of the Windows service if the application server will be installed as a windows service (for example “Tomcat5”). · Application Server Installation Directory: The directory where the web application server is installed (for example C:\wdeploy\appserv er\Tomcat5520). |
| WebLogic 10 | · Port: Administration port of the application server (for example “7001”). · Username: User name with administration rights to the application server. · Password: Password for account with administration rights to the application server. · Server Instance: Name of the current web application server instance (for example “mserver1”). · Application Server Domain Root Directory: The WebLogic domain root directory (for example C:\bea\weblogic10\user_projects\domains\base_domain). |
| Websphere6.1 | · SOAP Port: The SOAP Connector Port of the application server (for example “8880”). · Username: User name with administration rights to the WebSphere application server. · Password: Password for account with administration rights to the application server. · Server Instance: Name of the current web application server instance (for example “server1”). · Virtual Host: The virtual host to which the application must be bound. · Admin is Secure?: Select this option to enable security requiring administrative access credentials to the application.
· Application Server Installation Directory: The directory where the web application server is installed (for example C:\ProgramFiles\IBM\WebSphere\AppServer). |
| Oracle Application Server 10g R3 | · Admin is Secure?: Select this option to use Secure Sockets Layer (SSL) encryption for authentication.
· Port: Administration port of the application server (for example “6003”). This should be the request port of the <notification-server> element in the opmn.xml file. · Username: User with administration rights to the application server. · Password: Password for account with administration rights to the application server. · Server Instance: Name of the Oracle Application Server application server instance (for example “home”). · Server Name: Name of the target application server (for example, “myserver.domain.com”). · Group Id: Name of the server group to which the target application belongs (for example "Default_group"). · Application Server Installation Directory: The directory where the web application server is installed (for example C:\product\10.1.3\OracleAS_1). |
The "Start Installation" screen is displayed.
Remember your credentials for the web application server as they may be
required to install add-ons such as ProcessTracker or additional language
packs.
The "Start Installation" screen is the final screen in the installation.
· Click the Next button to start the installation process.
If
you ran setup.exe from the command line with the -w [filename] parameter,
this is the point at which you can Cancel
the installation process, as the .ini configuration file has been written.