The Client Components icon changes to

Use the procedure below to install BusinessObjects Enterprise server components. When you perform this installation, server components are installed,the default user and group accounts are created,and sample reports are
published to the system. When the installation is complete, the servers are started.
1. Left-click
on the icon beside Client Components
in the "Select Features" screen and select Entire
feature will be unavailable.
The Client Components icon changes
to
2. Left-click
on the icon beside Web Tier Components
and select Entire feature will be
unavailable.
The Web Tier Components icon changes
to
3. If you want to install SQL Anywhere, skip to step 4. Expand Server Components.
 Do not install SQL Anywhere if you want to use an existing database server.
Do not install SQL Anywhere if you only want to add server components
to an existing CMS cluster.
Do not install SQL Anywhere if you want to use an existing database server.
Do not install SQL Anywhere if you only want to add server components
to an existing CMS cluster.
a. Expand Central Management Server.
b. Left-click on the icon beside Auditor and select Entire Feature will be unavailable.
c. Left-click on the icon beside SQL Anywhere and select Entire Feature will be unavailable.
4. Deselect the Database Access, Export Support, Samples, and Help Files options if they are not required.
5. Click
Next to continue with the installation.
If you chose to install SQL Anywhere, enter information on your new CMS. If
you chose not to install SQL Anywhere you need to specify whether or not
this is your first CMS cluster.
If you chose not to install SQL Anywhere, and are installing server components through a "Custom or Expand" installation, you need to provide information in the "CMS Clustering"
screen.
6. If this installation is the first CMS in your deployment, select If 'Yes,' enter the information for the new CMS. You can now do one of the following.
· In the fields provided on the right of the screen, enter the CMS port number and administrator password.
· Select Configure the BusinessObjects Enterprise Administrator password at a later time.
7. Select If 'no,' enter the new CMS port, and details for a CMS with which to cluster if this server installation is not the first CMS in your deployment. New information entry fields will be displayed on the right side of the screen.
a. Specify a port number for your new CMS installation.
b. Provide
the CMS hostname, port number, and password for the cluster to which you
want to add the CMS of your installation.
Before proceeding to the next screen, the installation setup program will test
connectivity to your existing CMS cluster based on the information you
provided.
8. Click
Next to continue with the installation.
The "Server Intelligence Agent" screen is displayed.
The "Server Components Configuration" screen is used to enter the port number and an administrator password for the new Central Management Server (CMS). The CMS manages BusinessObjects Enterprise servers and manages the system and audit databases.
1. Specify
a port number in the CMS port field.
The default CMS port number is 6400.
The CMS will communicate with other BusinessObjects Enterprise servers through
the specified port.
2. Specify
a password for the CMS administrator account in the Password and
Confirm password fields.
Tip: You can opt to skip this step - select the Configure the BusinessObjects Enterprise
Administrator password at a later time box.
3. Click
Next to continue with the installation.
The "Server Intelligence Agent" screen is displayed.
If
the port you specified in step 1 is unavailable, you will be requested
to specify another port number.
A Server Intelligence Agent (SIA) node is automatically created during installation of BusinessObjects Enterprise. For more information on Server Intelligence and the
Server Intelligence Agent, refer to the SAP BusinessObjects Enterprise Administrator's Guide. The "Server Intelligence Agent" screen is used to name and designate a port address for the SIA.
1. Provide a unique name to identify the SIA node in the Node Name field.
Do not use spaces or non-alphanumeric characters in a SIA node name.
2. Specify
a port number for the SIA in the Port
field (default is 6410).
This port will be used by the SIA to communicate with the Central Management
Server (CMS).
3. Click
Next to continue with the installation.
Once the SIA information is entered, the port number will be validated before
you can proceed to configure the CMS database for your installation.
A warning will display if the port you specified is not available.
The "SQL Database Server Configuration" screen appears if you chose to install SQL Anywhere as the database server for your Custom or Expand installation.
1. Specify
the port number that you want to assign to the SQL Anywhere database server
in the SQL Anywhere Port Number
field.
The default port number is 2638. Use this number unless this port is unavailable.
2. Specify the Data Source Name in the Data Source Name field.
3. Specify and confirm a password for the SQL Anywhere dba user account in the SQL Anywhere DBA User Account pane.
4. Specify and confirm a password for the SQL BusinessObjects user account in the SQL Anywhere BusinessObjects User Account pane. Note that the username must be unique on the network.
5. Click
Next to continue the installation.
The "Start Installation" screen is displayed.
The "CMS Database Information" screen appears if you chose to use an existing database server as your CMS for your Custom or Expand installation.
1. Select
a database type from the Select existing
CMS database drop-down list in "CMS Database".
Depending on your database server selection, corresponding input fields are
displayed in "CMS Database".
2. Provide
all the required information for the database in the fields provided in
"CMS Database".
The table below summarizes all the information required for each database type.
| Database type | Information is required for installation |
|---|---|
| SQL Anywhere | ODBC DSN |
| MySQL | Data Source Name |
| Sybase | Sybase Server Name |
| DB2 | DB2 database alias |
| Oracle | tnsnames connect identifier |
| Microsoft SQL Server | ODBC DSN |
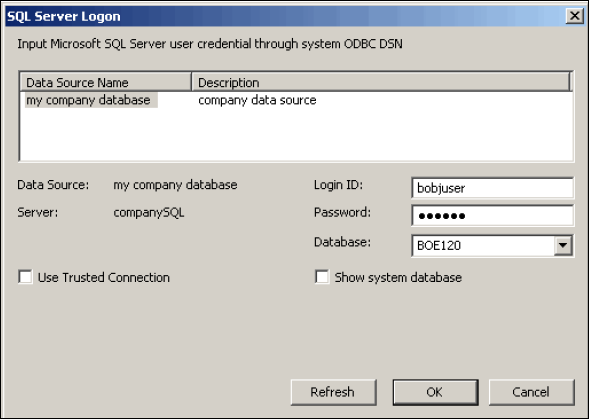
a. To
provide an ODBC DSN for a Microsoft SQL Server, click the Browse
button in "CMS Database".
The "SQL Server Logon" screen is displayed.
If
you are running the installation on a Windows 64-bit machine an additional
check box - Consume DSN created under
WOW64 - is displayed.
b. Use the "SQL Server Logon" screen to select a data source, database, and to provide user credentials.
c. Click
OK to submit your settings.
The "SQL Server Logon" screen is closed and an ODBC DSN entry is
displayed in"CMS Database".
If you do not want to specify an auditing database for your new installation skip
to step 6.
3. Select
the Auditing Database box to specify
an auditing database for your new installation.
The input fields under the Auditing Database
box are activated.
4. Select
a database type from the Select existing
Auditing database drop-down list in "Auditing Database".
Depending on your database server selection, corresponding input fields are
displayed in "Auditing Database".
5. Provide
all the required information for the database in the fields provided in
"Auditing Database".
The table below summarizes all the information
required for each database type.
| Database type | Information is required for installation |
|---|---|
| SQL Anywhere | Data Source Name |
| MySQL | Data Source Name |
| Sybase | Sybase Server Name |
| DB2 | DB2 database alias |
| Oracle | tnsnames connect identifier |
| Microsoft SQL Server | ODBC DSN |
6. Select the Reset existing database box to delete all current tables and entries in the existing database.
7. Click
Next to continue with the installation.
The "Start Installation" screen is displayed. This screen only
displays if a connection is established with the database configuration
you provided.
The "Start Installation" screen is the final screen in the installation.
· Click the Next button to start the installation process.
If you ran setup.exe from the command line with the -w [filename] parameter,
this is the point at which you can Cancel
the installation process, as the .ini configuration file has been
written.