Or
Click the Insert Alias button.
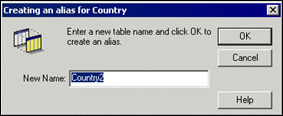
The Creating an Alias box appears. It prompts you to enter a name for the new alias.
To create an alias manually:
1. Click the table that you want to use to create an alias.
2. Select
Insert > Alias
Or
Click the Insert Alias button.
The Creating an Alias box appears. It prompts you to enter a name for the
new alias.
3. Enter a new name for the aliased table, or keep the one proposed.
 The name
that you give to an alias should be relevant to the role of the alias
to distinguish it from the base table. For example, Resort country is
an alias for Country. Resort Country is used for queries returning data
for resort countries, the base table Country is used in queries returning
data for customer countries.
The name
that you give to an alias should be relevant to the role of the alias
to distinguish it from the base table. For example, Resort country is
an alias for Country. Resort Country is used for queries returning data
for resort countries, the base table Country is used in queries returning
data for customer countries.
4. Click
OK.
The aliased table appears in the Structure pane.
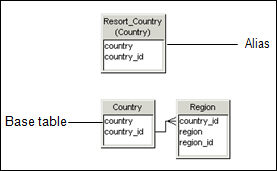
5. Create any joins necessary between the alias and other tables in the schema.
To avoid
confusing base tables with aliases, you can display the alias with the
name of the base table it represents in the table title as follows: Select
Tools > Options > Graphics, and then select the Aliased Name check
box.