To create a custom online Crystal Report:
1. Open TRS001 – TRS Application Setup screen.
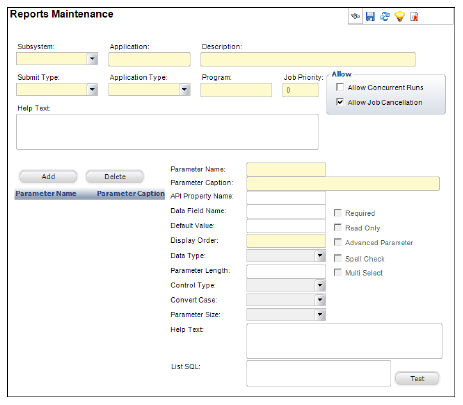
2. Click Create New to create new custom report application; the following screen will display.
3. Select the appropriate subsystem.
4. For the Application entry field, use the subsystem extension and a number ranging from 7000 to 9999 (this range is reserved for Client Custom Reports (i.e. FAR7001, MBR8001 etc…).
5. Give a Report Description.
6. Select Submit Type as ONLINE - Available for Online submission.
7. Select Application Type as CRYSTAL - Crystal Report.
8. Enter the report file name (i.e. FAR7001.rpt) in the Program File field.
9. If appropriate, check the boxes for Concurrent Instances and Job Cancellations.
10. Type in any helpful information for the end user in the Help Text box.
11. If appropriate, check the boxes for Concurrent Instances and Job Cancellation.
12. Add all the parameters used by the report in Report Maintenance screen by clicking the ADD.
The parameter name must be exactly the same as what is used in the report. You may refer to the base online report to see how the parameter attributes data type, Parameter Length, List SQL, etc. are entered.
13. Click Save when you finish.
14. Click Upload Report File to upload the report file.
A dialog window displays as shown below.
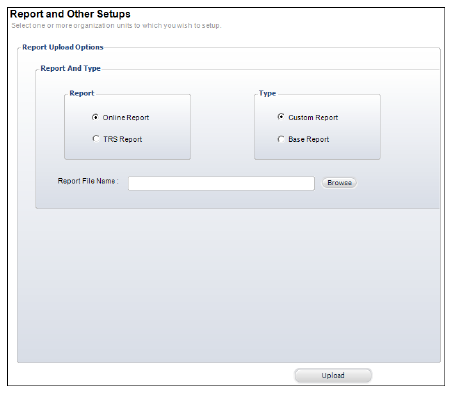
15. Select the appropriate radio buttons for the report you want to upload.
16. Select the report file (.rpt) from the folder you have stored by clicking Browse.
A separate window will allow you to search your computer for the report file.
17. Click Upload to upload the report into BusinessObjects Server.
This activity may take less than a minute and you would see a popup for a brief period of time letting you the status the report upload.

18. Click the Linked Screen task to add screen(s) where this report can be run from. Click the Add button to add one or more screens. The Report Category is what category under which the report will be listed.
19. Click Save to save the changes.
20. Set up the security for the application from the Application Security Setup screen by assigning appropriate groups.