With the Personify 7.3.1 release, you received two new homepage options:
· Default Home Page
· Fundraising Home Page
These homepage options were created as ASPX web pages and work with Personify commands to provide a more personal homepage with Quick Links to your users upon initial login to Personify. Each text box on the homepage links to a screen needed to complete that task. For example, clicking “Add a new product” opens the Product Central screen.
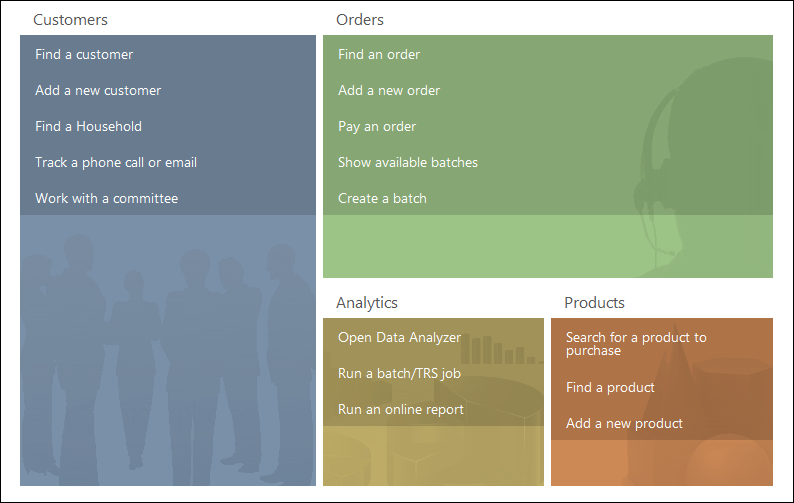
The Default Home Page offers you quick access to a variety of common tasks, such as working with Customers, Orders, and Products.
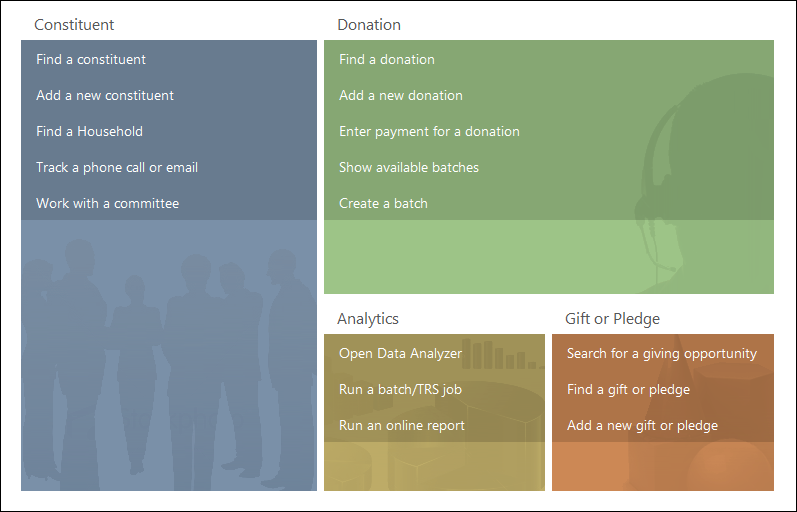
The Fundraising Home Page offers you a similar experience as the Default Home Page, except it is more fundraising-focused, by referencing Constituents, Donations, and Pledges.
To define the home page:
1. Applying the Personify Home Pages
2. Modifying a Personify Home Page
In order to do so, you must apply the Personify Home Page URL for the ASPX page(s) to your Application Parameters and select a persona’s default homepage on the Persona Maintenance (PSM004) screen as that Personify Home Page.
Personify Home Pages can only be applied at the persona-level, not user-level. Steps for applying the Personify Home Pages to personas in your Personify application can be found in the next subsection. If a user does not have access to a screen linked on the Personify Home Page, the security settings remain and that link disables for the user.
 The
Personify Home Pages are best viewed on a computer with 1280 x 800 resolution
and Internet Explorer 7 or a later version installed
The
Personify Home Pages are best viewed on a computer with 1280 x 800 resolution
and Internet Explorer 7 or a later version installed
Users of the Personify Home Pages can personalize the background of each home page panel, such as the Orders panel, by uploading their personalized images to the organization’s web server.
You should keep the following items in mind, however, if you allow your users to upload their own images.
· Image are not scanned for viruses before upload.
· Images are restricted to 4MB/image, by default (unless the web.config files setting for httpRuntime...maxRequestLength states otherwise).
· Images do not resize based on the dimensions of the Home Page panel.
· If a user wants the image to fit exact, they must upload images with the same dimensions stated below for each section and have a display resolution of 1280 x 800.
o Customers 300 x 445
o Orders 460 x 250
o Analytics 230 x 160
o Products 230 x 160
· Users must refresh the application (press F5) to apply the uploaded images to the homepage or wait until the next time they open Personify.
· Any
changes made to the images only save for that particular User ID and persona.
The uploaded images save in a separate folder for each user ID on the web
server.
For example, images uploaded by John Doe would save under the following
folder:
C:\wwwroot\Personify.HomePage\images\JDOE.
· Only
system administrators with access to the web server can restore the original
images for a user.
To do so, simply delete the image folder created for that user ID on the
web server.
Continuing with the example above, to restore John Doe’s homepage images
back to default, you need to delete the folder previously created that
contains his images:
C:\wwwroot\Personify.HomePage\images\JDOE.
Personify Home Pages (Default and Fundraising) are completely configurable to your organization’s needs. This includes each link’s functionality and link label, as well as total number of sections that display. You can create and apply as many Personify Home Pages to the Personify application as you desire.