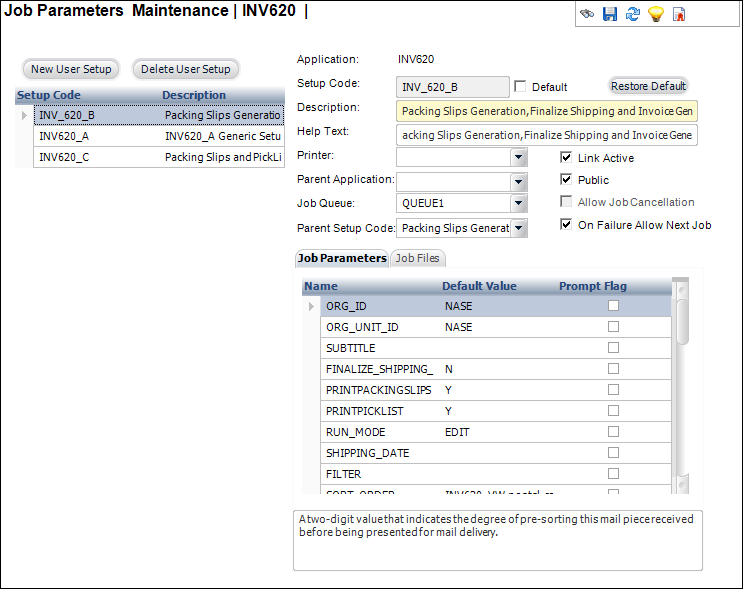
The Job Parameters Maintenance screen displays, as shown below.
The Job Parameter Setup screen enables system administrators to establish a description of a report or process setup, define the job, file, and printing parameters, and set up other relevant information for submitting a report or process.
Once you define the application and its parameters, you can create multiple setups for the application on this screen. This screen creates a new setup, copies an existing setup, schedules a job after the creation of a setup, and submits the job.
This screen also respects the security permissions established through the Security subsystem. If you do not have permissions to set up any job default parameters, you will not be able to add any default setups. If you have setup permissions on only one batch application, the batch will appear on this screen for you to set up.
To create a new user setup:
1. From the toolbar, select Reporting > Default Parameter Setup.
2. Enter search criteria.
3. Search
for the appropriate application and select it.
The Job Parameters Maintenance screen displays, as shown below.
4. Click
New User Setup.
A new row displays.
5. Enter the Setup Code.
6. If applicable, check the Default checkbox.
7. Enter the Description.
8. Enter the Help Text.
9. Select the Printer from the drop-down.
10. Select the Parent Application from the drop-down.
 The
child report runs immediately after the specified parent application runs.
Running time is decreased using this method.
The
child report runs immediately after the specified parent application runs.
Running time is decreased using this method.
11. Select the Job Queue from the drop-down.
Be
sure to check your queue settings to make sure your jobs route to the
proper queue.
12. Select the Parent Setup Code from the drop-down.
13. Check the checkboxes that apply:
· Link Active
· Public
· Allow Job Cancellation
· On Failure Allow Next Job
14. From the Job Parameters tab, if applicable, click the binoculars in the Default Value column and select the appropriate default from the Chooser.
15. If applicable, check the Prompt Flag checkboxes for the appropriate parameters.
16. From the Job Files tab, if necessary, select a different the File Type from the drop-down.
17. If necessary, manually change the File Name.
18. If necessary, click in the Printer Name column to manually change the appropriate printer to which to print the file.
19. If necessary, select Print Immediately.
20. If necessary, select a different Print Style from the drop-down.
21. If necessary, click in the Number column to manually change the number of copies of the file to be printed.
22. If necessary, select Delete After Print.
23. Click Save.
Screen Element |
Description |
|---|---|
New User Setup |
Button. The abbreviation and numeral definition for the report/process application as it relates to the subsystem and user setups. |
Delete User Setup |
Button. This button deletes the setup from the table. |
Setup Code |
Text box. The abbreviation and numeral definition for the user-defined report/process setup. |
Default |
Checkbox. When checked, defaults the setup in the application to the user-defined setup selected in the table. |
Restore Default |
Button. This button restores the default setups for the application. The existing setups for the application would be replaced. |
Description |
Text box. A description of the user-defined setup. |
Help Text |
Text box. This field provides some additional help information for the setup. This help text will be displayed on the Job Submission (TRS100) screen when the user clicks on the appropriate parameter. |
Printer |
Drop-down. A list of printer selections. The printer to which the output will be sent. |
Parent Application |
Drop-down. The parent application for the user-defined setup. |
Job Queue |
Drop-down. The job queue responsible for servicing this request. |
Parent Setup Code |
Drop-down. The code name for the parent setup. |
Link Active |
Checkbox. This indicates the option of enforcing the parent/child relationship between the parent setup and application. |
Public |
Checkbox. When checked, only setups created by you are displayed. |
Allow Job Cancellation |
Checkbox. When selected, indicates the job can be cancelled by the end-user. |
On Failure Allow Next Job |
Checkbox. When selected, the next linked job to be executed will run. This checkbox should be selected for batch processes which are not dependent on each other for data (i.e. where the first batch job that is run creates data for the linked batch job) and you are using the linked job functionality strictly for scheduling purposes. This flag can be used where it ignores the status of the completed job. |
Job Parameters Tab |
|
Name |
Read-only. The column contains the caption or title of the parameter. |
Default Value |
Text box. You can save a value of the parameter with the setup, which can be used as is while submitting the job next time. Hover over the column to display the binoculars in which you can click to select the appropriate option. |
Prompt Flag |
Checkbox. This determines whether to prompt this parameter at the time of job submission. |
Parameter Help Text |
This pertains to the end-user and provides non-technical help text as it relates to the purpose of this batch application. |
Job Files Tab |
|
File Type |
Drop-down. Click inside the File Type column to display a drop-down from which you can choose the appropriate type of file. |
File Name |
Column text box. The name of the file to be printed. |
Printer Name |
Text box. The name of the printer from which the file will be printed. |
Printer Immediately |
Checkbox. When selected, the files are printed immediately after the job is run. |
Print Style |
Drop-down. The style of the printed files (i.e., Landscape, Portrait, or Text File). |
Number of Copies |
Text box. The number of copies of the file that will be printed. |
Delete After Print |
Checkbox. When selected, the files will be deleted after they are printed. |