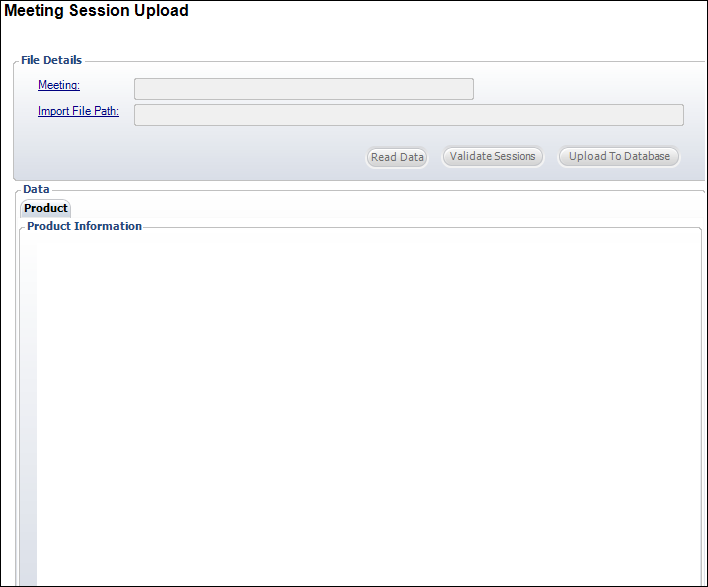
The Meeting Session Upload (MTG007_Session_Upload) screen displays, as shown below.
After you have created your meeting parent product, you have the option of uploading session detail information from an Excel spreadsheet using an Excel template to quickly create sessions associated with that specific meeting parent product.
To create meeting sessions via an Excel spreadsheet:
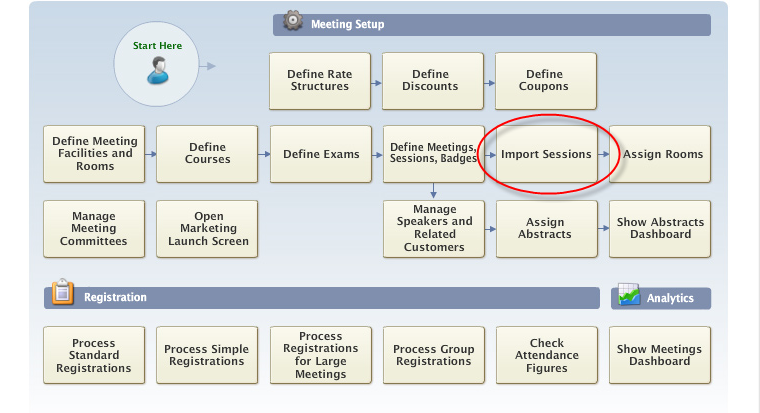
1. On the toolbar, select Meeting Definition > Meeting Central.
2. From
Meeting Central, click Import Sessions,
as highlighted below.
The Meeting Session Upload (MTG007_Session_Upload) screen displays,
as shown below.
3. Click
Meeting.
A Product Chooser window displays.
4. Search and select the meeting parent product you want to create sessions for.
5. From the Session Upload Templates task bar, click the link based on the complexity of the sessions.
· Zero-Priced Sessions – Use this template for meeting sessions that all have a price of zero (0) dollars.
· Single-Price Session – Use this template for meeting sessions that can have only one price. Each price can be different for different sessions with the spreadsheet, but they can not contain rate structure or rate code values.
· Multi-Price Sessions – Use this template for meeting sessions that include a complex pricing value or those you want to define a revenue and deferred account for. For example, if a session has a different price that may increase as you near the session date or a session needs to contain a rate structure or rate code, you need to use this template.
6. When the template opens in Excel, enter in information based on the template columns using one row for each session for all sessions associated with the meeting parent product.
 For
more information on the templates and a description of the information
you need to enter into each, please see Defining
Upload Template Parameters.
For
more information on the templates and a description of the information
you need to enter into each, please see Defining
Upload Template Parameters.
7. Highlight any unused rows down to row #25 and click Delete.
8. Save the Excel spreadsheet to your computer.
9. On the Meeting Session Upload screen, click Import File Path.
10. Search and select the Excel file you just saved.
11. Click
Read Data.
The spreadsheet information uploads to the Product Information table.
12. Click
Validate Sessions.
A Validation Successful window displays if the sessions validate in the
system.
If the validation is not successful, an error message appears listing the
reason(s) why the validation failed. If this occurs, correct your data
in the Excel spreadsheet and upload it again before trying to validate
it again.
13. When
the validation completes successfully, click Upload
to Database.
A Upload Successful window displays if the sessions uploaded to the system.
14. Open the meeting parent product to confirm the sessions are available in the system and edit/add any information as needed.