The Transcript Link screen displays, as shown below.
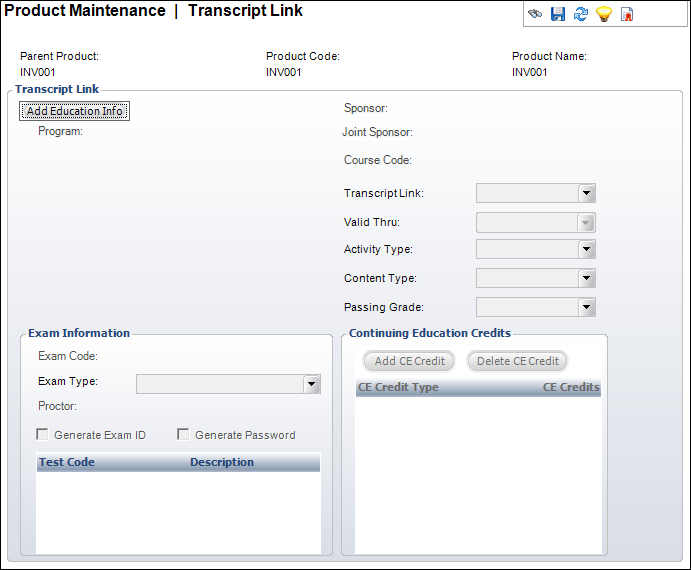
This screen holds information needed by the Transcript and Certification subsystems. Any product in Personify can be linked to a Transcript program to give the customer education credits or credits toward certification program requirements. A product can also be linked to a course, a proctored exam, or an Inventoried exam product.
You can assign continuing education credits based on either the purchase of the product, passing of an exam product, or upon request. For example, if you purchase the inventory product, you can receive CE credits. Exam information and an exam code can also be specified.
To add a transcript link:
1. From
the Relationships task category, click Related
Transcript Info.
The Transcript Link screen displays, as shown below.
2. Click
Add Education Info.
The Transcript Link information is enabled.
3. If necessary, select the related:
· Program ID
· Sponsor
· Joint Sponsor
· Course Code
4. Select the Transcript Link method from the drop-down.
5. Select the Valid Thru date from the drop-down.
6. If necessary, select the following:
· Activity Type
· Content Type
· Passing Grade
7. To add Continuing Education credits, perform the following:
a. Click Add CE Credit.
b. Select the CE Credit Type from the table drop-down
c. Enter the number of credits in the CE Credits table text box.
8. In the Exam Information section, perform the following:
a. Click
the Exam Code link and search
for the appropriate exam code.
The Exam Type displays automatically.
b. Click the Proctor link and search for a proctor for the exam.
c. If necessary, select whether or not to Generate Exam ID.
d. If necessary, select whether or not to Generate Password.
9. Click Save.
Screen Element |
Description |
|---|---|
Transcript Link |
|
Add Education Info |
Button. When clicked, the Transcript Link fields are enabled to add a education information. |
Delete Education Info |
Button. When clicked, the information entered in the Transcript Link fields is deleted. |
Program ID |
Link. When clicked, the Transcript Program Chooser screen displays to search for and select a transcript program ID.
When selected, the sponsor, joint sponsor, activity and content type codes are all copied from the TRN_Program table and become read-only. |
Sponsor |
Link. Automatically populated based on the Program ID selected. If no sponsor was associated with the program, you can click the Sponsor link to open the Customer Chooser screen displays and search for and select the customer who sponsored the product’s education information. |
Joint Sponsor |
Link. Automatically populated based on the Program ID selected. If no joint sponsor was associated with the program, you can click the Joint Sponsor link to open the Customer Chooser screen displays and search for and select the customer who joint sponsored the product’s education information. |
Course Code |
Link. When clicked, the Transcript Course Chooser screen displays to search for and select the course associated with the product. |
Transcript Link |
Drop-down. This is the method by which the transcript information will be updated. The available options are: · Manual: Transcript entry will be added directly on the customer transcript from the Customer Transcript Maintenance (TRN003) screen. · Passing Grade: Transcript entry will be added on the customer transcript when a Grade is selected on the Product Specifics tab on the Line Item Details screen of the product order. · Purchase: Transcript entry will automatically be added on the customer transcript when an order for the product is created and the Line Status becomes Active. · Upload: Transcript entry will be added on the customer transcript when the Program ID selected has this product defined on the Approved Transcript Program Definition (TRN000) screen. The upload can be accomplished via the Upload Transcript From Orders (TRN005C) screen or from the ASCII Upload for Approved Programs (TRN005A) screen.
The values are populated based on the fixed TRN_LINK_METHOD system type for the TRN subsystem. |
Valid Thru |
Drop-down. The last date that this product will award transcript credit. |
Activity Type |
Drop-down. The type of education activity associated with the product. For example, Credits, Education, or Exam.
The values are populated based on the non-fixed ACTIVITY_TYPE system type for the TRN subsystem. |
Content Type |
Drop-down. The type of content associated with the activity.
The values are populated based on the non-fixed CONTENT_TYPE system type for the TRN subsystem. |
Passing Grade |
Drop-down. The grade that must be achieved in order to pass the course. It is used by the upload programs when uploading exam or course results.
The values are populated based on the non-fixed GRADE system type for the TRN subsystem. |
Continuing Education Credits |
|
Add CE Credit |
Button. When clicked, a new row is added to the table to add CE credits associated with the product. |
Delete CE Credit |
Button. When clicked, the highlighted row from the table is deleted. |
CE Credit Type |
Table drop-down. The CE credit category added here are assigned to a customer who purchases the product.
The values are populated based on the non-fixed CE_CREDIT_TYPE system type for the TRN subsystem. |
CE Credits |
Table text box. The number of credits to assign to a customer when the product is purchased. |
Exam Information |
|
Exam Code |
Link. When clicked, the Transcript Exam Chooser screen displays to search for and select an exam code. This will link the product with a specific exam code. Only one exam code can be associated with a product. |
Exam Type |
Read-only. The type of exam being provided. This automatically populates based on the Exam Code selected. For example, Certification Exam, Continuing Education Exam, or Final Exam. |
Proctor |
Link. When clicked, the Customer Chooser screen displays to search for and select a customer that is the proctor for the exam. An organization may want to send printed exams and other information to the Proctor prior. |
Generate Exam ID |
Checkbox. When this is set, the creation of a product order will also generate a sequential number to provide a unique Exam ID that will be displayed on the Product Specifics tab on the Line Item Details screen. |
Generate Password |
Checkbox. When this is set, the system will generate a random series of numbers and letters 6 characters in length and will be displayed on the Product Specifics tab on the Line Item Details screen. |
 If there is a formal exam code
associated with the product, that exam code’s passing grade value
will take precedence over this one.
If there is a formal exam code
associated with the product, that exam code’s passing grade value
will take precedence over this one.